This isn't a forgiving project. Every phase — slope assessment, permitting, wall construction, drainage, and surface installation — requires precision. Shortcuts in any one area compound into serious problems that can take years to fully surface and cost far more to fix than to prevent.
This guide walks through the complete process of installing a patio on a sloped yard with retaining walls: what to assess before breaking ground, how to build correctly, and what warning signs to watch for at each stage.
Key Takeaways
- A patio needs a maximum slope of 1/8 inch per foot for drainage — anything steeper requires a retaining wall before any surface goes down
- Grades above 25–30% typically require a tiered retaining wall system rather than a single wall
- In California, retaining walls exceeding 4 feet in height generally require a permit and engineered drawings
- Drainage is the highest-priority design element; hydrostatic pressure behind a poorly drained wall is the leading cause of wall failure
- Complex hillside sites — steep grades, expansive soils, or walls near foundations — require a licensed hillside specialist
Before You Start: Site Assessment, Planning, and Permits
Evaluate the Slope Gradient
Before any design decisions are made, measure your slope's rise-over-run ratio. Divide the vertical rise by the horizontal run, then multiply by 100 to get a percentage:
- 5–10% slope: Gentle grade — often manageable with a single low retaining wall and cut-and-fill grading
- 15–25% slope: Moderate — likely requires a single taller wall or the beginning of a tiered approach
- 25–30% and above: Steep — tiered retaining walls are typically necessary; engineering review is non-negotiable
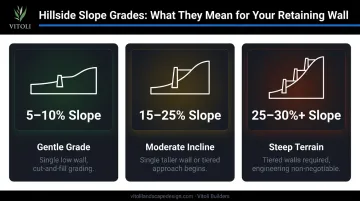
Tiered walls distribute lateral soil pressure across multiple structures rather than concentrating it on one. On steeper lots, this isn't a design preference — it's a structural requirement.
Southern California Soil Conditions
This region presents soil challenges that don't exist in most other parts of the country, and they directly affect wall design:
- Expansive clay soils: These swell when wet and shrink when dry. According to CalGeo, they can cause significant property damage if not properly addressed. LA County's retaining wall design standards use an active pressure assumption of 45 pcf for expansive soils versus 30 pcf for non-expansive — a 50% increase in lateral load the wall must resist.
- Caliche layers: Hardened carbonate deposits common in southwestern soils can make excavation difficult and affect drainage behavior.
- Seismic zones: California Geological Survey's Seismic Hazard Zones designate areas prone to liquefaction and earthquake-induced landslides. LA County requires geotechnical seismic pressure evaluation for walls supporting more than 6 feet of backfill in Seismic Design Categories D, E, or F.
A soil assessment isn't optional on hillside lots. It determines foundation depth, drainage design, and reinforcement requirements before a shovel touches the ground.
Permit Requirements
Those structural and soil realities flow directly into permit obligations. California's thresholds vary by municipality — confirm with your local building department before proceeding:
- LA County: Permit required for retaining walls exceeding 4 feet in height, measured from the bottom of the footing to the top of the wall
- City of Ventura: Stricter — permit required for walls exceeding 3 feet; walls over 5 feet or those supporting surcharge require a licensed Civil or Structural Engineer
- Hillside properties in LA and Ventura Counties often face additional scrutiny due to slope stability regulations
Skipping permits on hillside construction isn't just a code violation — it can result in forced demolition and eliminate the ability to sell or refinance the property.
Drainage Planning
Drainage must be mapped before excavation begins, not retrofitted once the wall is built. That means planning drainage outlet locations, confirming water flows away from the house foundation, and routing perforated drain pipe behind the wall during construction.
Vitoli Builders, which has completed over 1,800 hillside projects across Los Angeles and Ventura Counties, cites improper water management as one of the leading causes of wall failure. For complex or steep lots, engage a hillside construction specialist for a structural site assessment before breaking ground.
Tools and Materials You'll Need
Essential Tools
| Tool | Notes |
|---|---|
| Plate compactor | Required for base trench and sub-base; rental for most homeowners |
| Laser level or string line level | Critical for base course accuracy |
| Excavation tools / equipment | Hand tools for small projects; equipment rental or crew for larger ones |
| Hand tamper | For tight areas around wall blocks |
| Rubber mallet | Block placement and adjustment |
| Saw for cutting wall blocks | Angle grinder or masonry saw depending on block type |
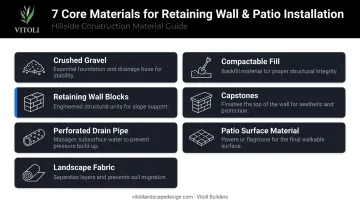
Core Materials
- Crushed gravel: For the base trench and drainage zone behind the wall
- Retaining wall blocks: Concrete segmental blocks are the most common due to structural reliability and design flexibility; natural stone and poured concrete work well for higher-end applications
- Perforated drain pipe: Installed at the base of the wall to collect and redirect water
- Landscape fabric: Used to separate drainage gravel from native soil
- Approved compactable fill: For the backfill zone — never topsoil or organic material
- Capstones: Finish the top course of the wall
- Patio surface material: Pavers, concrete, or natural stone
Reinforcement for Taller Walls
For walls over 3–4 feet in height, geogrid reinforcement or concrete deadmen may be required depending on the wall system. Allan Block's residential installation guidelines cover geogrid installation for walls under 6 feet, while VERSA-LOK flags walls over 4 feet as requiring special engineering consideration.
Confirm requirements with the wall manufacturer or a structural engineer before proceeding.
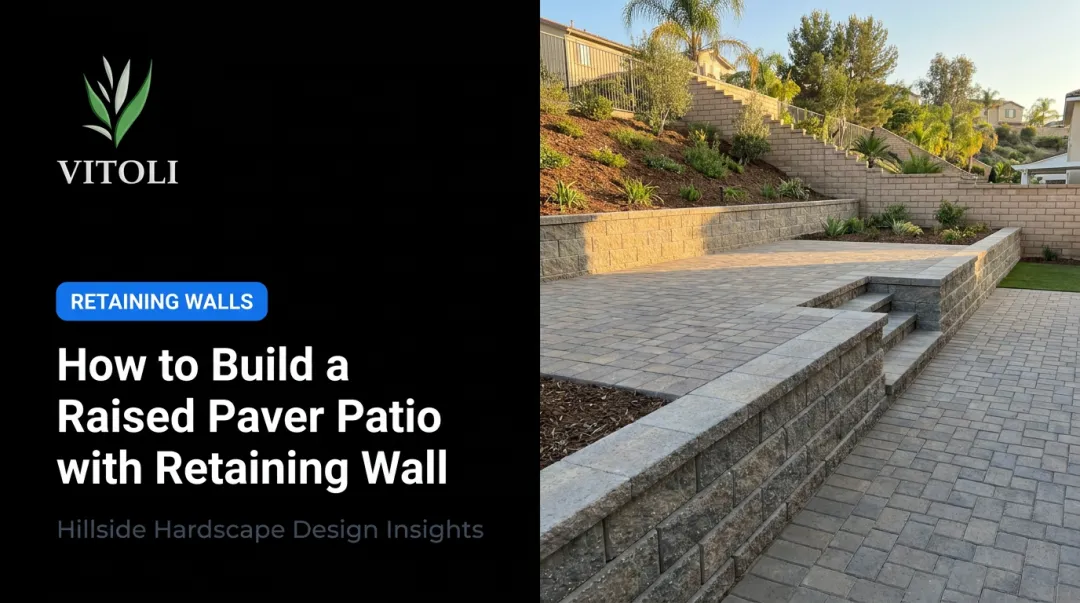
How to Install a Patio on a Sloped Yard With Retaining Walls
The installation follows a defined sequence. Altering that sequence — or skipping any step — is the most common cause of long-term structural failure.
Step 1: Excavate and Grade the Slope
Mark the patio footprint and wall location using stakes and string lines. Then excavate the base trench to the required depth.
Per Allan Block's installation specifications, the base trench should be:
- 24 inches wide
- 6 inches deep, plus 1 additional inch for every foot of planned wall height
Compact both the trench bottom and the broader patio area with a plate compactor before placing any material. Skipping compaction here sets off a chain of settlement problems that no amount of surface work can fix later.
Step 2: Build the Retaining Wall Base Course
Spread and compact crushed gravel in the base trench to create the foundation layer. Then place the first course of wall blocks starting at the lowest elevation point of the wall run.
The base course must be perfectly level in all directions — any deviation here amplifies as courses stack up and ultimately translates into an uneven patio surface. Minor adjustments can be made using coarse sand, but no more than 0.5 inches.
Step 3: Stack Wall Courses and Install Drainage
Stack subsequent courses, staggering block joints for structural integrity. As you reach the first full course height, install drainage:
- Place perforated drain pipe immediately behind the first course at the base of the wall
- Route the pipe so it outlets to daylight at the lowest point of the site
- Fill the zone directly behind the wall blocks with wall rock (drain gravel)
- Use approved compactable fill further back, away from the wall face
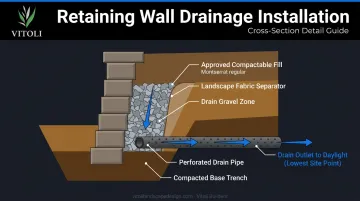
Belgard's installation guidance recommends drain outlets spaced no more than 50 feet apart along the wall's length. The CMHA's segmental retaining wall design guide is equally direct: free-draining granular fill behind the wall facing is what prevents hydrostatic pressure buildup — the leading structural threat to any retaining wall.
Step 4: Backfill and Compact in Lifts
Backfill must be added in controlled lifts — no more than 8 inches at a time — with each lift fully compacted before the next is added. Using a plate compactor from the second course upward helps consolidate the patio sub-base while the wall is being built.
Do not use topsoil, organic material, or cohesive clay as backfill. These materials compress under load and create the settlement conditions that crack patio surfaces within the first few years.
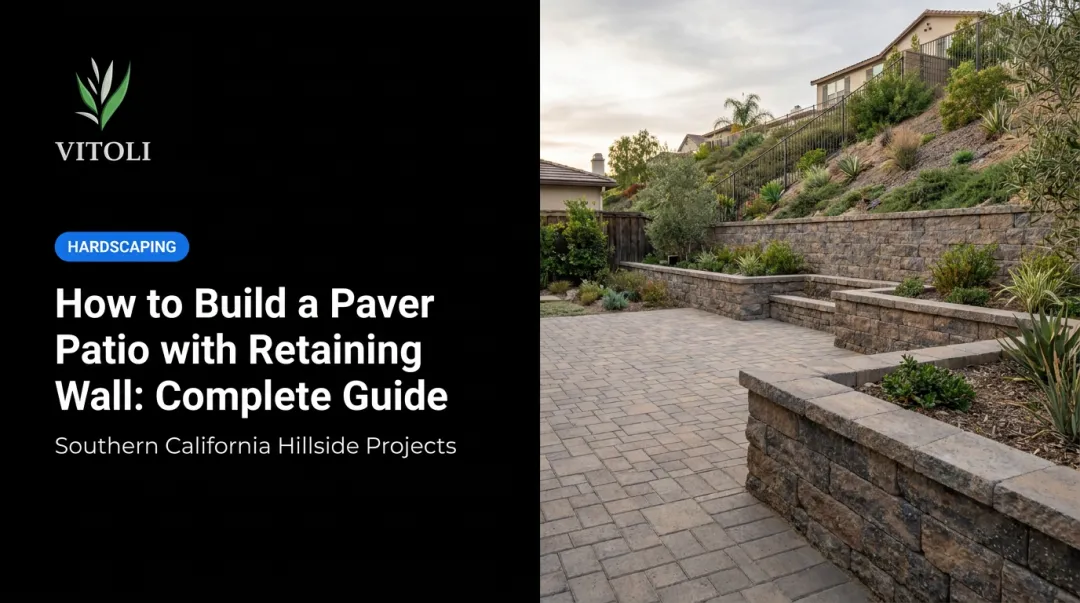
Step 5: Install the Patio Surface
Once the sub-base is compacted and the wall is complete, install the patio surface — pavers, natural stone, or concrete — on the prepared base. Three details at this stage determine both performance and appearance:
- Even a "level" patio should slope 1% (approximately 1/8 inch per foot) away from any structures or house foundation for surface drainage
- Cap blocks on the retaining wall provide a clean edge transition between wall and patio surface
- Matching or complementary materials between wall and patio create visual cohesion — especially visible on terraced hillside lots where both surfaces face outward
Common Problems and How to Fix Them
Retaining Wall Shifting or Leaning
A wall that bows or shifts outward is typically caused by hydrostatic pressure buildup from inadequate drainage behind it, or a base that wasn't dug deep enough and properly compacted.
Investigate drainage immediately. This is a structural issue, not a cosmetic one. In severe cases, the wall will need to be partially or fully rebuilt with correct drain pipe installation. Deferring this repair accelerates failure.
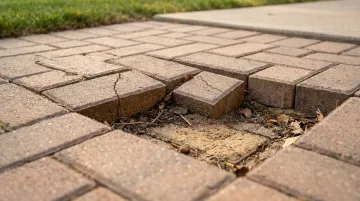
Patio Surface Settlement or Cracking
Uneven spots, dips, or cracks appearing within the first year or two usually point to insufficient sub-base compaction during installation, or organic fill material in the backfill zone that compresses gradually under load.
Settled pavers can sometimes be lifted, the sub-base regraded and recompacted, then re-laid. For concrete, the affected section typically needs to be cut out and repoured over properly compacted fill.
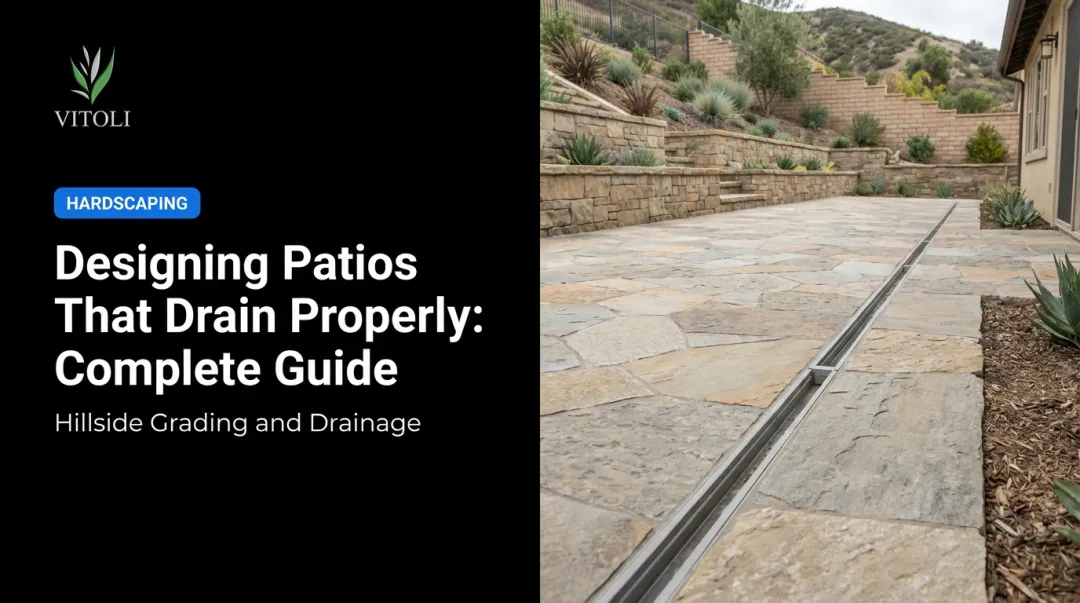
Water Pooling on or Around the Patio
Standing water on the patio surface or at the base of the retaining wall after rain typically indicates insufficient surface slope, a blocked drain pipe, or an outlet that terminates in a low point rather than daylighting properly (meaning the pipe discharges at a visible, open outlet above grade).
Confirm the patio surface meets the minimum 1% grade. Inspect drain pipe outlets and clear any blockage. In persistent cases, a French drain or channel drain may need to be added.
Pro Tips for a Successful Sloped Patio Installation
Sequence drainage before backfilling, not after. Once backfill is compacted, retrofitting a drain pipe is extremely difficult and expensive. Map all drainage routes on paper before breaking ground.
Document every phase. For hillside properties in California, photograph each stage of construction and retain copies of any engineer-stamped drawings and permit approvals. This documentation protects you at sale, refinancing, or future inspection — especially in municipalities with strict hillside construction oversight.
Know when the project exceeds DIY scope. These conditions call for a licensed hillside construction specialist rather than a DIY approach:
- Walls taller than 4 feet
- Tiered or stepped wall systems
- Expansive, clay-heavy, or unstable soils
- Walls near the house foundation or a property line
For homeowners in Los Angeles and Ventura Counties, working with an integrated team — one that handles engineering, permitting, and construction under one roof — eliminates the coordination gaps where hillside projects most often go wrong. Vitoli Builders manages all three in-house, with over 1,800 hillside projects completed across Southern California.
Frequently Asked Questions
Can you lay a patio on a slope?
Yes — but a retaining wall is required first to create a level, stable base. Patios should not exceed 1/8 inch per foot of slope. Any grade steeper than that must be addressed with a retaining wall before any surface material goes down.
What is the 1:3 rule for retaining walls?
The 1:3 rule is a structural guideline stating that for every 3 feet of exposed wall height, the wall should be embedded approximately 1 foot into the ground. This embedment resists overturning forces. Complex or unstable sites may require deeper embedment — confirm requirements with an engineer before building.
How steep is too steep to build a patio without professional help?
Slopes above 15–20% (roughly a 1-foot rise over every 5–7 feet of run) typically require tiered retaining walls and engineering review. At that grade, lateral soil loads become significant enough that improper wall construction poses a real structural and safety risk.
Do I need a permit to build a retaining wall for a patio in California?
In California, retaining walls exceeding approximately 4 feet in height (measured from the bottom of the footing to the top of the wall) generally require a building permit and engineered drawings. The City of Ventura requires a permit at 3 feet. Always confirm with your local building department, as thresholds vary by municipality.
How do I make sure water drains properly behind a retaining wall?
Install a perforated drain pipe at the base of the wall behind the first course, surrounded by drain gravel, with a clear outlet to daylight at the site's lowest point. This prevents hydrostatic pressure buildup — the primary cause of retaining wall failure — from developing behind the wall over time.
What is the best material for a retaining wall next to a patio?
Concrete segmental blocks are the most commonly used due to structural reliability and design flexibility. Natural stone and poured concrete are strong alternatives. Matching or complementing the wall material with the patio surface produces a more cohesive result, especially on terraced lots where both are visible at once.