Introduction
You build a patio. First rain comes, and water pools in three spots, sits against the house foundation, and turns your new outdoor space into a slip hazard. By spring, a paver has shifted. By year two, you're looking at a repair bill.
This scenario plays out constantly on Southern California hillside properties. Almost every time, the root cause is the same: drainage treated as an afterthought rather than a design priority.
FEMA estimates that just one inch of water can cause $25,000 in damage to a home. Proper patio drainage costs a fraction of that to get right the first time.
This guide covers what actually determines whether a patio drains correctly for decades:
- Slope and subbase standards that prevent pooling
- Drainage system options for different site conditions
- Material considerations that affect water management
- Hillside-specific challenges in Los Angeles and Ventura County
Whether you're planning a new build or diagnosing an existing problem, start here.
Key Takeaways
- Every patio needs at minimum a 1–2% slope directed away from the home
- A compacted 4–6 inch aggregate subbase is non-negotiable for long-term structural stability
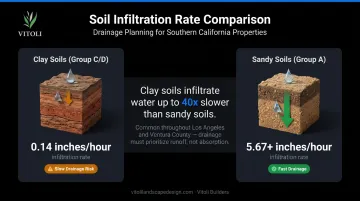
- Southern California clay soils infiltrate water up to 40x slower than sandy soils, so drainage plans must prioritize runoff, not just absorption
- Permeable pavers cut stormwater runoff by 25–100%, but clay-heavy hillside sites still require proper underdrain systems
- Downspouts must terminate at least 5 feet from any foundation—overlooking this undermines even well-designed patio drainage
Why Proper Patio Drainage Matters
Water and patios have a predictable relationship: water always finds the path of least resistance. When that path leads under your patio or toward your foundation, the damage compounds quietly until it becomes expensive.
Structural and Foundation Consequences
Standing water on or around a patio undermines the compacted subbase beneath it. As water saturates the aggregate layer, pavers lose their stable base and begin to sink and shift — turning a drainage problem into a structural one.
Foundation risk compounds the damage. Saturated soil expands and contracts with moisture changes, exerting lateral pressure on foundation walls. Water finds micro-cracks, seeps through, and creates interior moisture problems that lead to mold and lasting structural damage.
Secondary Hazards Worth Knowing
Drainage failures don't stop at structural damage:
- Slip hazards: Wet patio surfaces—especially smooth concrete or tile—become dangerous, particularly for older adults. Falls send approximately 8 million people to US emergency rooms annually.
- Mosquito breeding: The CDC directly links standing water to mosquito-borne illness including West Nile virus. The Greater Los Angeles County Vector Control District actively investigates residential standing water complaints.
- Surface degradation: Algae and mold grow on persistently damp surfaces, eroding both appearance and traction.
On a hillside property in Southern California, these aren't edge cases. Slope-driven runoff and clay-heavy soils accelerate every one of them.
The Foundation of Good Drainage: Slope and Subbase
Slope and subbase are where drainage is won or lost. No surface drain added after the fact can fully compensate for a poorly graded or inadequately compacted foundation.
The Slope Standard
The Concrete Masonry and Hardscapes Association (CMHA, formerly ICPI) specifies a minimum 2% crossfall for interlocking concrete pavements. In practical terms, that's approximately 1/4 inch of drop per linear foot.
The commonly cited range of 1/8" to 1/4" per foot (1–2% grade) reflects this standard. At 1/8" per foot, water moves—slowly. At 1/4" per foot, it moves reliably. Either end of the range is imperceptible underfoot; neither will make your patio feel tilted.
What matters as much as the number is the direction: slope must run away from the home toward a defined outlet. Sloping toward a fence, a neighboring property, or an adjacent structure simply moves the problem rather than solving it.
Subbase: The Part Nobody Sees
Below the pavers, the compacted aggregate base does two jobs at once: it provides structural support and it manages water that penetrates or collects beneath the surface.
CMHA standards specify:
- 4–6 inches of crushed aggregate for residential pedestrian applications
- Compaction to 98% Proctor density (per ASTM D698)
- Stable, compacted soil subgrade before the aggregate layer is placed
On hillside sites, a 4-inch base on stable soil may be adequate. On clay-heavy, seasonally saturated ground—common throughout Los Angeles and Ventura counties—going toward 6 inches reduces the risk of low spots forming as soil shifts seasonally.
Verifying Slope Before Laying Pavers
Check slope accuracy before pavers go down. Correcting it afterward means tearing out your installation. These three methods are all field-proven:
- Long level with a ruler — straightforward for smaller patios
- String line and line level — effective across wider spans
- Laser level — most accurate, especially on hillside terrain with irregular grades

The check should happen after the subbase is compacted and screeded, not after pavers are set.
Hillside Cut-and-Fill Considerations
On sloped properties, creating a level patio pad typically requires cutting into the uphill grade and using fill on the downhill side. Each step in this process directly affects how well the finished surface drains.
Key considerations for cut-and-fill sites:
- Compact fill in lifts, not as a single dumped layer — prevents differential settling that creates drainage low spots over time
- Install a retaining wall or edge treatment on the downhill perimeter to capture and redirect surface runoff exiting the patio
- Check permit requirements early — significant grading in Los Angeles and Ventura counties typically requires a permit and may trigger a geotechnical review
Types of Patio Drainage Systems
Surface slope alone handles simple situations. Everything more complex—larger patios, high rainfall intensity, hillside terrain, impermeable surfaces—calls for one or more of the systems below.
Surface Slope Only
Works when:
- The patio is small (under 200 sq ft)
- The surrounding soil is permeable
- There's a clear, unobstructed outlet at the patio's low edge
The limit: heavy rainfall overwhelms surface runoff capacity faster than a gentle slope can move it. Without a defined outlet, water simply accumulates at the patio's edge and migrates into adjacent soil—or back under the patio.
Channel and Trench Drains
A channel drain runs the full width of the patio's low edge, intercepting surface runoff across the entire surface and directing it through an underground pipe to a discharge point. This is the right solution for:
- Larger patio surfaces where slope alone is insufficient
- Impermeable surfaces (concrete, tile, mortared stone)
- Areas adjacent to the house where directing water quickly matters
Installation costs typically run $30–$100 per linear foot, according to HomeAdvisor, with complex installs reaching $150/LF.
French Drains
A French drain—a gravel-filled trench with a perforated pipe—captures subsurface water and runoff migrating off the patio edge, then carries it downhill or to a dry well. Per LSU AgCenter guidance, a proper installation includes:
- Pipe: 4-inch perforated, sloped at minimum 1% (1/8" per foot)
- Trench depth: 12–24 inches
- Backfill: 3/4" to 1-1/2" washed gravel wrapped in filter fabric
On hillside sites where groundwater and surface runoff converge, a French drain along the uphill perimeter of the patio intercepts water before it reaches the patio surface. Cost range: $10–$50 per linear foot for residential applications, more for complex hillside installs.
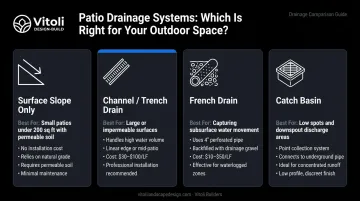
Catch Basins and Yard Drains
A catch basin is a grated point collector set at a low spot on or adjacent to the patio. Water flows in, exits through a buried PVC pipe, and discharges at a suitable outlet. They pair naturally with downspout drainage, and are particularly effective when:
- Gutter discharge lands directly on or near the patio
- A low point collects runoff from multiple directions
Dry Wells
A dry well holds collected drainage underground and allows it to percolate slowly into surrounding soil. NDS technical guidance states dry wells require soil infiltration rates above 0.5 inches per hour to function. On Southern California hillsides, clay soils routinely fall well below that threshold—making a percolation test non-negotiable before specifying this system.
To test: dig a 12" × 6" hole, saturate it, and measure the water level drop over one hour. If infiltration is too slow, route collected water to a channel drain or daylight outlet instead.
Choosing Patio Materials with Drainage in Mind
The material you choose determines whether drainage depends entirely on surface slope or gets help from the paving system itself.
Impermeable Surfaces
Poured concrete, mortared stone, and porcelain tile block all water at the surface. Every drop must exit via slope or a drain. Three practical implications follow from that:
- Any low spot becomes permanent — even minor subbase settling creates a standing water problem
- Precision grading is the entire drainage strategy — there's no secondary system to catch what slope misses
- Repairs require re-grading — not just patching the surface, but correcting the underlying elevation
Permeable Pavers (PICP)
Permeable interlocking concrete pavers (PICP) use open joints filled with aggregate instead of sand or mortar. Water passes between the pavers into the aggregate base rather than running across the surface.
The numbers are worth knowing:
- Infiltration rates up to 50 inches per hour with maintenance (ICPI/CMHA)
- 25–100% stormwater volume reduction depending on design (EPA)
- Peak flow reduction of up to 89%
The caveat for Southern California hillside properties: PICP's effectiveness depends on the underlying soil accepting water. On Group D clay soils (which infiltrate at 0.14 inches per hour or less), PICP over a conventional base still requires an underdrain system. The surface drains—but the water needs somewhere to go below.
Decomposed Granite and Gravel
Both materials are naturally permeable and allow water to pass through the surface. They require stable edging to prevent migration, and compaction reduces permeability over time. Periodic raking or replenishment of the surface layer restores drainage function. On hillside terrain, where drainage failures can accelerate erosion, that maintenance dependency is a real limitation for anything beyond a low-traffic garden path.
Hillside Patio Drainage Challenges in Southern California
Standard drainage principles apply everywhere. On Southern California hillsides, several factors push those principles to their limits.
Clay Soils Change the Equation
Much of Los Angeles and Ventura County sits on expansive clay soils—Group C and D classifications per USDA-NRCS—with saturated hydraulic conductivity of 0.14 inches per hour or less. Compare that to sandy Group A soils at over 5.67 inches per hour. Clay-dominant soils can infiltrate water 40 times slower than sandy soils.
When moderate rainfall hits a hillside patio sitting on clay, almost none of it infiltrates. It all runs off—immediately. Infiltration-based drainage strategies that work on flat, sandy-soil properties fail here without supplemental conveyance systems.
After California's extended dry summers, this gets worse. Hydrophobic soil behavior—where dry soil actively repels water rather than absorbing it—can reduce infiltration rates three-fold or more, a pattern well-documented on fire-affected slopes. This effect is most pronounced in areas with recent wildfire history, where existing drainage infrastructure may be wholly inadequate.
Upslope Runoff and Compounding Forces
A hillside patio doesn't just drain its own footprint—it receives water from the terrain above it. Gravity concentrates upslope runoff onto the patio surface during any rain event, increasing the volume the drainage system must handle well beyond what surface area calculations alone would suggest.
When drainage fails under these conditions, the consequences extend beyond puddles: water infiltrating beneath the patio subbase accelerates erosion, undermines the compacted base, and can destabilize retaining walls along the downhill edge.
Integrating Patio Drainage with the Broader Slope System
Those failure consequences point to the core distinction between hillside drainage design and flat-terrain drainage design: a hillside patio's drainage system cannot be engineered in isolation. It must coordinate with the retaining walls, swales, and French drains managing the entire slope.
Vitoli Builders, a Calabasas-based hillside specialist with over 20 years of experience across Los Angeles and Ventura counties, treats drainage integration as foundational to every project. Every retaining wall they build incorporates gravel backfill, perforated drain lines, and weep systems to relieve hydrostatic pressure. Left unmanaged, that pressure migrates onto adjacent patio surfaces and erodes the subbase beneath them. The result is a unified site water management system where patio drainage is one coordinated component, not an isolated add-on.
Common Patio Drainage Mistakes to Avoid
Most patio drainage failures trace back to one of three errors. All three are avoidable during initial construction.
Sloping Toward the House
The most common mistake: the patio surface tilts back toward the home because it was easier to grade that way during construction. Often the subbase was set level (or nearly so) and the error wasn't caught before pavers were laid.
The downstream consequences (foundation saturation, interior moisture intrusion, potential slab or crawlspace issues) develop slowly and cost far more to remediate than getting the slope right during installation. If you're hiring a contractor, verify the slope direction before pavers go down.
No Defined Outlet
Installing a proper slope and even a channel drain means nothing if there's no planned discharge point. Water intercepted by a channel drain still has to go somewhere: a drain line to the street, a dry well with confirmed percolation capacity, or a discharge point at the property's downhill edge.
Without a functional outlet, the drain simply moves the problem 10 feet down the yard. Drainage planning must start with the outlet and work backward.
Ignoring Roof Drainage
Even a well-designed outlet can't handle unlimited volume — and roof runoff is often the largest single source of water hitting a patio. Downspouts discharging onto or immediately adjacent to the surface can overwhelm the entire drainage system. A single rain event can push thousands of gallons through a home's gutter system.
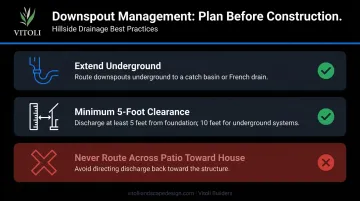
Plan downspout management before construction begins:
- Extend downspouts underground to a catch basin or French drain
- Route discharge at least 5 feet from the foundation (10 feet for underground systems), per DOE Building Science guidance
- Never route downspout discharge across the patio surface toward the house
Retrofitting downspout management after the patio is complete costs significantly more — and disrupts finished work.
Frequently Asked Questions
Does every patio need a drain?
Not every patio requires an installed drain fixture, but every patio needs a drainage strategy — at minimum, a correctly pitched surface directing water away from the home. Larger patios, impermeable surfaces, or patios near the foundation typically benefit from a dedicated drain system beyond slope alone.
What is the correct slope for patio drainage?
The industry standard is 1/8" to 1/4" per foot (1–2% grade), per CMHA specifications. On hillside sites or large patio surfaces, the upper end of that range—1/4" per foot—provides more reliable water movement. Steeper slopes may be warranted where runoff volumes are high.
What patio material drains best?
Permeable pavers with open aggregate-filled joints offer the strongest drainage performance by allowing water to pass through the surface rather than running across it. Concrete and solid stone work equally well when precisely graded, but rely entirely on surface slope—any low spot becomes a problem.
How do I fix poor drainage on an existing patio?
The main options depend on the root cause: add a channel drain at the low edge if slope is adequate but water has nowhere to go; install a French drain alongside the patio to capture migrating water; or—if the slope itself is wrong—relevel or reset pavers with corrected subbase grading.
How does hillside terrain affect patio drainage?
Hillside sites concentrate upslope runoff onto the patio surface in addition to the rainfall the patio itself receives. Drainage must manage both. That typically means combining slope, channel or French drains, retaining wall drainage, and discharge routes tied into the broader slope management system.
How much does it cost to add drainage to a patio?
French drains typically run $10–$50 per linear foot; channel drains $30–$100 per linear foot; overall yard drainage projects average $2,147–$7,168 according to Angi. Hillside properties in Southern California—with clay soils, slope access constraints, and permitting requirements—often exceed these ranges, and retrofit work typically costs more than drainage integrated during original construction.