Introduction
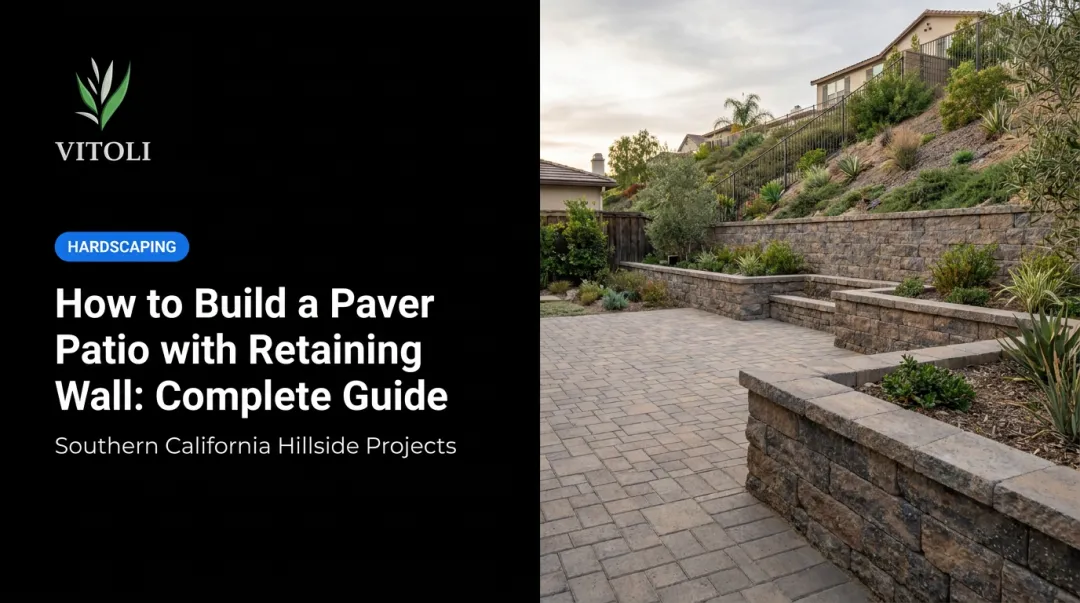
Many Southern California homeowners with sloped backyards are sitting on wasted square footage. A hillside lot that looks unusable from the back door can become a fully functional outdoor living space — provided the retaining wall and patio are engineered correctly.
The challenge is that "raised paver patio" sounds simpler than it is. You're not just laying pavers. You're engineering a structure that manages soil load, water pressure, and seismic stress simultaneously. Skip a step, and you'll see bulging walls, sinking pavers, or water intrusion within a season or two.
This guide covers what to plan before breaking ground and the five-phase construction sequence that determines long-term durability. Where relevant, it calls out specific code requirements and terrain realities for Los Angeles County and Ventura County properties.
Key Takeaways
- Excavate the wall trench to at least 24 inches deep and bury the first block course below finished grade
- Drainage is structural — perforated pipe at the wall base is non-negotiable
- Permit exemption heights vary by jurisdiction — 4 ft in LA City/County, 3 ft in Ventura County
- Compact backfill in lifts no greater than 8 inches; under-compaction is the leading cause of paver settlement
- Patios within 10 feet of the house foundation must slope away at a 2% minimum grade
What You Need Before Building
Thorough pre-build planning shapes every material and labor decision that follows — and in Southern California's hillside terrain, skipping it is where projects go sideways.
Planning, Design, and Permits
Start by measuring your existing slope. Use a string line and level, a rotary laser, or a zip level to determine how much elevation change you're working with. That elevation change dictates wall height, the number of block courses needed, and whether a guardrail is required.
On the railing question: California Residential Code R321 requires guards on open-sided walking surfaces more than 30 inches above grade, with those guards standing 42 inches high.
If your patio surface will be more than 2.5 feet above surrounding grade, plan for a railing from the start. Retrofitting one after the fact adds significant cost and often requires tearing into finished work.
Permit thresholds by jurisdiction:
| Jurisdiction | Permit Exemption Threshold | Notes |
|---|---|---|
| City of Los Angeles | Walls not over 4 ft | Exemption void if supporting surcharge or slope steeper than 1V:5H |
| LA County (unincorporated) | Walls not over 4 ft | Exemption void with surcharge |
| Ventura County | Walls not over 3 ft | Measured from finished grade on lower side |
| California Residential Code R404.4 | Engineering required over 48 in. unbalanced fill | Also triggered by lateral loads above soil at walls over 24 in. |
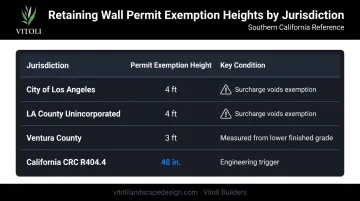
The critical takeaway: surcharge (patio furniture, planters, soil above grade, slopes nearby) can trigger an engineering requirement even on walls well under the permit exemption height.
Tools and Materials
Essential tools:
- Measuring tape, stakes, string line, carpenter's square
- Shovel or excavator, wheelbarrow
- Plate compactor
- Rubber mallet, level, chalk line
- Circular saw with diamond blade
- Safety PPE
Key materials:
- Retaining wall blocks with corner/cap units
- Geogrid reinforcement (type per engineer specification — uniaxial for wall reinforcement, per Tensar guidance)
- Woven geotextile fabric
- ¾-inch crushed angular stone (open-graded)
- 4-inch perforated Schedule 40 PVC pipe
- Coarse bedding sand or stone chips
- Concrete pavers (2⅜ in. for foot traffic; 3⅛ in. for vehicular areas per ICPI Tech Spec 18)
- Polymeric sand for jointing
Skill and Compliance Readiness
Low raised patios under 2 feet on a flat lot are manageable DIY projects. The margin for error narrows fast once the wall gets taller, the lot slopes, or the patio abuts the house foundation.
Clay soils, active slopes above the wall, and California's seismic conditions all introduce variables that a professional can identify before they become expensive problems. In Los Angeles and Ventura County hillside settings specifically, a pre-build structural review often determines whether the design works as planned — or needs to change entirely.
How to Build a Raised Paver Patio with Retaining Wall
Building a raised paver patio is a five-phase process. Each phase must be complete before moving to the next — errors compound quickly.
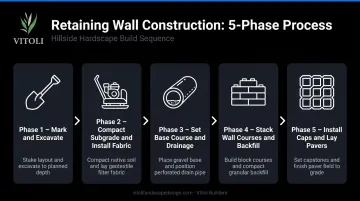
Step 1: Mark, Excavate, and Prepare the Footprint
Mark the patio perimeter with stakes and string line (or a garden hose for curved edges). Before any digging: call 811 at least two working days before you excavate. California excavation law requires notification of the regional utility locating service before any grading, trenching, or earth-moving begins.
Excavation requirements:
- Wall trench: minimum 24 inches deep to bury the first block course below grade
- Full patio interior: excavate to accommodate all base layers
- Add 6 inches to every side of the planned dimensions
Step 2: Compact the Subgrade and Install Geotextile Fabric
Compaction of the native subgrade is the foundation of everything above it. Run a plate compactor with a minimum of two perpendicular passes. In clay-heavy Southern California soils, a thin layer of ¾-inch angular stone helps achieve compaction before laying fabric.
Geotextile fabric installation:
- Cover the full excavated area, including down into the wall trench
- Overlap pieces by at least 12 inches
- Shingle away from the house so water flows over, not under, each seam
Step 3: Set the Base Course and Install Drainage
Place and compact the gravel base in the wall trench, then set the first block course starting at the lowest elevation point. Check each block for level and alignment — any irregularity in the base course amplifies as courses rise.
Drainage pipe installation is a structural requirement:
- Place 4-inch perforated Schedule 40 PVC (holes facing down, per Allan Block guidance) at the back of the trench
- Elevate the pipe about 4 inches above the filter fabric
- Slope at a minimum 1% gradient toward a daylight exit point through the wall
- Space outlets at maximum 50 feet
Step 4: Stack Wall Courses, Add Geogrid, and Backfill in Lifts
Stack wall courses in a staggered running bond pattern, offsetting each row by half a block length. Add geogrid reinforcement at intervals specified by your wall engineer.
Geogrid type is a structural decision, not a field call. Per Tensar's manufacturer guidance, uniaxial geogrids are the primary reinforcement for MSE retaining walls. Specify the geogrid per your engineered wall design rather than assuming a universal type applies.
Backfill protocol:
- Fill and compact in lifts no greater than 8 inches (NCMA standard)
- Use compactable crushed stone or clean sand — no organic fill
- Compact each lift fully before adding the next
- Keep interior fill one course below the top of the wall at all times while building
Step 5: Install Caps, Screed the Paver Bed, and Lay Pavers
Glue wall caps using polyurethane adhesive applied in beads perpendicular to the wall (not continuous runs) — this lets water escape rather than pool under the cap.
Screed a 1-inch bedding layer of coarse sand or stone chips over the compacted base. For paver installation:
- Start from one corner and maintain consistent joint spacing
- Cut pavers as needed at wall edges
- Compact the finished surface with a plate compactor
- Fill joints with polymeric sand — CMHA requires paver joints to be full and compacted by end of each day

No edge restraint is needed since the retaining wall cap serves as the perimeter edge.
Building Against a House: Special Considerations
When the patio abuts the home's foundation:
- Drainage slope: CRC R401.3 requires impervious surfaces within 10 feet of the building foundation to slope at least 2% away from the structure (not 1% — this is a common misconception)
- Expansion joint: Place a compressible expansion joint wherever pavers or wall edges run parallel to the exterior wall
- The gap between a retaining wall and a house foundation is an engineer-specific detail — consult a licensed professional before assuming a standard dimension applies
Key Variables That Determine Long-Term Performance
A raised paver patio on a Southern California hillside faces seasonal wet/dry cycling, clay soils, and seismic activity. These variables determine whether it lasts decades or fails within a few years.
Wall Height and Surcharge Load
The taller the wall and the heavier the load behind it, the greater the lateral pressure. Surcharge — any load beyond level grade within a 45-degree area from the footing — includes patio furniture, planters, soil, slopes above grade, and nearby structures.
CRC R404.4 requires registered professional design for walls retaining more than 48 inches of unbalanced fill, or walls over 24 inches resisting lateral loads beyond soil pressure. A low wall can still require an engineer if it sits below a slope or supports significant surcharge.
After heavy rain events in Southern California, the consequences of underprepared walls are well-documented. ABC7 reported a partial retaining wall collapse in Hollywood Hills after significant rainfall undermined a steep hillside — LADBS geologists evaluated the site and the property was red/yellow tagged.
Base Depth and Compaction Quality
Base depth requirements vary by soil type. Belgard's general paver guidance specifies 4–6 inches of compacted granular aggregate, but hillside or clay-soil sites often require more. For reinforced soil zones behind retaining walls, NCMA requires compaction to 95% Standard Proctor or 92% Modified Proctor density — a performance standard, not just a depth guideline.
Under-compacted base material leads directly to settling pavers, cracked joints, and uneven surfaces that worsen each season.
Drainage Design
Where compaction failures create surface problems, drainage failures create structural ones. Hydrostatic pressure — water trapped behind the wall with nowhere to go — is the primary cause of retaining wall collapse.
A properly drained system requires three components:
- Perforated pipe at the wall base (holes down, 1% minimum slope to daylight)
- Gravel backfill column to allow water percolation
- Geotextile fabric to separate drainage media from native soil
In Southern California's wet/dry cycles, even a well-built wall will shift and crack if water has no path out.
Paver and Material Selection
- Use 2⅜-inch (60mm) pavers for pedestrian patio areas; upgrade to 3⅛-inch (80mm) for any vehicular load
- Avoid low-grade blocks — inconsistent dimensions compound as the wall rises, making level courses progressively harder to maintain
- Specify geogrid by engineer: wall reinforcement and base stabilization serve different structural functions and require different product types
Common Mistakes to Avoid
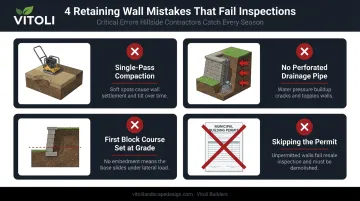
Most patio and retaining wall failures trace back to a handful of predictable errors. Avoid these four:
Single-pass compaction. One pass creates soft spots that show up as visible depressions within the first year. Run two perpendicular passes on subgrade and keep all backfill lifts to 8 inches maximum.
No perforated drainage pipe. Surface grading alone cannot stop hydrostatic pressure from building behind the wall. The pipe at the base of the trench is your primary defense — skipping it guarantees long-term problems regardless of block quality.
First course set at grade. Per Allan Block's embedment guidelines, the first course needs a minimum 6-inch burial. A block sitting at finished grade has no lateral resistance and will shift.
Skipping the permit. Unpermitted retaining walls over the height threshold can trigger LADBS Orders to Comply, investigation fees (the LAMC authorizes a $660 noncompliance fee if an owner fails to comply within 15 days of the compliance date), and complications at resale. On hillside properties in Los Angeles County, enforcement is more rigorous — the risk is real.
When to DIY vs. Hire a Hillside Specialist
A raised patio under 2 feet of wall height, on a flat lot, with no adjacency to the house, is a reasonable DIY project for a motivated homeowner with the right equipment.
Beyond that threshold, the risk profile changes significantly. Bring in a professional when:
- Wall height exceeds 3 feet (Ventura County) or 4 feet (LA City/County) — or lower when surcharge loads apply
- The lot has active slopes above or below the wall
- The patio sits adjacent to the home's foundation
- Soils are poor, expansive, or clay-heavy (common across LA's hillside zones)
- The project requires an engineer's stamp or city permit
For Southern California homeowners navigating hillside terrain, Vitoli Builders brings over 20 years of experience across Los Angeles County and Ventura County, covering retaining walls, slope stabilization, drainage systems, and precision earthwork.
Their in-house design and engineering team handles site evaluation, permitting coordination, and structural execution as a single contractor relationship. Reach them at 866-575-5795 or at their Calabasas office: 23586 Calabasas Road, Suite 209.
Frequently Asked Questions
Is a raised patio cheaper than a deck?
A raised paver patio typically has lower long-term maintenance costs than a wood deck, which needs regular sealing, staining, or board replacement. Upfront costs can be higher on hillside lots due to retaining wall materials and base preparation.
How much does a 20x20 paver patio cost in Southern California?
According to Angi's 2026 Los Angeles data, professional paver patio installation in LA runs $9–$28 per square foot, putting a 400 sq ft patio at roughly $3,600–$11,200 before hillside-specific costs. Engineering, permits, drainage, and wall construction on a sloped lot can move that number materially higher.
Do I need a permit to build a raised patio with a retaining wall in California?
Permit thresholds vary by jurisdiction: LA City and LA County exempt walls not over 4 feet (from bottom of footing to top of wall); Ventura County's exemption applies to walls not over 3 feet from finished grade on the lower side. Both exemptions disappear when surcharge or sloping earth is present. Verify current requirements directly with your local building department before starting.
How deep should the base be for a raised paver patio?
Belgard's paver installation guidance specifies 4–6 inches of compacted granular aggregate as a general baseline, with at least 1 inch of bedding sand. Hillside or clay-soil sites in Southern California often require greater depth and may need engineer-specified soil stabilization — base depth should follow site conditions, not just a rule of thumb.
How do I keep water from getting behind my retaining wall?
Install 4-inch perforated Schedule 40 PVC pipe at the base of the wall trench with holes facing down, at a minimum 1% slope to a daylight exit point. Surround it with a gravel column and line the trench with geotextile fabric. This drainage assembly relieves hydrostatic pressure before it can build to damaging levels.
How long does it take to build a raised paver patio with a retaining wall?
A modest DIY project typically runs one to three weekends, depending on patio size and wall height. A professional crew on a hillside project with permitting and engineering requirements can range from several days to a few weeks. If a soils report or plan check is required, expect additional time — LADBS hillside plan checks alone can take six to twelve weeks.