In January 2023, a retaining wall in Corona collapsed during a storm, red-tagging four duplexes and displacing eight families. This wasn't an unusual event in Southern California. Hillside properties in Los Angeles County and Ventura County face compounding risks: expansive clay soils, steep grade changes, and seismic activity that turns construction shortcuts into structural failures.
This guide is for homeowners with sloped properties dealing with erosion, unusable terrain, or failing existing walls — and for anyone deciding whether this is a DIY project or one that requires a specialist.
Key Takeaways
- Step-up technique is required when terrain rises along the wall's length — each step-up must fully bury one complete block
- Start installation at the lowest wall elevation and work upward toward higher ground
- Drainage is non-negotiable: perforated drain pipe plus compacted gravel backfill behind every course
- Walls over 4 feet tall (buried block included) require permits and often engineered drawings per the 2022 California Building Code
- Skipping compaction at step-up transitions is the leading cause of long-term wall failure
What Is a Step Up Retaining Wall and When Do You Need One?
A "step up" retaining wall isn't a separate wall type — it's a base installation technique. When the ground behind or beneath a wall rises along its length, the footing trench must step upward in increments to maintain proper buried-block depth throughout.
Without stepping, some sections of the wall would be over-buried (wasting material) while others would be under-buried — leaving the base exposed to erosion, which can cause blocks to shift, lean, or wash out over time.
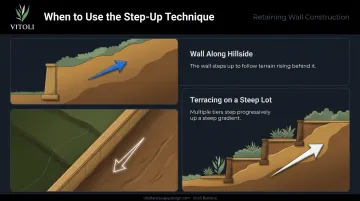
When the Step-Up Technique Is Required
Those failure risks make the step-up technique essential in three common situations:
- Walls running along a hillside where terrain slopes upward behind the wall face
- Sloped backyards where grade changes significantly across the wall's length
- Terracing projects on steep lots — common across Southern California hillside properties in areas like Malibu, Hidden Hills, and the Ventura County foothills
According to Allan Block's installation guidelines, step-ups begin at the lowest wall elevation and continue up the slope, with the trench extended into the slope far enough to fully bury one block at each transition. Versa-Lok specifies stepping the leveling pad and base course in 6-inch increments wherever the grade along the wall face changes elevation.
Prerequisites, Safety Requirements, and Tools Needed
Permits and Utility Checks
Before any digging begins:
- Call 811 (DigAlert) — California law defines excavation broadly to include grading, trenching, and soil displacement. Utility marking is legally required before you break ground
- Check local permit thresholds — the 2022 CBC exempts retaining walls under 4 feet (measured from footing bottom to wall top), unless supporting surcharge or retaining regulated liquids. Note these local rules:
- City of Los Angeles: walls over 2 feet in the public right-of-way require a B Permit with structural calculations
- LA County municipalities: some require permits for walls as low as 3 feet when retaining a slope above a structure
Site Readiness
Assess these before proceeding:
- Soil type — Southern California hillsides commonly have expansive clay soils that require drainage planning beyond a standard perforated pipe
- Lowest wall elevation — sets your baseline for excavation depth and drain pipe outlet positioning
- Slope above the wall — overloading risk from an uphill grade requires engineer consultation before design begins
Essential Tools
| Category | Tools |
|---|---|
| Excavation | Round-point shovel, square blade shovel, mini-excavator for larger projects |
| Compaction | Plate compactor (required); hand tamper only for tight spaces |
| Leveling | 4 ft. level, torpedo level, laser transit for larger projects |
| Layout | Tape measure, string line, marking paint, stakes |
| Installation | Rubber mallet, block chisel, circular saw with masonry blade, caulk gun for cap adhesive |
Required Materials
Once your tools are staged, confirm you have these materials on-site before breaking ground:
- Retaining wall blocks (sized to project height)
- 3/4-minus compacted gravel
- 4-inch perforated drain pipe
- Geotextile filter fabric
- Construction adhesive for cap row
- Approved backfill soil
How to Install a Step Up Retaining Wall: Step-by-Step
The step-up sequence runs strictly from the lowest elevation upward. Skipping steps, especially compaction, creates failure points that won't show up until months later — often after heavy rain or seismic activity.
Step 1: Establish the Layout and Lowest Starting Point
Use a string line, stakes, and marking paint to define the wall's face line across its full length. Identify the lowest point — this is where excavation starts and where the drain pipe will outlet. Use a level or laser transit to mark intended finished wall height from this lowest point before excavation starts.
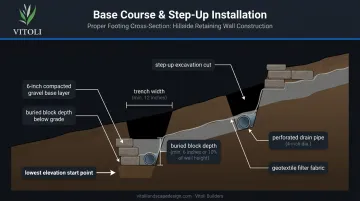
Step 2: Dig the Base Trench
At the lowest elevation, dig the base trench:
- Width: 24 inches for standard walls; 18 inches for walls under 4 feet
- Depth formula: 6 inches for gravel base + buried block depth (1 inch for every 1 foot of wall height)
- The trench must extend far enough into the slope to fully bury one complete block at each step-up transition
Step 3: Install Geotextile Fabric, Gravel Base, and Drain Pipe
- Lay geotextile filter fabric across the trench floor and up the back face — this prevents soil from migrating into the drainage layer
- Add compacted gravel — minimum 6 inches of 3/4-minus gravel; compact in lifts no thicker than 6-8 inches with at least 2-3 plate compactor passes per lift
- Place the perforated drain pipe at the lowest trench point toward the back before setting the first block course. Following Allan Block and Belgard specifications, outlets must reach daylight or a storm system — spaced no more than 50 feet apart
Step 4: Set the First Base Course and Begin Step-Ups
- Place the first block at the lowest trench elevation; check level in both directions
- Lay the base course across the lowest section
- When terrain rises, excavate each step-up to accommodate both the 6-inch gravel base and full buried block depth — every block at a step-up transition must sit completely below grade
- Compact and level each step-up area before placing blocks
Note: Incomplete burial at step-up transitions is the most common cause of wall failure — erosion undercuts the base when blocks aren't fully set below grade.
Step 5: Build Up Courses, Backfill, and Compact
- Fill block hollow cores and add gravel backfill 12 inches behind the blocks after each course
- Compact backfill in lifts no thicker than 6-8 inches; never skip compaction between courses
- Offset each course by half a block length for structural staggering
- Install geogrid reinforcement at manufacturer-specified intervals if wall height requires it
- Allan Block: typically every other course
- Versa-Lok: vertical spacing not to exceed 2 feet
Step 6: Cap the Wall and Complete Backfill
- Brush debris from the final course before applying construction adhesive
- Press cap blocks firmly into place
- Fold geotextile fabric back over the gravel backfill zone before covering
- Backfill behind the cap zone with topsoil to allow planting and create a clean finished appearance
Design Tips for Step Up Retaining Walls on Hillside Properties
Material Selection
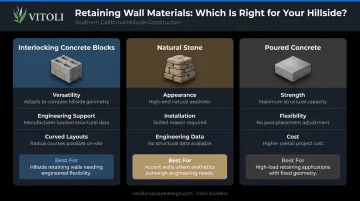
Three primary options suit different hillside applications:
- Interlocking concrete blocks — most versatile for curved or stepped layouts on uneven terrain; manufacturer-backed engineering data available for structural sizing
- Natural stone — high-end appearance, but demands skilled installation and offers no manufacturer engineering support for structural design
- Poured concrete — maximum strength for tall engineered walls, but no design flexibility after placement and higher cost for most residential projects
For most Southern California hillside properties, interlocking block systems are the practical starting point for walls under 6 feet — manufacturer design charts and installation specs make sizing and permitting straightforward. That said, regardless of material, drainage is the detail that determines whether a well-built wall lasts or fails.
Design Drainage From the Start
Don't treat drainage as an afterthought:
- Size the gravel backfill zone to handle stormwater runoff from the full slope above — critical on clay-heavy soils where water percolates slowly
- Include drainage outlets (day-lighters) at wall ends or through weep holes in the face course
- Direct surface water away from the wall via swales and berms uphill of the structure
Getting drainage right also informs how many walls you need — which is often more than one.
Consider Terracing Over One Tall Wall
Instead of one wall over 4 feet, two or three shorter terraced step up retaining walls distribute soil pressure more effectively.
Per Allan Block's tiered wall guidelines, walls generally act independently when horizontal spacing is at least twice the height of the lower wall — the 2:1 setback rule. This approach also creates usable planting areas between tiers and typically reduces engineering requirements per individual wall.
Visual Design Tips
- Vary block color or texture at cap courses for a finished look
- Use curved layouts where terrain allows for a more natural appearance
- Integrate planting pockets or low-voltage lighting into the wall face to transform a structural element into a landscape feature
Common Step Up Retaining Wall Problems and Fixes
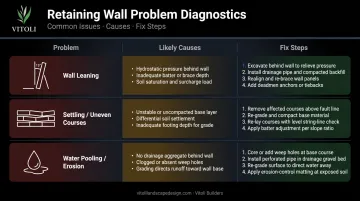
Wall Leaning or Tilting Forward
Likely causes:
- Insufficient buried block depth at one or more step-up transitions
- Inadequate compaction behind the wall
- Hydrostatic pressure from poor drainage
How to fix it:
- Identify the failing section and disassemble back to the base
- Verify step-up block burial depth meets spec at every transition
- Improve drainage to relieve hydrostatic pressure
- Rebuild with proper compaction at each lift
Settling or Uneven Courses
Likely causes:
- Under-compacted base gravel
- Step-up trench not properly leveled before block placement
- Soil beneath the gravel base not compacted before gravel was added
How to fix it:
- Remove affected courses down to the problem layer
- Re-excavate, re-compact the gravel base, and re-level
- Rebuild upward from that point
Water Pooling or Erosion Behind the Wall
Likely causes:
- Drain pipe not installed or blocked
- Geotextile fabric omitted, allowing soil to clog the drainage layer
- Gravel backfill zone too narrow to handle site runoff volume
How to fix it:
- Excavate behind the wall to access the drain pipe and backfill zone
- Flush or replace the clogged pipe
- Add or replace filter fabric to protect the drainage layer
- Verify the pipe slopes correctly toward the outlet
Pro Tips and When to Call a Professional
Sequence tip: Finish all step-up base excavation and compaction before placing any blocks. Resist building up as you go — completing the full base first ensures a consistent leveled plane and makes it far easier to verify buried block depth at every transition.
Documentation tip: Photograph every stage of installation — specifically buried block depth at each step-up and the drain pipe position before backfilling. This documentation matters for permit sign-offs, future maintenance, and property resale. Buyers and home inspectors on hillside lots increasingly ask for retaining wall construction records.
Southern California-specific reality: Hillside properties in Los Angeles County and Ventura County push basic step-up retaining wall projects into engineered territory faster than most homeowners expect. Expansive clay soils, seismic risk, and steep grade changes are the norm here, not the exception.
The LA County Building Code Manual requires retaining walls to be designed for stability against:
- Overturning and sliding
- Excessive foundation pressure
- Water uplift
- Seismic forces
All five criteria require engineering input on anything beyond a simple low wall on stable soil.
Once those code requirements come into play, engaging a specialist becomes the practical move — not just the cautious one. For complex sites (multiple tiers, unstable soils, walls near foundations, or anything approaching the permit threshold), professional engineering prevents expensive failures down the line.
Vitoli Builders has completed more than 1,800 hillside retaining wall projects across Los Angeles County and Ventura County over 20+ years. That track record includes navigating the exact soil conditions, seismic requirements, and permit processes that make Southern California hillside work uniquely demanding.
Frequently Asked Questions
What is the 1:3 rule for retaining walls?
The 1:3 rule states a wall should be embedded at least one-third of its total height below grade (a 3-foot exposed wall needs 1 foot of burial). For segmental block walls, manufacturers use lower ratios: Allan Block specifies 1 inch per foot of wall height, and NCMA guidelines reference H/10 as minimum embedment.
What are the four types of retaining walls?
The four main categories are gravity walls (rely on mass and weight), cantilever walls (reinforced concrete using structural leverage), sheet pile walls (thin vertical sheets driven into ground), and anchored walls (cables or rods extend into the slope). For residential hillside landscaping, gravity-style interlocking block walls are the most common choice.
How deep should the base trench be for a step up retaining wall?
The trench needs a minimum of 6 inches for the compacted gravel base plus additional depth for buried block — 1 inch of burial per foot of wall height per Allan Block specifications. At each step-up transition, the trench must be deep enough to fully bury one complete block below grade.
Do step up retaining walls require a permit in California?
In most California jurisdictions, retaining walls over 4 feet in total height (including buried block) require a grading or building permit and engineered drawings. Some municipalities in Los Angeles County set that threshold at 3 feet when the wall retains a slope above a structure. Verify local codes before starting excavation.
How do you prevent a step up retaining wall from leaning or failing?
Three factors matter most:
- Bury every block at a step-up transition to the required depth
- Compact gravel backfill in lifts no thicker than 6-8 inches after each course
- Install a perforated drain pipe behind the wall to prevent hydrostatic pressure buildup