Experienced DIYers with excavation access and compaction equipment can realistically tackle smaller walls under 3 feet on stable, level-ish lots. Anything taller, on a hillside, or over expansive clay soils — common across Los Angeles and Ventura Counties — requires a licensed contractor and often a structural engineer.
This guide covers the full build sequence, from planning through paver installation, with direct notes on where projects most often go wrong.
Key Takeaways
- A raised paver patio and retaining wall must be engineered as one integrated structural system
- Proper drainage behind the wall is the single most important failure-prevention element
- In California, walls over 4 feet (measured from footing bottom to top) typically require a permit — hillside sites and surcharge loads can lower that threshold to 3 feet
- Base depth, compaction quality, and geogrid placement determine how long the structure lasts
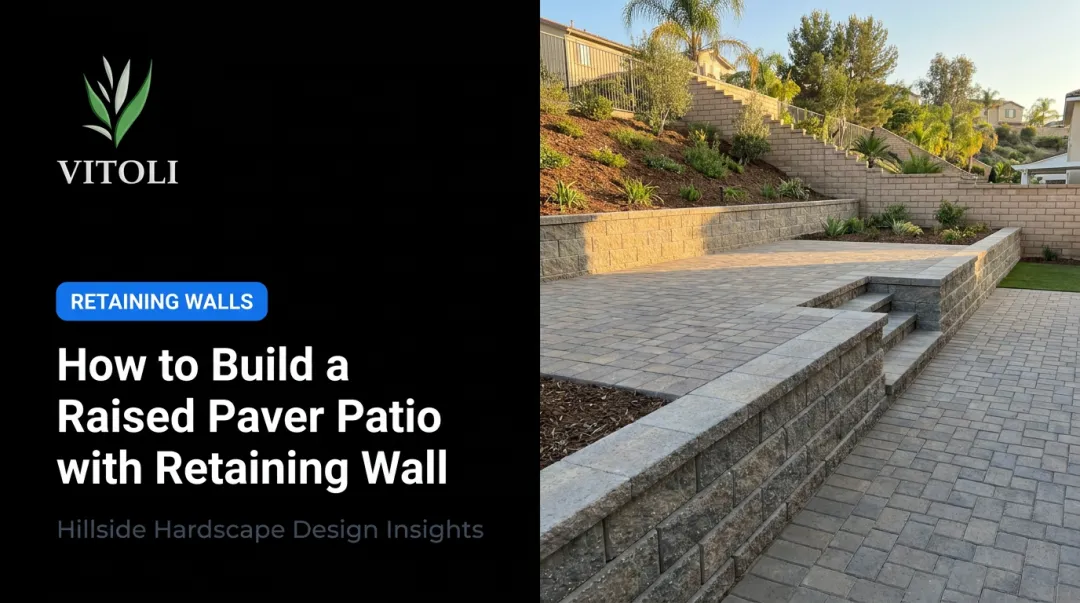
Planning Your Paver Patio with Retaining Wall
Measure the Slope and Determine Wall Height
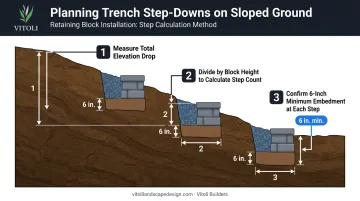
Start with a string line and level, rotary laser, or zip level stretched across the yard. This measurement tells you the required wall height and whether the base trench needs step-downs to maintain the NCMA-required minimum 6-inch embedment of the first wall course at every point along the trench. That standard applies at every point along the trench, not just at one end.
On sloped ground, the trench floor steps down at intervals equal to the block height. To plan those step-downs:
- Measure total elevation drop across the wall's length
- Divide that drop by your block's height to get the number of step-downs
- Confirm each step maintains the 6-inch embedment minimum before excavating
Permits and Code Requirements
Permit thresholds vary, but California Residential Code R105.2 exempts retaining walls not over 4 feet unless they support surcharge loads or impound hazardous liquids. Local rules tighten that threshold significantly:
| Jurisdiction | Permit Threshold |
|---|---|
| LA County | Over 4 ft from footing bottom, or any wall supporting surcharge/slope |
| City of Los Angeles | Over 4 ft, or any height on slopes steeper than 1V:5H (20%) |
| City of Ventura | 4 ft and higher, or lower walls supporting surcharge |
Guardrails are a separate trigger. The California Building Code requires guards along open-sided walking surfaces more than 30 inches above grade, with a minimum guard height of 42 inches. A raised patio can hit this threshold before it hits the permit threshold for the wall.
Before any excavation, call 811 — California's required before-you-dig service — to locate underground utilities.
Material Quantity Calculation
Estimate base material yardage using: square footage × depth in inches ÷ 324. Add a waste allowance of roughly 10% for square patios, up to 20% for curved or diagonal patterns.
For a standard pedestrian patio, ICPI Tech Spec 2 specifies a minimum 4-inch compacted aggregate base over well-drained soils — though hillside and clay-soil projects will require more.
Materials and Tools Required
Getting the right materials upfront prevents mid-project delays — and for hillside builds, several items on this list (geogrid, non-woven fabric, perforated drain pipe) are non-negotiable, not optional upgrades.
Essential Materials
- Retaining wall blocks and caps
- Concrete pavers
- 3/4-inch angular clean stone or ASTM #57 (drainage and base layers)
- Woven geotextile fabric (under patio base); non-woven (wall drainage zone)
- Biaxial geogrid (wall reinforcement and patio base tie-in)
- Perforated drain pipe — 4-inch Schedule 40 PVC, per NCMA drainage guidelines
- Coarse sand or stone chip (bedding layer)
- Polyurethane adhesive (cap bonding)
- Polymeric jointing compound or permeable joint material
Essential Tools
- Open-reel measuring tape, stakes, and string line
- Carpenter's square and chalk line
- Plate compactor (rent a reversible/ramming compactor for clay subsoils)
- Shovel, wheelbarrow, rubber mallet
- 4-foot level
- Circular saw with diamond blade
- Hard-bristle broom and PPE (gloves, safety glasses, respirator)
How to Build a Paver Patio with Retaining Wall: Step-by-Step
Each phase feeds directly into the next. Shortcutting any single step doesn't just affect that phase — it compromises the entire system's long-term performance.
Step 1: Mark Out and Excavate
Using stakes and string line (or a hose for curved edges), mark the full patio perimeter plus a minimum of 6 inches on each side for the wall trench. Excavate the trench to accommodate the gravel base, drainage layer, and the buried first course of blocks.
On sloped ground, step down the trench floor at intervals to maintain the 6-inch minimum embedment throughout. All organic material must be removed from the excavation — it cannot be used as backfill. Work to a tolerance of 1/4 inch across the full area.
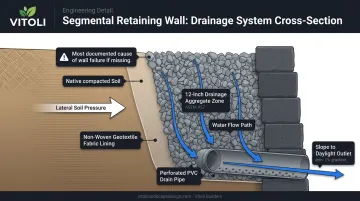
Step 2: Compact Subgrade and Install Drainage
Compact the subgrade with a minimum of two perpendicular passes. Clay soils in Southern California often require a reversible compactor rather than a standard plate compactor.
Lay geotextile fabric across the entire excavated area with seams overlapping at least 12 inches, shingled so water moves downhill rather than collecting under overlaps. Then place clean, free-draining aggregate — NCMA best practices require at least 12 inches of drainage aggregate directly behind the wall units with no more than 5% fines passing a No. 200 sieve.
Install the perforated drain pipe in the trench behind the wall, sloped toward a daylight outlet. Confirm pipe orientation and exact slope with your drainage designer or AHJ, as these details vary by product and site conditions.
This drainage layer is what prevents hydrostatic pressure from building behind the wall. Missing or incorrectly installed drainage is the most documented cause of wall failure.
Step 3: Set the First Course of Wall Blocks
Screed the trench base level and begin laying the first course starting at the lowest elevation point. Check each block for level and alignment as you place it — use a rubber mallet for minor adjustments. The first course requires the most precision in the entire build. Every irregularity here multiplies with every course above it.
Fill block cores and the 12-inch drainage zone directly behind the blocks with clean 3/4-inch wall rock. Fill in front of the blocks with on-site soil to prevent shifting during backfill.
Step 4: Build Up the Wall with Backfill and Geogrid
Stack additional courses in a running bond pattern, with each course offset by half a block length. As the wall rises, install biaxial geogrid at intervals specified by the wall manufacturer. Biaxial geogrid (two-directional) is preferred for raised patio applications because it ties together both the wall face and the patio interior base material.
Key geogrid notes:
- Extend geogrid across the full width of the patio interior, not just the zone immediately behind the wall
- Follow manufacturer-specified intervals — typically every 4–8 inches of wall height
- Geogrid lengths commonly equal 60% of total wall height or 4 feet, per NCMA guidance
Backfill and compact the interior in 8-inch maximum compacted lifts, keeping wall rock directly behind and inside the blocks throughout.
Once you reach the desired wall height, glue caps using polyurethane adhesive. Apply beads perpendicular to the wall face (not a continuous bead), so trapped water has an escape path.
Step 5: Complete Interior Compaction and Lay Pavers
With caps set, compact the patio interior base to the elevation needed for the bedding course. If the patio abuts a house foundation, maintain a minimum 1/2-inch gap between the retaining wall and the foundation. Sustained pressure against the foundation causes long-term structural damage and can be concealed by the cap overhang.
Screed the bedding layer (coarse sand or stone chip) flat at the correct elevation. Lay pavers from one corner, maintaining consistent joint spacing and your chosen pattern.
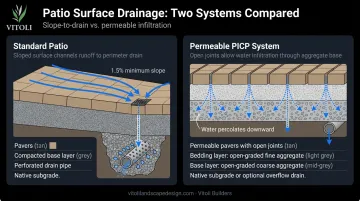
Surface drainage — plan this before base prep begins:
- Standard patio: Slope the surface at 1.5% minimum toward a catch drain connected to the drainage system (ICPI Tech Spec 2 standard)
- Permeable system: Use a designed PICP assembly with open-graded aggregate layers and permeable joints (permeable systems require a fully open-graded base engineered to handle water load, not just polymeric sand over a standard base)
Cut pavers as needed near caps and structures. Once laid, compact the full paver surface with a plate compactor and fill all joints with your chosen jointing compound, following manufacturer activation instructions.
Post-Build Checks: Drainage, Leveling, and Joints
Before calling the project complete, run three checks:
- Wall plumb and level — Sight down each course for any visible bowing or block displacement
- Drain pipe function — Run a hose behind the wall and confirm water exits at the daylight outlet without backing up
- Surface pitch — Confirm water moves toward the intended drainage point and does not pool against the house or in the center of the patio
Watch for these early warning signs before returning the site to full use:
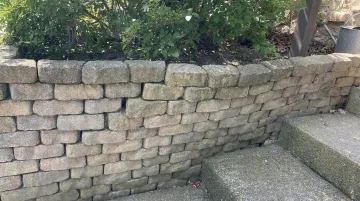
- Efflorescence on wall blocks — white mineral deposits signal moisture moving through the wall
- Slight paver rocking — indicates an unstable base layer beneath
- Slow-draining joints — points to compaction or drainage deficiencies
Each of these issues worsens significantly after the first heavy rain season. Catching them now is far cheaper than excavating afterward.
Common Problems and Fixes
Here's a quick reference for the three most common issues — with what causes them and how to address each.
| Problem | Common Causes | Fix |
|---|---|---|
| Wall bulging or leaning | Hydrostatic pressure, inadequate geogrid, poor base compaction under first course | Excavate behind the affected section, improve drainage, add geogrid, and rebuild. Full structural failure requires demolition and reconstruction of that wall section. |
| Pavers settling or uneven | Insufficient base compaction, organic material in subgrade, water washing out base fines | Lift affected pavers, re-compact base material to the correct depth and grade (typically 4–6 inches), and relay. Resolve drainage first — otherwise the base will erode again. |
| Water pooling on patio or behind wall | Clogged or mispitched drain pipe, no daylight outlet, or patio set level with no drainage slope | Inspect and flush the drain pipe; re-slope or replace if pitch is off. For surface pooling, evaluate joint compound type, base permeability, and whether a catch basin is needed. |
When to Call a Professional
Some of these fixes are straightforward — reflaying a few settled pavers, for example, is a manageable repair. But wall movement is a different situation. A leaning retaining wall signals structural stress, and in hillside settings across Los Angeles and Ventura County, that stress can escalate quickly if ignored.
If your wall has shifted more than an inch or water is consistently pooling behind it despite drainage repairs, get a professional assessment before attempting a DIY fix.
Pro Tips for a Long-Lasting Paver Patio with Retaining Wall
These three practices separate projects that hold for decades from ones that fail within a few years — especially on hillside lots in Southern California.
Get a soils assessment before finalizing design. Expansive clay soils, documented throughout Los Angeles and Ventura Counties in Ventura County's 2024 expansive soils dataset, exert far greater lateral pressure on a retaining wall than sandy or well-drained soils. That pressure directly affects base depth, geogrid spacing, and drainage capacity. Skipping this step on a challenging lot is one of the most expensive decisions a homeowner can make.
Match pavers and caps to the same manufacturer system. This ensures compatible dimensions, reduces unnecessary cuts, and means geogrid intervals and surcharge specifications are engineered as one system. The retaining wall supports the full weight of the patio base and everything on it — not just the soil behind it.
Get a professional evaluation before excavating on hillside lots. Projects involving walls over 4 feet, slopes steeper than 20%, or expansive soil conditions carry real risk if designed without a site assessment first.
Vitoli Builders has completed over 1,800 hillside projects across Los Angeles County and Ventura County. Their team evaluates soil composition, slope grade, drainage patterns, and load requirements before any design decisions are made. Reach them at 866-575-5795 or Info@vitolilandscapedesign.com.
Frequently Asked Questions
How much would a 20x20 paver patio cost?
Cost varies widely depending on paver material, wall height, base depth, drainage complexity, and local labor rates. A 400-square-foot raised patio with a retaining wall is a meaningfully more complex and expensive project than a ground-level patio of the same size. Get current contractor estimates in your area for an accurate figure.
What is the 1/3 rule for retaining walls?
The 1/3 rule is a common field reference — roughly one-third of total wall height buried below grade. NCMA design guidance uses site-specific embedment ratios (H'/20 for level conditions, up to H'/7 for slopes) with a 6-inch minimum embedment. For walls over 3 feet, rely on NCMA or engineer-specified values, not the 1/3 rule alone.
Do I need a permit to build a retaining wall for a patio?
Most California jurisdictions require a permit for retaining walls over 4 feet (footing bottom to wall top). Walls supporting a surcharge load like a patio, or on slopes steeper than 20%, may require permits regardless of height. Confirm with your local building department — unpermitted walls create liability and may need to be removed.
How deep does the trench need to be for a paver patio retaining wall?
Trench depth depends on the leveling pad, minimum embedment, and drainage aggregate required — all of which vary by wall height, soil conditions, and the manufacturer's specifications. As a starting point, plan to excavate deep enough to accommodate the gravel base plus a minimum 6-inch buried first course, and confirm final depth with the wall manufacturer or engineer for your specific project.
How do I manage surface water drainage on a raised patio?
Two primary methods: slope the surface at minimum 1.5% toward a catch drain tied into the perforated pipe system (ICPI standard), or install a full PICP system with open-graded aggregate and permeable joints. Choose your method before base prep begins — drainage cannot be retrofitted into a finished base.