Introduction
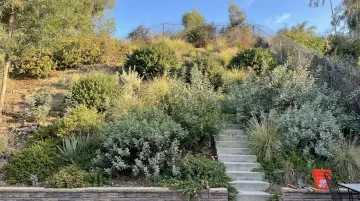
For hillside property owners across Southern California, the backyard is technically there — just practically unusable, eroding a little more with every winter storm. Sloped terrain doesn't just limit outdoor living — it creates real structural risk when soil migrates, drainage fails, and the ground beneath starts shifting.
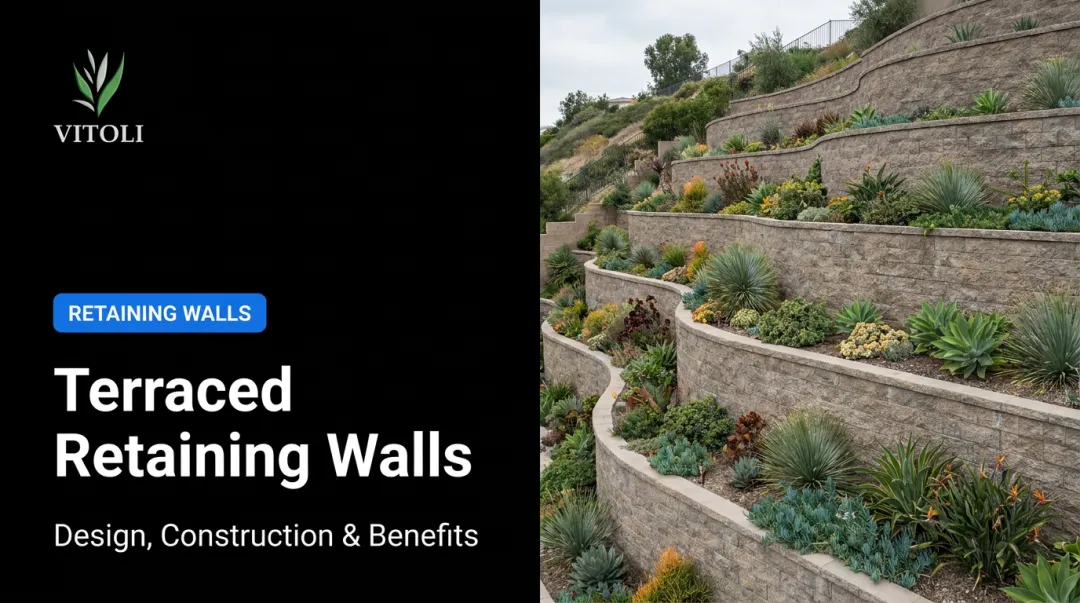
Terracing solves all three problems at once. By converting a continuous slope into a series of level platforms held back by retaining walls, you stop erosion, create usable space, and protect the property's long-term stability.
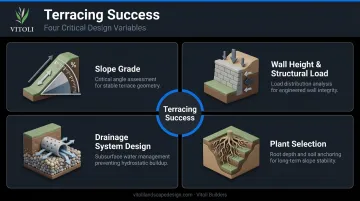
The catch is that terracing looks simpler than it is. The difference between a terrace system that holds for decades and one that buckles after its second wet season comes down to four variables: slope grade, wall material, drainage engineering, and construction sequence. Skip or undersize any one of them, and the others can't compensate.
This guide walks through everything you need to make the right calls before a single shovel breaks ground — and know when the project demands more than a DIY approach can safely deliver.
Key Takeaways
- Terracing converts unstable hillside terrain into level, usable platforms that control erosion and add livable space
- Always build walls bottom-up — excavating upper terraces first destabilizes everything below
- Drainage behind every wall is non-negotiable — walls built without it fail
- In Ventura County, walls over 3 feet trigger a permit; in LA County, the threshold is 4 feet
- Projects above two walls, steep grades, or walls approaching permit height belong in professional hands
How to Terrace a Hillside: Step-by-Step
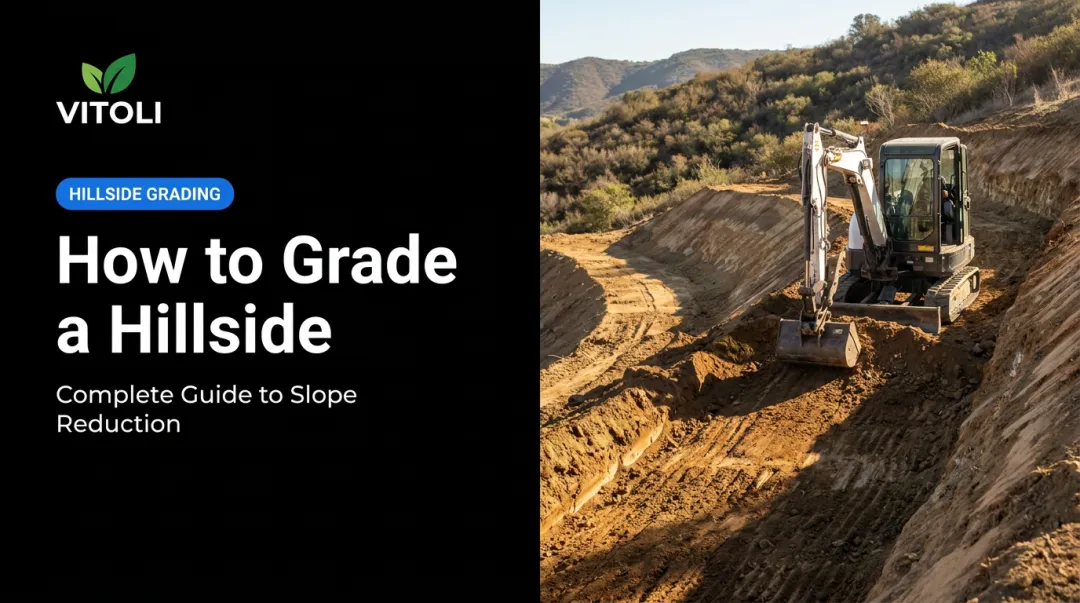
Step 1: Assess the Slope and Plan Your Terrace Layout
Before anything gets staked, calculate your slope. USGS defines percent slope as rise divided by run, multiplied by 100. A yard that drops 6 feet over 20 horizontal feet is a 30% slope — steep enough to require careful engineering.
That measurement tells you:
- How many terrace levels are feasible
- Approximate wall height per level
- Whether you're in permit territory before you lift a shovel
Use stakes and string lines to mark each terrace boundary on the actual ground. Confirm each platform will be wide enough to be usable — at minimum 3–4 feet for planting beds, more if you're planning seating or patio areas. Also map your step or pathway connections between levels at this stage, not after walls are built.
Permit check: In LA County, walls over 4 feet from the bottom of the footing to the top require a permit. In Ventura County, that threshold drops to 3 feet from finished grade. Walls near property lines or supporting a slope may trigger review even below those heights. Always verify with your local building department before digging.
Step 2: Excavate and Grade Each Terrace Platform
Start excavation at the bottom terrace and work upward. This sequence exists for a practical reason: loosened soil from upper cuts will migrate downhill. If lower walls aren't in place yet, that soil cascades onto unprepared ground and doubles your labor.
Each terrace is formed by cutting into the slope at the front and sometimes filling at the rear. Grade each platform so it slopes very slightly back toward the hillside, not toward the wall face. This subtle detail keeps water from pooling against the wall and accelerating erosion behind it.
Equipment access matters here. A compact excavator can complete what would take weeks of hand-digging. On properties with narrow side gates or restricted access, common on hillside lots in Los Angeles and Ventura Counties, factor in the labor cost of hand excavation early, not as a surprise mid-project.
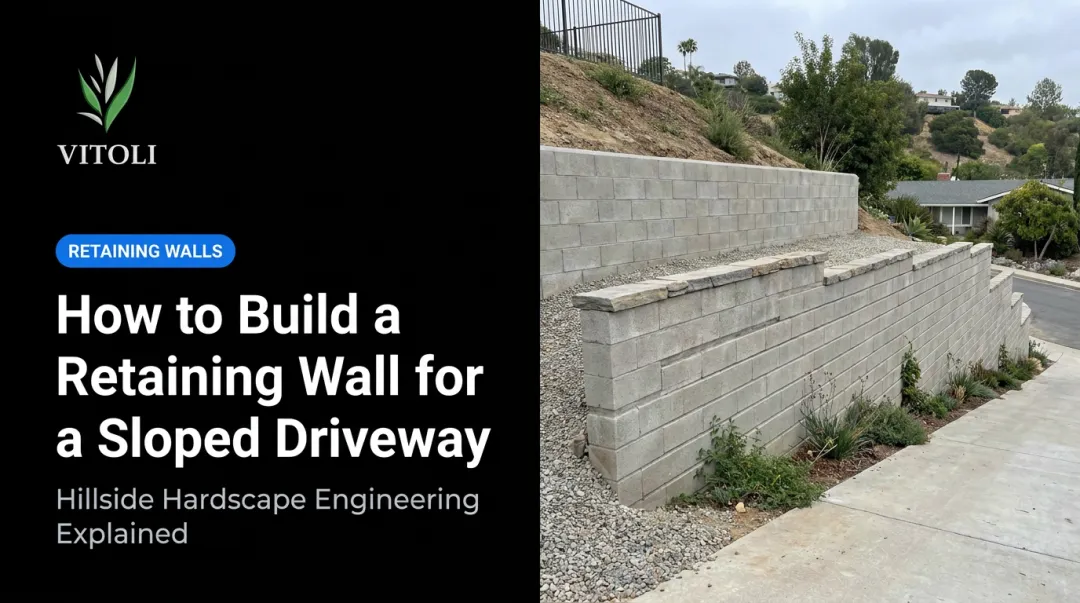
Step 3: Build Retaining Walls from the Bottom Up
Set wall footings in compacted, undisturbed soil. Pouring into loose fill is how walls fail at the base — and in Southern California's clay-heavy hillside soils, deeper footings are frequently necessary for adequate stability.
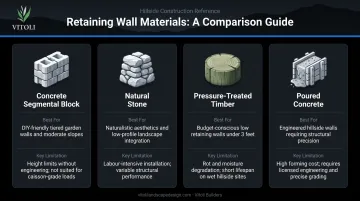
Common wall materials and trade-offs:
| Material | Best For | Limitation |
|---|---|---|
| Concrete segmental block | Most hillside terracing applications | Requires proper batter and drainage |
| Natural stone | Premium aesthetic goals | Significantly higher installed cost |
| Pressure-treated timber | Low walls on gentle slopes | Limited lifespan; not suited to steep grades or heavy rain |
| Poured concrete | Maximum strength on severe grades | Highest cost; requires formwork |
Note: LA County's building code specifically prohibits wood construction for retaining walls in Seismic Design Categories D, E, or F — which applies to most of the region.
Batter each wall slightly into the slope rather than building it perfectly vertical. This backward lean counteracts the lateral soil pressure pushing outward and adds years to the wall's lifespan.
Step 4: Install Drainage Behind Each Wall
Drainage is where most DIY projects and low-bid contractor jobs fall short. It's also the most common source of wall failures.
LA County's building code requires retaining wall backfill to be fully drained via sub-drains, weep holes, or approved methods. The California Building Code further requires walls to be designed for stability against water uplift.
Standard drainage assembly behind each wall:
- Lay a 4-inch perforated drain pipe at the base of the wall before backfilling
- Wrap the pipe in filter fabric to prevent sediment from clogging it over time
- Surround with clean crushed gravel (drainage aggregate)
- Direct the outlet to a proper discharge point: a swale, dry creek, or storm drain
NOAA reports that 30–50% of annual precipitation on the West Coast arrives in just a few atmospheric river events. Southern California hillside soils — particularly clay-heavy terrain — can't absorb that volume quickly, and hydrostatic pressure builds fast against an undrained wall.
A partial drainage system is far less effective than a complete one. Gravel without pipe, or pipe without fabric, each reduce the system's ability to relieve pressure when an atmospheric river hits.
Step 5: Backfill, Plant, and Connect Levels with Paths or Steps
Backfill each terrace with a mix of native soil and amendments graded to drain away from the wall face. On Southern California hillside terraces, plant selection does structural work — root systems anchor soil and reduce erosion between walls.
Recommended erosion-control plants for Southern California slopes:
- California lilac (Ceanothus) — fast-establishing, drought-tolerant, recommended by CNPS for hot sunny slopes
- Penstemon — deep-rooted, low water demand after establishment
- Native bunch grasses — root systems reaching 10–20 feet deep, providing exceptional soil anchoring
- Buckwheats and native sages — low-maintenance, strong inter-wall erosion control
Research on vegetated versus bare slopes shows arbor vegetation reducing sediment yield by 84.76% and shrub cover reducing sediment by 92.45% under moderate rainfall. Terraces left bare remain erosion-vulnerable even when the walls are sound.
Install steps or pathways using the same or complementary materials as the retaining walls. Set them into the slope, not stacked on the surface. Minimum 36-inch width for comfortable navigation.
What to Prepare Before You Start Terracing a Hillside
Pre-project preparation directly determines whether terracing succeeds long-term or becomes an expensive repair job. Here's what needs to be in place before excavation begins.
Equipment and Materials Checklist
- Compactor and level
- Excavation tools or equipment rental
- Chosen wall material (with quantity calculated)
- Rebar or anchor stakes (wall-type dependent)
- 4-inch perforated drain pipe
- Clean crushed gravel and filter fabric
- Appropriate soil and amendments
- For walls over 3 feet: formwork or block-specific installation tools
Site and Compliance Requirements
Call 811 before any digging. California law requires excavators to notify the regional notification center at least 2 working days before breaking ground — this locates underground utilities and prevents costly (and dangerous) surprises.
Check permit requirements with your local building department before any stakes go in the ground. Key thresholds to know:
- LA County: Walls over 4 feet typically require a permit
- Ventura County: The threshold drops to 3 feet
- Near property lines: Review may be required at even lower heights
Soil and Drainage Assessment
Southern California hillside properties frequently have dense clay or decomposed granite, both of which behave very differently from sandy soils during rain events. Clay soils drain slowly, which means hydrostatic pressure builds faster behind walls after storms.
Existing drainage problems — pooling, seepage, saturated patches — are not separate issues. They're part of the terracing scope and must be addressed in the drainage design, not treated as something to fix later.
Key Variables That Determine Terracing Results
Slope Grade
Grade determines everything downstream: how many walls you need, how tall each must be, and whether the project crosses into engineering and permit territory. According to CBC Appendix J, slopes steeper than 1:5 (20%) require benching when fill exceeds 5 feet, and LA County requires geotechnical investigation for walls supporting slopes steeper than 2:1.
Underestimating slope grade leads to walls that are too short to create flat platforms — forcing reconstruction. Have the actual numbers before finalizing your design.
Wall Height and Structural Load
Caltrans engineering data shows that lateral earth pressure scales with the square of wall height : doubling wall height roughly quadruples the load the wall must resist. That's the physics behind California's 4-foot permit threshold — the point where soil forces require engineered design to manage safely.
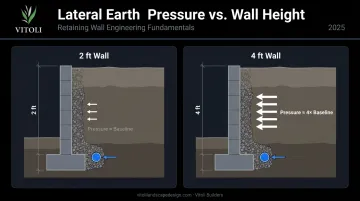
Walls built beyond their structural capacity without proper footings, drainage, or engineering may hold through dry years but fail after the first genuinely wet season.
Drainage System Design
Water is the primary force that destroys retaining walls, not the weight of soil itself. A properly installed drainage system relieves hydrostatic pressure before it builds to dangerous levels. A wall with no drainage might look fine in year one and fail after its first atmospheric river event.
A complete drainage system typically includes:
- Perforated pipe running behind the wall base
- Compacted gravel backfill to channel water toward the pipe
- Filter fabric to prevent soil from clogging the aggregate
- A daylight outlet directing water away from the structure
Plant Selection and Root Establishment
Plants on a terraced hillside serve a structural function. Deep-rooted species bind soil mechanically between walls, reduce surface runoff velocity, and provide erosion reinforcement that no wall alone achieves. Shallow-rooted annuals or bare soil between walls leaves the inter-wall slope faces vulnerable regardless of how well the walls are built.
Getting these four variables right before breaking ground is what separates a terrace that holds for decades from one that needs repair after the first heavy rain season.
Common Mistakes When Terracing a Hillside
Most terracing failures trace back to a handful of decisions made before the first wall goes up. These three mistakes are the most common — and the most avoidable.
Building top-down instead of bottom-up. Excavating upper terraces first sends loosened soil cascading down onto unprepared ground. Lower wall positions destabilize before they're built, doubling cleanup time and increasing slope instability throughout construction.
Skipping or under-sizing drainage. Omitting the perforated pipe and gravel backfill is the most direct path to wall failure. Even partial systems — gravel without pipe, or pipe without filter fabric — perform far worse than a complete drainage setup. Whatever you save upfront gets erased in the first repair cycle.
Using the wrong material for the slope. Pressure-treated timber works for gentle grades with short walls. It isn't appropriate for steep slopes, tall walls, or areas with heavy seasonal rainfall. The mismatch between material capacity and actual load conditions causes premature failure — often faster than homeowners anticipate.
When Terracing Makes Sense — and When to Call a Professional
Terracing is the right call when a slope has enough horizontal run to create usable platform widths, when erosion is actively damaging the property, or when the goal is converting unusable hillside into outdoor living space.
DIY terracing is reasonable when:
- All walls are under 2 feet
- The slope is under 15%
- The project involves a single planting level
- Access is easy and no permit is triggered
Above those thresholds, the structural forces involved — and the cost of rebuilding a failed wall — far exceed the labor savings of going without professional help.
For hillside properties in Los Angeles and Ventura Counties with steep grades, multi-level terracing, drainage complexity, or walls approaching or exceeding permit height, the variables are too interconnected to manage independently. Each decision — drainage, wall height, soil bearing — affects the others.
Working with a hillside specialist like Vitoli Builders, which has completed over 1,800 hillside projects across Southern California, means engineering, drainage design, permitting, and construction are handled as a single integrated scope. That matters because separate contractors each carry partial visibility into how the system works as a whole.
Frequently Asked Questions
How do you stabilize a steep hillside?
Stabilizing a steep hillside typically requires a combination of structural retaining walls built bottom-up with proper drainage, deep-rooted erosion-control plants, and potentially engineered solutions like caissons or tie-backs for extreme grades. Slopes over 30% generally require professional engineering assessment before any construction begins.
Do I need a permit to terrace a hillside in California?
In LA County, retaining walls over 4 feet from the bottom of the footing to the top require a permit and engineered drawings. Ventura County's threshold is lower — just 3 feet from finished grade. Walls near property lines or supporting a slope may trigger review at even lower heights, so always confirm with your local building department first.
What is the best retaining wall material for hillside terracing?
Concrete segmental block is the go-to choice for most hillside terracing — it balances durability, drainage compatibility, and cost effectively. Natural stone delivers premium aesthetics but comes at significantly higher installed cost. Pressure-treated timber works only for low walls on gentle slopes and is prohibited in LA County's seismic design categories.
How many terrace levels should I create on my hillside?
The number of levels is determined by your slope's total vertical drop divided by the intended wall height per level. The goal is for each platform to be at least 3–4 feet wide to be usable, with wall heights staying within structurally and legally manageable limits for your jurisdiction.
What plants work best for hillside terrace erosion control in Southern California?
Deep-rooted natives like California lilac (Ceanothus), penstemon, native bunch grasses, and buckwheats are well-suited for Southern California slope faces. They bind soil between terrace walls, handle dry summers after establishment, and cut the surface runoff that causes inter-wall erosion.
How long does a hillside terracing project take to complete?
A simple 2-level DIY project on a gentle slope might take 4–6 weekends of labor. A professionally executed multi-level project with drainage, permitting, and hardscape integration typically runs 2–6 weeks of active construction, preceded by a 4–8 week design and permitting phase.