The difference comes down to load. The 2022 California Building Code lists 250 psf as the live load for vehicular driveways subject to trucking — that surcharge pressure transfers into the soil behind your wall every time a vehicle rolls past. Add California's seismic environment, clay-heavy hillside soils, and wet-season rainfall patterns across LA County and Ventura County, and the engineering requirements add up fast.
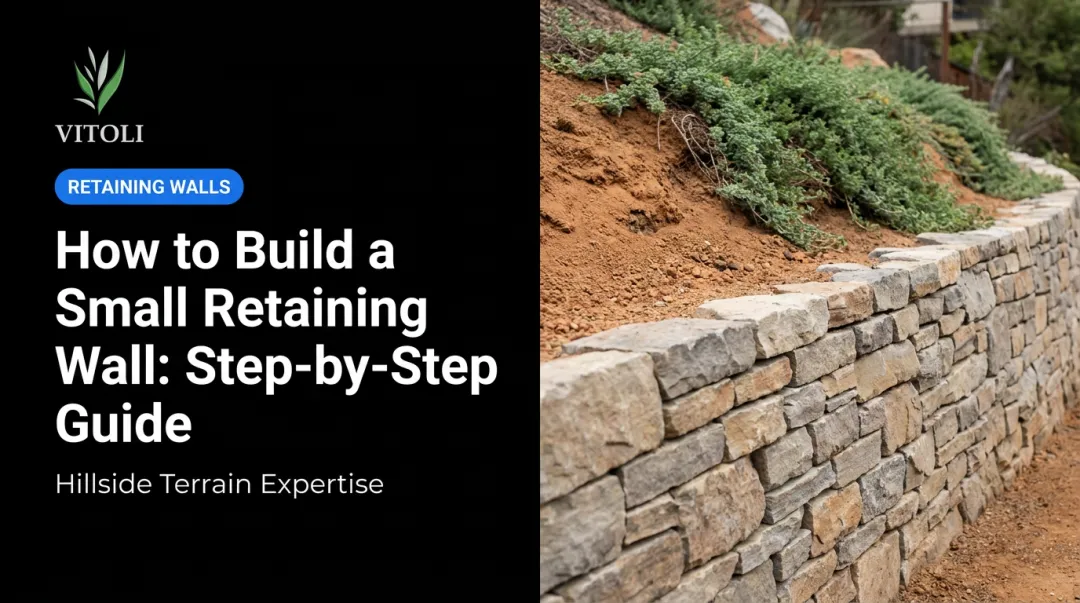
This guide covers the full process: assessing the site, permitting, construction step by step, key variables that affect performance, and the mistakes that turn a $5,000 project into a $15,000 repair.
Key Takeaways
- Driveway retaining walls face vehicle surcharge loads that standard backyard walls don't, which changes footing depth, drainage design, and reinforcement requirements
- Drainage is the most critical step: a 12-inch gravel column plus a perforated drainpipe behind the wall is non-negotiable
- LA County requires permits for surcharge-supporting walls at any height — check your local jurisdiction before breaking ground
- Clay soils expand when wet and exert far greater lateral pressure than sandy fill
- Walls over 3–4 feet adjacent to a driveway should involve a licensed specialist and engineer-stamped design
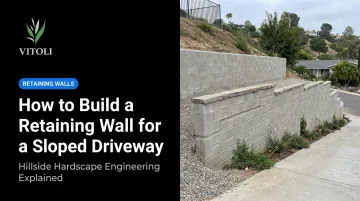
How to Build a Retaining Wall for a Sloped Driveway
Step 1: Assess the Slope and Plan the Layout
Start by measuring the slope grade along the driveway edge. This tells you how tall the wall needs to be and whether a single wall or a tiered system is the right approach. Walls over 3–4 feet require substantially more engineering — and typically a permit.
For tiered walls, spacing matters. Per NCMA-based guidance, if the upper wall is positioned closer than twice the lower wall's height, it effectively acts as additional surcharge on the lower wall. That changes the structural requirements for both tiers.
Wall placement relative to the driveway edge is equally important. Vehicles create a dynamic destabilizing force on the soil near the wall face — Versa-Lok's design guidelines restrict equipment with wheel loads over 150 psf from operating within 10 feet of the wall. Treat the driveway itself as a surcharge condition, not a neutral adjacent surface.
Before any digging, call 811 (DigAlert in California) — state law requires notification at least two working days before excavation begins. That call also informs the permit and site prep work in Step 2.
Step 2: Obtain Permits and Prepare the Site
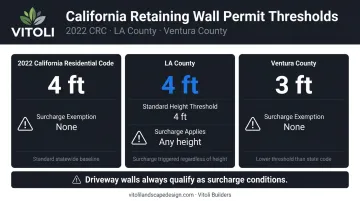
Permit requirements in California vary more than most homeowners expect:
| Jurisdiction | Permit Threshold | Surcharge Exception |
|---|---|---|
| 2022 California Residential Code | Walls over 4 ft (footing to top) | No exemption if supporting surcharge |
| LA County | Walls over 4 ft | Any height supporting surcharge or slope requires permit |
| Ventura County | Walls over 3 ft | No exemption if supporting surcharge |
Since a driveway-adjacent wall is by definition a surcharge condition, LA County requires a permit regardless of wall height. Hillside overlay zones and high fire hazard severity zones — both common across LA and Ventura Counties — add additional review requirements.
Unpermitted work creates real exposure. California's Civil Code transfer disclosure requirements mean unpermitted structures must be disclosed at sale, and stop-work orders can be issued at any stage of construction.
Site prep once permits are in hand: clear vegetation from the work area, mark the trench line, and set up for excavation.
Step 3: Excavate and Prepare the Base Trench
The base course of the wall must be buried below grade. Belgard's installation specifications call for the trench to be 12 inches wider than the block width, with an aggregate pad at least 6 inches deep extending 6 inches in front of and behind the first course. Versa-Lok specifies a granular leveling pad at least 6 inches thick and 24 inches wide.
For embedment depth, Versa-Lok specifies a minimum of 1/10 of the exposed wall height; Belgard specifies at least 6 inches of block below finished grade. The key point: the base course must be set well below grade — not at grade level — to resist overturning forces.
Once excavated, compact the trench floor to a firm, level surface before placing the aggregate pad.
Step 4: Install the Drainage System
This step is skipped more often than any other — and it's the reason most retaining walls fail.
Research on geosynthetic-reinforced MSE wall failures documented 301 cases, with 69% resulting in partial or complete collapse and 27% involving external water as a contributing factor. The same dataset found 73% of failures involved relatively impermeable silt or clay backfill — exactly the soil conditions common in Southern California hillside areas.
The required drainage assembly:
- Gravel column — 12 inches of clean, free-draining 3/4-inch angular aggregate running the full length of the wall behind the block
- Perforated drainpipe — a 4- or 6-inch perforated pipe placed at the lowest point of the gravel layer, sloped to drain away from the wall
- Filter fabric — wrap the pipe or the gravel zone to prevent fine soil particles from migrating in and clogging the system
- Outlet — Belgard specifies outlet drain tiles through the wall face approximately every 50 feet to allow collected water to exit
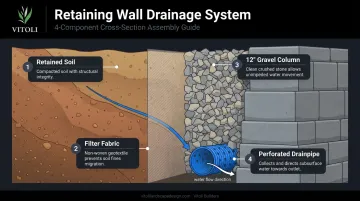
Skipping any part of this system allows hydrostatic pressure to build behind the wall. Hydrostatic pressure builds without visible warning — by the time a wall begins to bulge or lean, structural damage is already underway.
Step 5: Build the Wall Course by Course
With the drainage layer in place, begin laying block:
- First course: Set level and plumb on the compacted aggregate pad. This course is the foundation for everything above it — take time to get it right
- Running bond: Stagger each subsequent course by half a block for structural interlocking
- Batter: Most segmental block systems include a built-in setback that angles the wall slightly toward the retained soil as it rises — follow manufacturer specifications for your specific product
Geogrid reinforcement is required once walls exceed the gravity-wall limits of the block system. Belgard and Versa-Lok both require geogrid above their respective gravity-wall height thresholds — Versa-Lok specifies geogrid for walls over 4 feet.
Geogrid is placed 1 inch from the block face and extends back into the retained soil per engineering specifications, installed at manufacturer-specified course intervals — typically every few courses.
Note: Segmental concrete block systems use geogrid reinforcement, not traditional deadman anchors. Use geogrid per manufacturer specs rather than improvised anchor systems.
Step 6: Backfill and Finish
Backfill procedure matters as much as wall construction:
- Use clean granular fill — not excavated native clay soil — in the zone directly behind the drainage gravel
- Compact in 6-inch lifts using a hand tamper near the wall face
- Keep self-propelled compaction equipment at least 4 feet from the back of the wall to avoid lateral pressure damage
- Do not operate vehicles on geosynthetic reinforcement until at least 6 inches of backfill covers it
For finishing: cap the top course with cap blocks for stability and appearance. Confirm surface drainage runs away from the wall, not toward it. Optional additions — plantings, landscape lighting, decorative stone facing — improve curb appeal without compromising function when installed properly.
What You Need Before You Start Building
Successful driveway retaining walls start with preparation. Mid-project complications almost always trace back to missing materials, wrong tools, or skipped compliance steps.
Materials and Wall System
| Material | Purpose |
|---|---|
| Segmental concrete retaining wall blocks | Wall structure — most DIY-accessible option |
| 3/4-inch angular crushed gravel | Base pad and drainage column |
| 4- or 6-inch perforated drainpipe | Drainage system |
| Filter fabric sleeve | Prevent soil clogging in drainpipe |
| Cap blocks | Top course finish |
| Landscape fabric | Separate native soil from granular backfill |
Material comparison for driveway applications:
- Segmental concrete block offers the best DIY feasibility — widely available and engineered for surcharge loads when installed per manufacturer specs
- Natural stone delivers excellent curb appeal but comes with higher labor costs and less consistent sizing
- Poured concrete or engineered systems are required for tall or heavily loaded walls and are not a DIY option
Tools and Equipment
- Plate compactor (rentable from local equipment rental companies — essential for base prep)
- Mason's level and string line
- Rubber mallet
- Shovel and wheelbarrow
- Masonry saw or chisel for block cuts
Permits and Site Assessment
Before breaking ground in California, confirm:
- Verify permit requirements for your jurisdiction — height thresholds and surcharge rules vary (see Step 2 for specifics)
- Check whether the property falls within a hillside overlay zone or high fire hazard severity zone, both common in LA County and Ventura County
- Obtain HOA approval if applicable
- Call 811/DigAlert to locate utilities before any digging
Key Variables That Affect Your Retaining Wall's Performance
Two walls built with identical blocks can perform very differently. These four variables are consistently underestimated — and each one compounds the others:
- Wall height and vehicle surcharge load — how tall the wall is and what traffic it bears
- Slope grade behind the wall — the angle of the hillside being retained
- Drainage design — how effectively water is routed away from the wall
- Soil type and compaction — what the wall is actually holding back
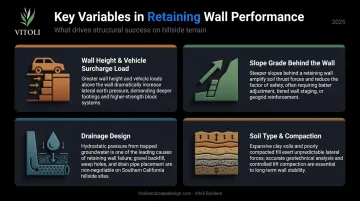
Wall Height and Vehicle Surcharge Load
Height is the most significant structural variable — soil pressure increases substantially as walls get taller. Driveway-adjacent walls add surcharge load on top of that baseline pressure. The 2022 California Building Code assigns 250 psf live load to vehicular driveways subject to trucking. That load transfers into the soil and into your wall every time a vehicle passes.
This is why a 4-foot driveway retaining wall is a fundamentally different engineering problem than a 4-foot garden wall on flat terrain.
Slope Grade Behind the Wall
The angle of the slope being retained directly affects lateral earth pressure. A steep backslope behind the wall generates considerably horizontal force than a level backfill condition. That affects block selection, geogrid requirements, and how deep the base course needs to be set.
Drainage Design
Southern California's wet season delivers concentrated rainfall after months of dry conditions — saturated soil against a wall with inadequate drainage can generate enough hydrostatic pressure to cause failure within a single storm season. The 12-inch gravel column and perforated drainpipe assembly described in Step 4 is the engineered response to this risk, not an optional upgrade.
Soil Type and Compaction
Clay-heavy soils — common throughout Southern California hillside areas — absorb water and expand, exerting significantly more lateral pressure than granular soils. Research on expansive soil behavior has documented lateral swelling pressures from high-plasticity clays reaching thousands of pounds per square foot under saturation.
If the site shows clay-heavy conditions, bring in a geotechnical engineer before finalizing the design. The cost of that assessment is a fraction of what a wall failure or rebuild runs.
Common Mistakes When Building a Driveway Retaining Wall
Skipping or Undersizing the Drainage System
Using too little gravel, omitting the drainpipe, or placing native clay soil directly behind the wall are the most common errors. The consequence isn't immediate — hydrostatic pressure builds over one or two wet seasons, then the wall bulges or tips. By that point, repair costs typically exceed original construction costs.
Setting the Base Course Too Shallow
Placing the base course at or near grade level is visually undetectable but structurally significant. Without adequate burial depth, the wall has almost no resistance to overturning forces. This mistake often stays invisible until a heavy rain event saturates the soil behind the wall.
Ignoring Permits and Setback Requirements
In California, walls built without required permits create multiple problems: stop-work orders during construction, mandatory disclosure during real estate transactions, and increased personal liability if the wall fails and causes property damage. Hillside properties in LA County are closely scrutinized during sales — unpermitted retaining walls are a known transaction complication.
Using the Wrong Backfill Material
Excavated native soil looks like a convenient backfill source, but clay-heavy native soil traps water, increases lateral pressure, and undermines the drainage system you just installed. Within the drainage zone, only clean granular fill belongs — native material is not a substitute, regardless of how much effort you've already put into the drainage layer.
Each of these mistakes shares a common trait: the damage is invisible until it's expensive. Getting the drainage, burial depth, permits, and backfill right from the start is far cheaper than correcting any one of them after the fact.

When to DIY vs. Hire a Professional
DIY is reasonable when:
- Wall height is under 2–3 feet
- Slope grade is modest
- Soil is well-draining (not clay-heavy)
- You're using a segmental block system and following manufacturer installation specs
- All permit and drainage requirements are met — DIY doesn't exempt you from these
Professional involvement is required or strongly recommended when:
- The wall exceeds 3–4 feet adjacent to a driveway
- The property is on steep hillside terrain
- Soil conditions include expansive clay or other unstable material
- The property is in a seismic hazard zone (check via CGS Seismic Hazard Zones) or high fire hazard severity zone
- Vehicle surcharge loads are a factor in the design
For complex hillside driveway walls across Los Angeles County and Ventura County, Vitoli Builders specializes in precisely these scenarios: soil assessment, engineering design, drainage systems, and permitted construction handled under one roof.
With over 20 years of experience, their team manages the variables that make a driveway retaining wall on hillside terrain a different project category than a standard landscape wall — surcharge loads, expansive soils, and seismic considerations included.
The cost-risk tradeoff here is straightforward: an improperly built driveway retaining wall can damage the driveway surface, undermine adjacent structures, and create legal liability. A professional hillside specialist identifies the site-specific factors upfront and designs around them — rather than discovering them after the wall starts moving.
Frequently Asked Questions
What is the best option for a sloped driveway?
A retaining wall with proper drainage — typically segmental concrete block or natural stone — is the most effective structural solution for stabilizing a sloped driveway edge. For steep grades, tiered walls with adequate horizontal separation between tiers are preferable to a single tall wall.
Can a retaining wall be built on a slope?
Yes, retaining walls are specifically designed for slope conditions. The wall is built into the slope with the base course buried below grade for stability, and the slope grade directly affects engineering requirements including footing depth and reinforcement.
What is the 1/3 rule for retaining walls?
The 1/3 rule states that the buried portion of a wall should equal at least one-third of total wall height. Manufacturer specifications vary: Versa-Lok requires a minimum of 1/10 of exposed wall height, while Belgard requires at least 6 inches below finished grade. Always follow your specific wall system's guidelines.
Do I need a permit to build a retaining wall for my driveway in California?
Most likely yes. The California Residential Code's 4-foot exemption does not apply to driveway-adjacent walls because they support vehicle surcharge. LA County requires permits at any height for these walls; Ventura County's threshold is 3 feet. Verify with your local building department before starting.
How deep should the footing be for a driveway retaining wall?
Manufacturer minimums range from 6 inches below finished grade (Belgard) to 1/10 of exposed wall height (Versa-Lok). Driveway-adjacent walls often require deeper embedment due to vehicle surcharge loads. For walls over 2 feet, consult local building codes or a licensed engineer.
What is the best material for a driveway retaining wall?
Segmental concrete block offers the best combination of DIY accessibility and structural performance for most residential applications. Natural stone adds aesthetic value but requires more skilled installation. Poured concrete or engineered concrete systems are the right choice for tall walls or heavily loaded conditions, but they require professional installation.