Introduction
A geogrid retaining wall looks straightforward on paper — layer blocks, embed mesh, compact backfill, and repeat. In practice, the tolerances are tight, and when something goes wrong, the failure isn't cosmetic. It's structural.
Wall bulging, joint separation, blowouts from hydrostatic pressure, geogrid pulling free under load — these failures happen months after installation, typically during the first heavy rain event, when hidden compaction problems and mis-tensioned layers finally become visible.
A peer-reviewed database of 171 failed geosynthetic reinforced walls found 127 collapses and 44 cases of excessive deformation — with water infiltration and compaction deficiencies appearing repeatedly as root causes. That data covers engineered walls, not DIY builds.
Simple walls under 3 feet on flat, stable terrain can be manageable DIY projects. Anything taller, anything on a sloped lot, anything near a structure or driveway — that's a different category of work entirely.
In Southern California, where seismic activity, steep terrain, and complex soil conditions frequently combine on the same property, professional involvement isn't optional for most wall projects.
This guide covers every phase of geogrid retaining wall installation: materials, step-by-step construction, drainage, and the failure points that matter most.
Key Takeaways
- Geogrid is required for most walls taller than approximately 3.5–4 ft and any wall with surcharge loads above it
- Geogrid length = 0.8 × wall height for non-engineered residential walls
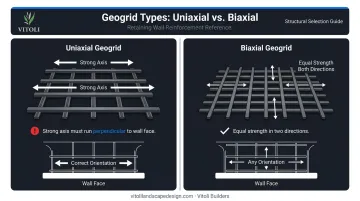
- Uniaxial geogrid must be oriented with the strong axis perpendicular to the wall face — orientation cannot be corrected after pinning
- Backfill in 8-inch lifts maximum; keep heavy equipment at least 3 feet from the wall face
- Walls 4 ft and taller, hillside walls, and surcharge-loaded walls in California require a permit and engineer sign-off
What Is Geogrid and When Does a Retaining Wall Need It?
Gravity Walls vs. Reinforced Walls
A standard gravity retaining wall resists lateral earth pressure using the mass of its own blocks. This works for short walls on relatively flat ground — but it has hard limits. As wall height increases, the forces acting on the face increase faster than block mass alone can resist.
A reinforced wall uses geogrid to engage a much larger volume of compacted soil behind the face, turning that entire reinforced zone into the effective structural mass. The wall and the reinforced soil zone work together, which is why a reinforced wall can handle heights, slopes, and surcharge loads that a gravity wall cannot. FHWA research confirms that geosynthetic reinforcement resists tensile forces, restrains lateral soil deformation, and increases lateral confinement — and all three mechanisms work simultaneously in a properly built reinforced segmental wall.
When Geogrid Is Required
No single universal threshold applies everywhere, but the conditions that trigger geogrid are well-established:
- Wall height exceeding approximately 3.5–4 ft — manufacturer technical guides identify 4 ft as the point where special reinforcing techniques or professionally prepared plans are required
- Positive slopes above the wall — any uphill grade increases lateral earth pressure significantly
- Surcharge loads — driveways, parking areas, or structures near the wall top
- Expansive clays or soft, organic soils beneath or behind the wall
- Seismically active regions — CGS Earthquake Zone maps identify fault rupture, liquefaction, and seismic landslide hazard zones across Los Angeles and Ventura County
On Southern California hillside properties, three or four of these conditions often exist on a single site. When that happens, engineered drawings aren't optional — most jurisdictions require stamped plans before issuing a permit. Understanding which type of geogrid you're specifying is the next practical question.
Uniaxial vs. Biaxial Geogrid
| Type | Strength Direction | Retaining Wall Application |
|---|---|---|
| Uniaxial | One primary direction | Standard choice; strong axis must run perpendicular to wall face |
| Biaxial | Two directions equally | More placement flexibility; must still meet embedment length requirements |
For most segmental retaining walls, uniaxial geogrid is the standard specification. The orientation requirement is non-negotiable: if the strong ribs run parallel to the wall face instead of into the reinforced zone, the reinforcement provides no meaningful benefit. Once the next block course pins the grid, that error cannot be corrected without dismantling the work.
Geogrid Length and Spacing
For non-engineered residential walls, the rule of thumb is geogrid length = 0.8 × total wall height. Place geogrid every other course, starting from the top of the base course.
This 0.8H ratio is a preliminary screening value — appropriate only for simple conditions. For walls with surcharge loads, sloped sites, expansive soils, or seismic considerations, geogrid lengths and layer elevations must be specified in stamped engineering drawings.
Geogrid Retaining Wall Installation Guide
Prerequisites and Safety Considerations
Before any excavation begins, these requirements are non-negotiable:
- Call 811 — California law requires utility notification at least 2 working days before excavation, not counting the notification date
- Obtain required permits — In the City of Los Angeles and Ventura County, the exemption applies only to walls not exceeding 4 ft measured from the bottom of footing to the top of the wall, and only when no surcharge or slope is present. LA County confirms that retaining walls of any height supporting a surcharge or slope require permit review
- Soils assessment — Required for significant wall heights or poor soil conditions
- Engineering involvement — For any wall 3.5–4 ft or taller, on a hillside lot, or near structures
Do not proceed if any of these conditions are present:
- Actively unstable or slipping slopes
- High groundwater at excavation depth without a mitigation plan
- Inadequate sub-base bearing capacity
- Required engineering approvals not yet obtained
For hillside properties in Los Angeles or Ventura County , soil instability, seismic loads, and drainage complexity routinely intersect. Vitoli Builders has spent over 20 years solving exactly these conditions on Southern California hillsides. Getting a specialist involved before excavation starts prevents the kind of foundation errors that no amount of corrective work can fully undo.
Tools and Materials Required
With prerequisites cleared, gather the following before breaking ground.
Essential Materials:
- 3/4-inch crushed gravel or road base for leveling pad
- Geogrid rolls (correct type and width per design specifications)
- Approved granular backfill (free of organics and oversized rock; acceptable USCS types: GW, GP, SW, SP — gravel- and sand-dominant soils with low fines)
- Clear crush drainage gravel
- Perforated drain pipe with filter sock
- Geotextile filter fabric
- Retaining wall block units including base course and cap units
Essential Tools:
- Excavator or skid steer (hand tools for smaller walls)
- Plate vibratory compactor
- Hand tamper for the near-wall zone
- String line and steel stakes
- Spirit level
- Utility knife or heavy-duty scissors for cutting geogrid
- Safety stakes for tensioning geogrid during backfill
Additional materials for larger projects: Base stabilization fabric improves sub-base performance on poor subgrade. Nuclear density gauges are professional-grade tools for compaction verification. On engineered walls, compaction testing is typically required by the approving engineer.
How to Install a Geogrid Retaining Wall (Step-by-Step)
The installation follows a defined sequence. Every step depends on the one before it , and compaction errors in the base compound with every course added above.
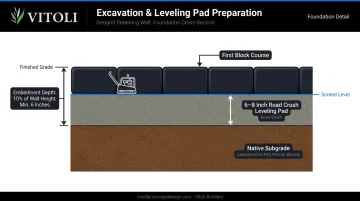
Step 1: Excavation and Leveling Pad
Excavate the full reinforced zone to the required depth. This means accommodating:
- Embedment depth (10% of total wall height, minimum 6 inches)
- The full length of the geogrid reinforced zone
- The leveling pad itself (6–8 inches below the first block course)
Remove all organic material from the excavation. Compact the sub-base to 95% Standard Proctor density (ASTM D698). Place 6–8 inches of 3/4-inch road crush, compact thoroughly, and screed level in both directions.
Any tilt in the leveling pad amplifies with every course added above it. Take the time to get this right.
Step 2: First Course of Blocks and Initial Backfill
Set base course blocks on the leveling pad, aligned precisely to a string line. Backfill in front to the required embedment depth. Fill block cores with drainage gravel. Backfill behind the first course in a single compacted lift, bringing material flush and level with the top of the blocks before continuing.
Step 3: Cut and Place Geogrid
Cut geogrid to the design-specified length. Before placing:
- Confirm the strong axis of uniaxial geogrid runs perpendicular to the wall face
- Place the front edge as far forward on the block course as possible without exposing it at the face
- Lay adjacent lengths parallel (never overlapping)
- Stake in place to maintain position
Step 4: Place the Next Block Course and Tension the Geogrid
Set the next block course in half bond (staggered vertical joints) directly on the geogrid. The block's connection mechanism pins the grid between courses. Once the course is set, pull the geogrid from the back end to remove any slack, then re-stake. Do not shift block alignment during tensioning.
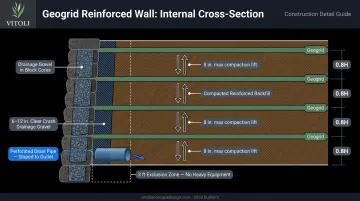
Step 5: Backfill the Reinforced Zone and Install Drainage
Place approved backfill from the back of the reinforced zone toward the wall in 8-inch lifts maximum, compacting each lift fully. Keep heavy compaction equipment at least 3 feet from the wall face and use only a hand tamper in the near-wall zone.
Drainage runs concurrently:
- Fill block cores with drainage gravel
- Place 6–12 inches of clear crush drainage gravel directly behind the blocks
- Install perforated drain pipe sloped to outlets at wall ends or through the face (VERSA-LOK recommends outlets every 40–50 ft minimum)
Continue the geogrid-course-backfill cycle at every design-specified course interval until reaching full wall height.
Step 6: Top Course, Filter Fabric, and Final Grading
Set cap units to complete the wall. Lay geotextile filter fabric across the top of the reinforced backfill zone before adding topsoil to prevent fine particles from migrating into the drainage gravel below. Grade the top and toe of the wall to direct surface water away from the wall face, and protect any disturbed soil from erosion.
Post-Installation Checks and Validation
Before considering the project complete, verify:
- Sight down the wall face — look for consistent batter (setback per manufacturer specifications) and no outward lean
- Check all courses — every block should be fully seated with no gaps at joints
- Confirm the drain outlet is clear, properly sloped, and draining in the correct direction
- Verify no geogrid is exposed at the wall face
Wall lean, joint separation, and erosion failures typically appear weeks or months after construction , most often during the first significant rain event, because compaction deficiencies and mis-tensioned geogrid layers aren't visible until lateral pressure builds. A post-installation review catches these before the wall is loaded.
Common Installation Problems and Fixes
Most geogrid retaining wall failures trace back to the same three sources: compaction errors, geogrid misplacement, and drainage neglect. Catching any of these early makes the difference between a simple fix and a costly rebuild.
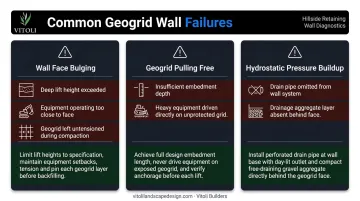
Wall Face Bulging or Leaning Outward
Likely causes:
- Backfill compacted in lifts deeper than 8 inches
- Heavy equipment operated too close to the wall face
- Geogrid not tensioned before backfill was placed
Fix: If caught early, remove the affected backfill, re-tension or replace the geogrid layer, and compact in correct 8-inch lifts with heavy equipment kept at least 3 feet back. If the wall has already settled significantly, professional structural assessment is required before any remediation.
Geogrid Pulling Free or Slipping
Likely causes:
- Grid not placed far enough forward into the block connection zone
- Compaction equipment run directly on the geogrid, damaging its structure
Fix: Ensure the front edge of grid reaches the leading edge of the block course (without showing on the face) and that the upper block course fully pins it. Replace any geogrid showing tears or deformation from equipment contact — damaged grid provides no reliable reinforcement.
Water Buildup and Hydrostatic Pressure
Likely causes:
- Drain pipe missing, or not sloped correctly to a functional outlet
- Drainage gravel absent from block cores or the zone directly behind the wall face
Fix: Verify the perforated drain pipe runs with adequate slope to functional outlets. Confirm clear crush gravel fills block cores and extends 6–12 inches behind the blocks. Add geotextile filter fabric if fines are migrating into the drainage layer. Hydrostatic pressure ranks among the leading causes of retaining wall failure. Drainage is a structural requirement, not an optional add-on.
Pro Tips for Installing a Geogrid Retaining Wall Effectively
A few habits separate walls that hold for decades from those that fail within a season.
Never rush the backfill sequence. Don't place backfill for the next geogrid layer until the current layer is fully compacted and the geogrid is tensioned and staked. This sequencing mistake is the most common cause of reinforcement failure in non-professional installations.
Check geogrid orientation before every single layer. It takes 30 seconds. Once the next block course pins the geogrid, incorrect orientation cannot be corrected without dismantling completed work. The habit is worth building from the first layer.
Know when to hire a specialist. Walls over 4 feet, hillside sites, expansive or clayey soils, and seismically active areas — which includes most of Los Angeles and Ventura County — carry real structural and legal risk when self-installed. Vitoli Builders (CA License #1043914) handles the geotechnical assessment, engineered compaction planning, and permit coordination that these conditions require.
A failed wall in these environments typically means full demolition, re-engineering, and reconstruction — costs that far exceed what professional installation runs upfront.
Conclusion
Geogrid retaining wall installation quality determines whether a wall holds for decades or fails in the first wet season. The technical requirements — correct leveling pad preparation, proper geogrid orientation, disciplined backfill compaction in 8-inch lifts, and functional drainage — aren't optional refinements. They are the wall.
Respect the complexity thresholds honestly. If the wall exceeds 4 feet, the terrain is steep, soil conditions are uncertain, or the site sits in a seismically active region like much of Southern California, professional involvement isn't optional — it's a structural requirement.
Contact your local building department before starting any permitted work. For walls that fall outside straightforward residential conditions, engage a qualified engineer or a hillside construction specialist like Vitoli Builders, who can assess site-specific factors before a single block is placed.
Frequently Asked Questions
When should you use geogrid on a retaining wall?
Geogrid is generally required for walls taller than approximately 3.5–4 ft, walls with surcharge loads above them (driveways, slopes, structures), and walls on hillside terrain or in poor soil conditions. Even shorter walls may need it depending on soil type, drainage conditions, and local code requirements. Always verify site-specific factors rather than assuming a short wall is automatically exempt.
How long should geogrid be for a retaining wall?
For non-engineered residential walls, use the rule of thumb: geogrid length = 0.8 × total wall height. Engineered walls will have geogrid lengths specified in engineer-approved design drawings, which supersede any general rule. Always verify against block manufacturer guidelines and confirm with your local jurisdiction before proceeding.
What is the difference between uniaxial and biaxial geogrid?
Uniaxial geogrid has strength in one primary direction and must be installed with that strong axis running perpendicular to the wall face (into the reinforced zone). Biaxial provides roughly equal strength in two directions. For most segmental retaining wall applications, uniaxial is the standard specification — engineer's drawings take precedence for your specific project.
Can I install a geogrid retaining wall myself?
Simple walls under 3 feet on flat sites can be DIY projects with careful prep and proper compaction. Anything over 3.5–4 feet, on a hillside, or near a structure requires professional installation and a licensed engineer — in California, permit and engineering requirements are strictly enforced at these thresholds.
Does a geogrid retaining wall require a permit in California?
Requirements vary by jurisdiction. In Los Angeles and Ventura County, walls over 4 ft typically require a permit — and any wall supporting a surcharge or slope triggers permit review regardless of height. Contact your local building department before starting work to confirm the thresholds for your location.