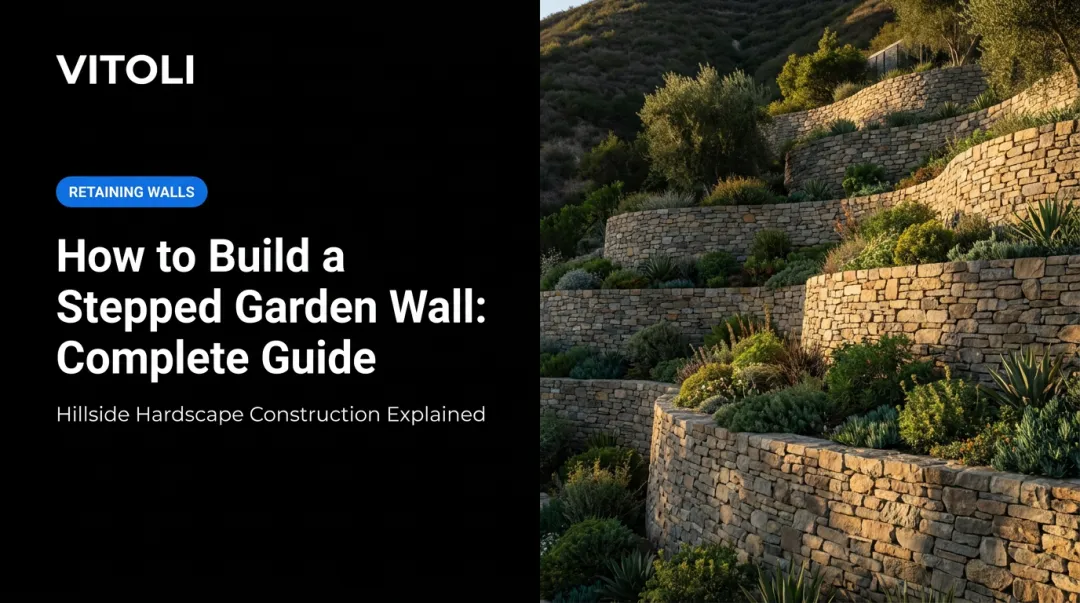
: Step-by-Step Guide](https://file-host.link/website/vitolilandscapedesign-wmb49i/assets/blog-images/aeea698c-9757-41e4-8bb2-fafa677b234a/1783030241516718_b4adea780f7a45d2a83c2a3c267b7712/360.webp)
The problem is that most DIY retaining walls that fail don't fail because of bad blocks. They fail because of a rushed base, skipped drainage, or a wall that's simply too tall for a gravity system. Hydrostatic pressure — water accumulating behind a wall with nowhere to go — is one of the leading, preventable causes of retaining wall failure, and it's the detail most DIYers skip entirely.
This guide covers everything needed to build a small retaining wall correctly: materials, a seven-step build process, the performance factors that determine whether a wall lasts a decade or a season, and a clear picture of when the job should go to a professional.
Key Takeaways
- A compacted gravel base and a fully buried first course are what prevent the wall from shifting — skip either step and the whole structure is compromised.
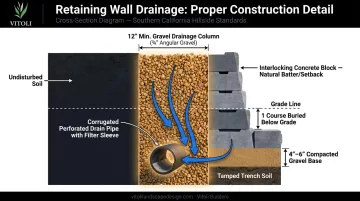
- Drainage gravel behind the wall should be at least 12 inches wide, not 2 inches.
- Permit thresholds vary: 4 feet in LA County, 3 feet in Ventura County. Hillside properties may require review at any height.
- Walls over 3–4 feet, on sloped terrain, or near a home's foundation require a licensed contractor or engineer.
- Call 811 before you dig — it's required by California law.
What You Need Before Building a Small Retaining Wall
Proper preparation determines whether your wall lasts five years or fifty. Material shortcuts and skipped utility checks are where most problems start — long before a single block is placed.
Materials and Tools
Materials:
- Interlocking concrete retaining wall blocks (dry-stack system)
- Cap/topper blocks
- Compacted crushed aggregate, ¼ inch to 1½ inch (base and backfill) — not paver sand
- ¾-inch clean angular gravel for the drainage column behind the wall
- Corrugated perforated drainage pipe with filter sleeve
- Landscape fabric (optional, soil-dependent)
- Exterior-grade concrete block adhesive for cap blocks
Tools:
- Shovel and flat spade
- Rubber mallet
- Torpedo level and line level
- Hand tamper or plate compactor
- String line and wooden stakes
- Tape measure
- Work gloves
One note on that crushed aggregate: Allan Block's installation specs call for well-graded compactible aggregate with no more than 10% passing the #200 sieve. Paver sand is not a structural base. It's only acceptable as a thin final-leveling layer if your specific block manufacturer explicitly allows it.
Permits and Utility Checks
Call 811 first. California law requires you to notify a regional notification center at least two working days before any excavation. DigAlert handles this for Southern California — it's free, and it identifies underground utility lines before you break ground.
Permit thresholds vary by county:
| Jurisdiction | Permit Threshold | Notes |
|---|---|---|
| California Residential Code | Under 4 ft exempt | Measured from bottom of footing to wall top |
| LA County | Under 4 ft exempt | Any height requires permit if supporting a slope or surcharge |
| Ventura County | Under 3 ft exempt | Measured from finished grade on lower side |
One LA County rule most homeowners miss: retaining walls of any height supporting a slope or surcharge require a permit. If your wall is on a hillside, check with your local building department before starting — even a 2-foot wall may trigger review.
How to Build a Small Retaining Wall: Step-by-Step
Step 1: Plan the Layout and Calculate Materials
Mark the wall's footprint using wooden stakes and a string line. Use a line level to establish your desired final wall height, then count how many block courses that requires.
Calculate trench depth using this formula:
(block height × number of courses) + cap block height + gravel base depth = total trench depth
One full course of blocks must be buried underground. If your blocks are 4 inches tall and you want three exposed courses plus one buried course, that's 16 inches of block plus your gravel base. Count the buried course in your material order — it's structural, not decorative.
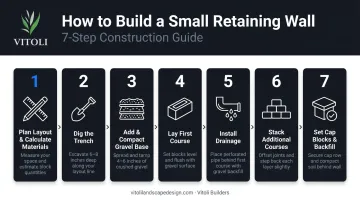
Step 2: Dig the Trench
Dig straight down with minimal disturbance to surrounding soil. Typical trench depth for a small wall runs 8–12 inches, accounting for a 4–6 inch gravel base plus one buried block course.
Before adding any base material: tamp the exposed trench soil thoroughly. Unstable trench bottom is a primary cause of wall settlement. No amount of good blocks will compensate for a soft floor.
Step 3: Add and Compact the Gravel Base
Pour crushed aggregate into the trench, rake smooth, and compact firmly with a hand tamper or plate compactor. Then check with a level — the base must be flat and even across the full wall length.
- Allan Block specs 4 inches of base depth for walls under 4 feet
- Belgard and Pavestone often specify 6 inches as a conservative benchmark
- For walls holding back sloped terrain, use 6 inches minimum
This is the step people rush. A 20-minute shortcut here creates a leaning wall within one or two seasons.
Step 4: Lay and Level the First Course of Blocks
Start at the lowest end of the wall or a fixed corner. Place the first course on the compacted gravel base and check each block individually — level side to side, level front to back, and aligned with adjacent blocks. Adjust with the rubber mallet.
This course sets every course above it — an unlevel block in the base row compounds with each row added on top. Take your time here.
- Fill hollow-core block centers with gravel at this stage
- Leave a gap between the back of the blocks and undisturbed soil — this is where drainage material goes
- Manufacturer specs (VERSA-LOK, Allan Block) call for at least 12 inches of drainage width — not a narrow strip
Step 5: Install Drainage Behind the Wall
Once the first course is set, lay a corrugated perforated drainage pipe (with filter sleeve) directly behind the blocks at base level. Position the pipe exit point at a low end or corner where water can discharge freely away from the wall. A pipe without a daylight outlet is not a drainage system — it's just a buried tube.
Pack ¾-inch clean angular gravel into the gap behind the blocks and around the drainage pipe. VERSA-LOK and Allan Block both specify at least 12 inches of drainage aggregate behind the wall units — not a narrow strip.
The NCMA's Segmental Retaining Walls Best Practices Guide confirms that proper drainage components reduce loading on the wall and mitigate performance issues. This column of gravel is the primary defense against the hydrostatic pressure that pushes blocks outward after heavy rain.
Step 6: Stack Additional Courses
With drainage in place behind the first course, continue building up. Stack subsequent courses by staggering the joints — offset each row by at least half a block so no vertical seam lines up between rows. VERSA-LOK specs require at least 4 inches of overlap; Allan Block calls for at least one-quarter block length.
Press the lip of each block firmly into the groove below to engage the interlocking system. Keep the following in mind as the wall rises:
- Continue adding gravel backfill behind each new course
- The wall will naturally lean slightly back into the hillside — this "batter" is intentional
- VERSA-LOK's pin system creates roughly ¾ inch of setback per course; Allan Block offers 6–12 degree setback options
That backward lean distributes soil pressure more efficiently — in most cases, reducing outward force by 20–30% compared to a perfectly vertical wall.
Step 7: Set Cap Blocks and Backfill
Apply a bead of exterior-grade concrete block adhesive to the top course of standard blocks. Press cap blocks firmly into place, stagger them to close gaps, and check with a level before the adhesive sets. Let it cure per manufacturer instructions before disturbing.
Backfill the area behind the wall in layers, tamping each layer as you go. Loose backfill erodes and shifts, undoing the wall's drainage design. When finished, the soil surface should:
- Cover the first buried course
- Slope slightly away from the wall for surface drainage
Key Factors That Affect Long-Term Performance
A properly built wall can still fail if these variables are ignored during construction.
Foundation Depth and Compaction
Burying 10% of the total wall height underground — at minimum one full block course — anchors the wall against sliding and tipping. VERSA-LOK's installation guidelines document this as the standard embedment rule.
Poorly compacted base gravel is the most common structural failure point in DIY walls. The trench soil beneath the gravel must also be tamped — compaction is a two-layer requirement.
Drainage Design
When water saturates soil behind a wall, hydrostatic pressure multiplies against the blocks. The gravel column and drainage pipe dissipate this pressure before it can damage the structure. On hillside properties and in high-rainfall areas, drainage needs increase significantly — a simple pipe without proper gravel backfill width won't hold up.
For hillside builds, professional drainage goes further. Vitoli Builders, a hillside construction specialist serving Los Angeles County and Ventura County, integrates gravel backfill, perforated drain lines, and weep systems as a three-part system on every build — because in Southern California's wet seasons, drainage failure is the most common reason walls don't survive year two.
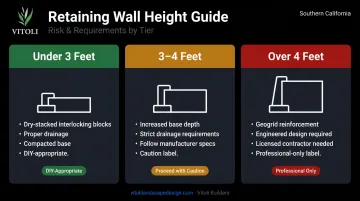
Wall Height and Reinforcement Thresholds
| Wall Height | What's Required |
|---|---|
| Under 3 ft | Dry-stacked interlocking blocks with proper drainage and base |
| 3–4 ft | Closer attention to base depth, drainage, and manufacturer specs |
| Over 4 ft | Geogrid reinforcement, engineered design, or professional construction |
VERSA-LOK states that unreinforced gravity walls may be stable up to 4 feet under ideal conditions — level backfill, good soils, no surcharge. Belgard notes that maximum gravity wall height is site-specific. Neither manufacturer offers a universal guarantee above 3 feet without reviewing site conditions first.
Common Mistakes When Building a Small Retaining Wall
- Skipping or rushing the base — Tamping the trench soil and compacting the gravel base are not optional. Blocks placed on loose or unlevel material will settle unevenly and lean within one to two seasons, often faster.
- Neglecting drainage — Omitting gravel backfill or a drainage pipe is the single most common reason DIY retaining walls fail. Hydrostatic pressure after rain can push blocks outward even on walls that look solid on dry days.
- Building too tall for the material — Stacking interlocking blocks beyond the manufacturer's dry-stack height limit (typically 3–4 feet) without geogrid reinforcement creates a wall that looks fine initially but is structurally compromised under sustained soil load.
- Ignoring permits and local codes — Skipping a required permit can result in fines, forced removal, and complications at resale. In California, this is especially relevant for hillside properties in LA County and Ventura County, where walls supporting slopes or surcharges require review regardless of height.
When to DIY vs. Hire a Retaining Wall Professional
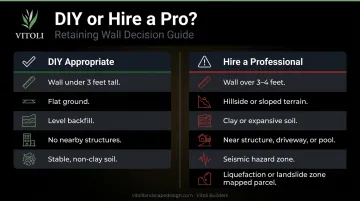
When DIY Is Reasonable
A wall under 3 feet tall, on relatively flat ground, with level backfill and no nearby structures is a manageable project for most capable homeowners. Be realistic about the physical demands: sustained digging, heavy block lifting (most retaining blocks run 35–80 lbs each), and precision leveling on your hands and knees. Budget a full day — a 10–20 foot wall done right takes an experienced DIYer roughly 6–8 hours.
When to Call a Professional
Stop the DIY plan and bring in a licensed contractor when:
- The wall exceeds 3–4 feet tall
- The site involves a hillside or sloped terrain with significant soil pressure
- Soil is clay-heavy, expansive, or unstable
- The wall is near a structure, driveway, or pool
- You're in a mapped seismic hazard zone — Southern California has more than 300 faults capable of magnitude 6 or larger earthquakes, making wall failure a safety risk rather than just a cosmetic one
- Your parcel falls in a CGS EQ Zapp mapped liquefaction or landslide zone
For hillside property owners in Los Angeles County or Ventura County, retaining walls are often part of a broader slope stabilization strategy — not a standalone landscaping project.
Vitoli Builders handles this type of complex terrain work, combining site-specific engineering, caisson foundation systems, and integrated drainage design to build walls engineered for Southern California's seismic conditions. With over 20 years of experience and a licensed in-house design-build team (CA License #1043914), they bring the engineering depth that soil, slope, and earthquake risk demand.
Frequently Asked Questions
How deep should a small retaining wall be?
Typical trench depth runs 8–12 inches — 4–6 inches of compacted gravel base plus one fully buried block course. The standard embedment rule is 10% of total exposed wall height, so a 30-inch wall needs roughly 3 inches minimum; one buried course satisfies this for most standard block sizes.
Does a 2-foot retaining wall need rebar?
No — standard 2-foot dry-stacked interlocking block walls don't require rebar. Systems like VERSA-LOK and Allan Block are engineered to perform without mortar or rebar at low heights under suitable site conditions. Rebar becomes relevant for poured concrete or masonry walls, or any wall exceeding 3–4 feet.
What is the best material for a small retaining wall?
Interlocking concrete retaining wall blocks are the most practical choice for small DIY walls — they have engineered setback systems, detailed manufacturer installation guides, and don't require mortar. Natural stone and timber are alternatives, but both are harder to install level and timber has a shorter service life.
Do I need a permit to build a small retaining wall in California?
Most California jurisdictions exempt walls under 4 feet (LA County) or 3 feet (Ventura County) from permits — but those exemptions disappear if the wall supports a slope or surcharge load. Always check with your local building department before starting; hillside properties in particular often trigger review requirements regardless of wall height.
How do I ensure proper drainage behind my retaining wall?
Pack at least 12 inches of ¾-inch clean angular gravel directly behind the blocks as the wall rises, and install a corrugated perforated drainage pipe with a filter sleeve at the base — routed to a point where water can exit freely. Without a working outlet, the drainage system is useless. Drainage failure is the most common cause of retaining wall collapse.
How long does it take to build a small retaining wall?
A small wall under 3 feet tall and 10–20 feet long typically takes a single experienced DIYer 6–8 hours. The first buried course takes the most time due to precision leveling; subsequent courses stack considerably faster once the base is set.