Introduction
Hillside homeowners in Los Angeles County and Ventura County face a recurring problem: every winter rain season accelerates soil loss on slopes that were already marginal. Exposed roots, gullies forming overnight, mulch washing downhill — these are symptoms of a slope that can't hold itself together under concentrated runoff.
Retaining walls are a proven structural solution for this problem. The key word is structural. A wall installed without proper drainage, foundation preparation, or engineering review doesn't solve the problem. It compounds it, trapping water with nowhere to go until hydrostatic pressure pushes the wall out entirely.
This guide covers how to use retaining walls for erosion control correctly: when they're the right tool, how to assess your site, how to build one with drainage that actually works, and how to maintain it over the long term.
Key Takeaways
- Retaining walls control erosion by holding back saturated soil and redirecting water flow away from structures
- Wall type selection depends on slope grade, soil composition, wall height, and load — no single type works for every site
- Drainage is the single most critical factor in long-term performance: without it, hydrostatic pressure will destroy even a well-built wall
- Walls over four feet typically require a building permit and engineered drawings in California
- Inspect your wall after every significant rain event; early intervention prevents structural failure
When Should You Use a Retaining Wall for Erosion Control?
A retaining wall is the right answer when your slope problem has a structural component: surface interventions alone won't hold the soil in place.
Signs a retaining wall is the correct solution:
- Visible soil loss or gullying after rain events
- Exposed tree roots or foundation edges on a sloped area
- Mulch consistently washing out of planting beds on a grade
- A slope steeper than 2:1 (two feet of horizontal run for every foot of vertical rise) without stable, established vegetation
- Existing landscape features like patios or structures being undercut by erosion
Situations where a wall is often over-specified:
- Flat or gently sloped yards with minor surface runoff — regrading and drainage swales often solve this more cost-effectively
- Properties where the real problem is a concentrated downspout discharge, not slope instability
- Very short slopes (under 18 inches of vertical rise) where groundcover or erosion matting would stabilize the soil adequately
The Southern California Context
For hillside homeowners across Los Angeles County and Ventura County, retaining walls frequently shift from optional to necessary. USGS research on Southern California rainfall and landslides identifies thresholds around 10 inches of seasonal rainfall followed by storm intensities of 0.2 to 0.25 inches per hour as common triggers for shallow slope failures.
Clay soils — prevalent across much of the region — absorb water far more slowly than sandy soils. NRCS infiltration data puts clay steady infiltration at roughly 0.04 to 0.2 inches per hour.
When rain intensity exceeds that rate, water sheets off the surface rather than percolating through, concentrating erosive force at the base of slopes. On these lots, a retaining wall with integrated drainage is what keeps the hillside stable through winter.
What to Assess Before You Build
Getting this phase wrong costs more than getting the construction wrong. The site variables below determine wall height, material choice, drainage design, and whether you'll need an engineer, a permit, or both.
Key Variables to Evaluate
| Variable | Why It Matters |
|---|---|
| Slope grade and vertical rise | Determines required wall height and whether terracing is needed |
| Soil type and bearing capacity | Expansive clay soils exert far more lateral pressure on a wall than sandy or loamy soils — this directly affects structural design |
| Proximity to structures, property lines, utilities | Affects wall placement, required setbacks, and permitting |
| Existing drainage patterns | Water entry points on the slope determine where drainage infrastructure must go |
When to Call an Engineer
Walls under three to four feet on stable, non-expansive soil may fall within a capable contractor's range. But professional engineering review is warranted when any of the following apply:
- Wall height approaches or exceeds four feet
- Soil is clay-heavy, saturated, or shows signs of movement
- The wall will sit near a structure, retaining a loaded area (driveway, pool, upper patio)
- Slope above the wall is steeper than 3:1 horizontal-to-vertical
California Permit Requirements
California Building Code Section 105.2 exempts retaining walls from permit requirements only when they do not exceed four feet measured from the bottom of the footing — not the exposed face height. If the wall supports any surcharge (a driveway, slope above, or structure), the exemption disappears regardless of height.
Local jurisdictions — including cities within Los Angeles County and Ventura County — may apply stricter thresholds or require grading permits alongside building permits. Skipping permits creates liability if the wall fails and complicates property resale. Vitoli Builders has worked through this process on over 1,800 hillside projects across both counties, treating permit scoping as a standard first step rather than an afterthought.
How to Build an Erosion-Control Retaining Wall: Step-by-Step
Wall failure almost always traces back to one of three phases: insufficient foundation prep, missing drainage, or incorrect backfill. Rushing any of these to save time costs far more in repair later.
Site Preparation and Foundation Work
Clear vegetation, roots, and any unstable fill from the building area. Excavate a base trench deep enough to reach stable, undisturbed native soil — or to a properly compacted replacement fill.
Allan Block's installation specifications require base material placed on undisturbed native soil or suitable fill compacted to at least 95 percent Standard Proctor density (ASTM D698). Their specs call for a minimum six-inch base of clean wall rock before the first course is set.
Common setup error: Setting the first block course on soft or uncompacted soil without a gravel base. Once saturated backfill adds weight, the wall settles unevenly — causing cracking and outward lean at the base.
Setting the First Course and Establishing Batter
The first course should be fully level and set into the ground with at least one course buried below finished grade. This below-grade burial creates the anchor that resists overturning forces.
As the wall rises, maintain a slight backward lean — called batter — toward the retained soil. This lean counteracts lateral soil pressure. Manufactured block systems specify a batter angle per course; Allan Block's engineering manual identifies a nominal 12-degree setback for their standard units. Follow the manufacturer's specification — deviating from it undermines the wall's structural geometry.
Building Up Courses and Integrating Drainage
This is where drainage infrastructure must be installed — it cannot be added retroactively once backfill is in place.
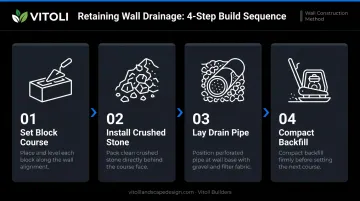
The sequence for each lift:
- Set the course of block or stone
- Install clean crushed stone (wall rock) behind the course — keep fine soil and clay out of this zone
- Where required, lay perforated drain pipe at the base of the wall, surrounded by gravel and wrapped in filter fabric to prevent soil particles from clogging the system
- Compact backfill incrementally before placing the next course
Drainage aggregate should extend from the base drain pipe upward and behind the wall face. This creates a free-draining column that allows water to move down to the pipe rather than building pressure against the wall.
Capping and Final Backfill
Cap the wall with a top course or cap treatment to block direct water infiltration behind the wall from above. Grade the final surface slightly away from the wall — water should sheet away from the retained soil zone, not drain back into it.
Before calling the project complete, run through these final checks:
- Drain outlets are clear and flowing freely
- Wall maintains consistent batter from base to cap
- No course has shifted or tilted during backfill compaction
Choosing the Right Retaining Wall Type for Erosion Control
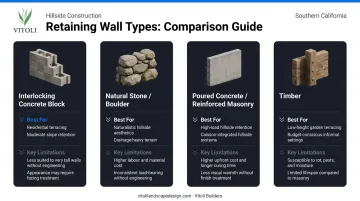
Material selection is driven by wall height, soil conditions, load requirements, and site aesthetics. Here's how the main categories compare:
| Wall Type | Best For | Key Limitations |
|---|---|---|
| Interlocking concrete block (SRW) | Moderate slopes, terracing, consistent appearance | Requires geogrid reinforcement beyond gravity-wall height limits |
| Natural stone or boulder walls | Irregular slopes, naturalistic settings | Larger footprint; gravity-dependent; labor-intensive |
| Poured concrete or reinforced masonry | Tall walls, heavy loads, limited space behind wall | Requires forming and professional installation |
| Timber | Low walls (under 3 ft), lower-budget projects | Shorter lifespan; not recommended for wet climates or heights above 3 ft |
How Height Changes the Equation
Taller walls face exponentially greater lateral pressure. A wall that functions adequately as a gravity structure at two feet may require geogrid soil reinforcement at five feet — and engineered design at six feet or more. Belgard's technical guidance notes that the maximum gravity height for segmental block depends on the specific unit, soil conditions, slope above the wall, and surcharge — there's no universal threshold.
The Case for Terracing
On steep Southern California hillside lots, a single tall wall often isn't the best answer. Multiple shorter walls — terraced at intervals up the slope — distribute lateral load across several smaller structures rather than concentrating pressure at a single point.
Terracing also tends to be more cost-effective than engineering a single monolithic wall for the full height — and it creates usable garden or patio space between tiers as a bonus.
Vitoli Builders selects materials based on slope grade, soil composition, drainage conditions, and design goals, working across concrete, masonry block, natural stone, and poured-in-place systems depending on what each hillside site demands.
Drainage and Backfill: The Steps That Determine Whether Your Wall Lasts
California Building Code Section 1610 treats hydrostatic pressure as a structural design load. That classification matters. Water trapped behind a retaining wall is an engineering force the wall must be designed to resist or eliminate — not a maintenance problem to address after the fact.
How Hydrostatic Pressure Destroys Walls
When saturated soil behind a wall has no drainage path, water pressure builds against the wall face. This pressure increases with depth and accumulates with every rain event. Over time, it causes:
- Outward bulging at mid-wall
- Cracking along block joints or at the base
- Gradual forward lean that accelerates until the wall tips or collapses
The failure mechanism is entirely preventable with correct drainage design. Walls fail from hydrostatic pressure because the installer never included drainage, or installed it wrong.
Core Drainage System Components
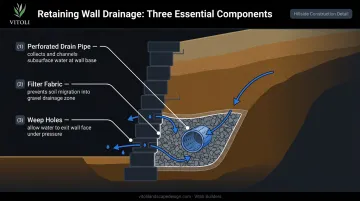
Correct drainage design addresses the pressure problem at the source. Every erosion-control retaining wall needs all three of these elements:
- Perforated drain pipe at the base of the wall, surrounded by clean crushed stone
- Filter fabric wrapping the gravel zone to prevent fine soil particles from migrating into and clogging the drainage aggregate
- Weep holes or drain outlets at the wall face to provide a clear path for water to exit
Backfill Material Selection
What you place directly behind the wall face matters as much as the drainage pipe. Backfill zones should be sequenced:
- Lower zone (adjacent to drain pipe): clean, free-draining crushed stone or gravel
- Upper zone: native soil, placed only after the free-draining layer is established
Avoid heavy clay fill against the wall face. It's one of the most damaging installation errors on Southern California hillside projects. Clay holds water, expands when wet, and generates far more lateral pressure than free-draining material.
There's one constraint these systems can't handle: standard drainage setups (gravel fill and perforated pipe) manage incidental water movement through the backfill zone. They aren't built for uncontrolled groundwater, active seepage, or a high water table. Persistent wet soil or visible seepage on your site requires geotechnical review before wall design proceeds.
Best Practices for Long-Term Erosion Control Performance
A well-built wall with good drainage still needs periodic attention, particularly after the heavy rain events that define Southern California winters.
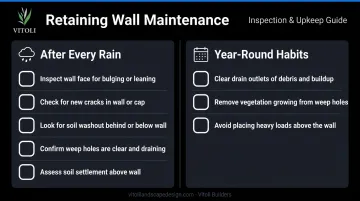
Post-rain inspection checklist:
- Look for bulging at mid-wall — any outward movement indicates pressure buildup
- Check block joints for new cracks or widening of existing ones
- Examine the base for soil washing out from behind the wall
- Confirm weep holes and drain outlets are running clear water, not muddy discharge
- Look at the top of the retained soil zone for settlement or cracking
Between storms, a few consistent habits keep the drainage system working as designed.
Year-round maintenance:
- Clear drain outlets and weep holes of debris, leaf buildup, and sediment; a blocked outlet performs no better than no drainage at all
- Remove vegetation growing into or directly behind weep holes to prevent plugged outlets and root pressure on joints
- Avoid placing heavy loads (vehicles, large planters, storage containers) directly on or behind the retained soil zone unless the wall was engineered for that surcharge
Spotting a shifted block or a new crack early keeps the fix at the maintenance level. Wait long enough and the same problem becomes a structural replacement.
Frequently Asked Questions
How do you stop erosion on a retaining wall?
Grade the top of the wall to direct surface water away from retained soil, and plant groundcover or low-growing vegetation behind the wall to stabilize that zone. The most important factor is functioning drainage — water must move through the wall system, not over or around it.
Will homeowners insurance cover a falling retaining wall?
Coverage depends heavily on the specific policy and cause of failure. The Insurance Information Institute notes that landslide and earth movement events are typically excluded from standard homeowners policies, and FEMA's Standard Flood Insurance Policy does not cover retaining walls. Walls that fail from gradual deterioration or poor installation are generally excluded; review your policy directly with your insurer before assuming coverage.
What happens if you don't backfill a retaining wall correctly?
Improper backfill prevents the wall from distributing lateral soil pressure evenly, leading to uneven settlement, cracking at block joints, and progressive forward movement. Correct backfill uses free-draining material near the drain pipe, compacted in lifts — this is what transfers load to the structure and keeps it stable long-term.
What is the 1:3 rule for retaining walls?
The 1:3 rule states that a wall's buried footing depth should equal at least one-third of the total exposed height — so a three-foot visible wall needs at least one foot below grade. This is a general guideline, not a universal standard. Actual embedment requirements vary based on soil conditions, wall height, and surcharge loads.
Do retaining walls require permits in California?
Under California Building Code Section 105.2, walls exceeding four feet measured from the bottom of the footing (not the exposed face) require a permit and engineered drawings — and walls supporting surcharge lose the exemption regardless of height. Local jurisdictions in Los Angeles County and Ventura County often set stricter thresholds, so check with your building department before starting.
How long do retaining walls last?
Lifespan varies primarily by material and drainage quality. Concrete block and natural stone walls with proper drainage and maintenance can perform for 50 years or more. Timber walls typically require attention or replacement within 15 to 20 years as moisture and insects degrade the wood. Drainage quality is the greatest variable — a concrete wall with chronically blocked drains will fail far earlier than a stone wall that drains correctly after every storm.