A determined DIYer can handle a modest, flat patio. But if your yard has any significant slope — especially common across hillside neighborhoods in Los Angeles County and Ventura County — the project complexity rises fast. Expansive clay soils, grading requirements near foundations, and drainage discharge all need to be resolved before you break ground.
This guide covers the complete installation sequence, from site readiness through sealing, following ICPI industry standards for pedestrian concrete paver patios.
Key Takeaways
- Base preparation — excavation, compaction, and slope — determines whether your patio lasts or fails
- Target a 2% surface slope (roughly ¼" per foot) away from any structure
- Follow this order: excavate, compact base, screed sand, set edge restraints, lay pavers, compact, add joint sand, then seal
- Never substitute hand-tamping for a plate compactor on any patio over 50 sq ft
- Order all pavers from the same production batch and retain extras for future repairs
Before You Start: Prerequisites, Tools, and Materials
Successful paver installation begins before any digging. Two things must happen first:
- Call 811 — the national utility locate service. Hitting a gas or water line mid-excavation is expensive and dangerous. This call is non-negotiable.
- Assess existing drainage patterns — understand where water currently flows across and around your site, particularly relative to your home's foundation.
Site Readiness
Your site is ready when:
- All organic material (grass, roots, topsoil) can be removed from the planned footprint
- The perimeter is clearly defined
- You've confirmed the yard can support the necessary excavation depth
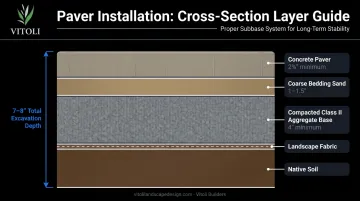
For standard pedestrian patio use, ICPI guidance specifies the following minimums for well-drained soils:
- Compacted aggregate base: 4 inches minimum
- Bedding sand: 1 to 1.5 inches
- Paver thickness: 2⅜ inches minimum
- Total excavation depth: roughly 7 to 8 inches for a typical residential patio
In Southern California, expansive and clay-heavy soils are common throughout LA County and Ventura County — Ventura County's GIS dataset maps over 1,700 expansive soil records classified Low, Medium, or High. Clay soils swell when wet and shrink when dry, which directly undermines any base built on top of them.
On these sites, increase base depth by 2 to 4 inches beyond the standard minimum.
Tools Required
Essential:
- Shovel and flat rake
- Plate compactor (rent one — more on this below)
- Screed pipes, 1" diameter
- Straight 2x4 (screed board)
- Rubber mallet
- String lines and stakes
- Line level
- Push broom
- Leaf blower
Helpful but optional:
- Speed square
- Mini level for individual paver checks
- Diamond masonry saw for perimeter cuts
Materials Required
- ☐ Concrete pavers — measure your square footage, order from one batch, keep extras
- ☐ Class II road base aggregate (crushed rock)
- ☐ Coarse bedding sand — not recycled concrete, not fine mason sand
- ☐ Landscape fabric/weed barrier
- ☐ Polyethylene edge restraints with landscape spikes
- ☐ Polymeric joint sand
- ☐ Concrete paver sealer
Using inferior base material — decomposed granite, fill dirt, or recycled concrete — is among the most common reasons paver patios fail within the first few years.
How to Install Concrete Patio Pavers: Step-by-Step
Each step in this sequence must be completed and verified before moving to the next. Errors compound. A base that's off by ½" becomes a drainage problem you'll spend a weekend trying to fix two years from now.
Step 1: Excavate and Grade the Site
Calculate your dig depth:
- Paver thickness (typically 2⅜") + 1" bedding sand + 4" compacted base = approximately 7½" total
Set up a string line grid across your planned patio perimeter using stakes driven into the ground at each corner. Pull lines taut and level them with a line level. Then adjust one side to create your target slope: 2% grade, or ¼" of drop per linear foot, moving away from the house.
On a 12-foot-wide patio, that means the far edge should sit 3 inches lower than the edge adjacent to the foundation. Mark this on your stakes before digging a single shovel-full.
If your yard slopes significantly, some areas will need fill added rather than soil removed. You cannot rely on existing ground contour — you're building a new, engineered surface. Uneven native terrain must be filled and compacted to a consistent grade.
Southern California note: California building guidance requires ground adjacent to foundations to slope away at no less than 5% for 10 feet. Impervious surfaces like patios near structures should slope at least 2%. Coordinate your patio grade with these requirements, not just the paver drainage standard.
Step 2: Compact the Base and Install Bedding Sand
Fill the excavated area with Class II road base aggregate. Compact in lifts — 4 to 6 inches at a time — using a plate compactor. ICPI specifications call for 98% standard Proctor density per ASTM D698 for pedestrian applications.
That means multiple compactor passes until the surface doesn't deflect underfoot and matches your slope guide strings.
On the plate compactor: Home Depot rents a 20" vibratory plate compactor for around $105/day. That rental fee is a fraction of what it costs to reset a patio that settled unevenly because someone hand-tamped the base. Hand-tamping is not an equivalent method — do not treat it as one.
Once your base is compacted and graded, screed 1 inch of coarse bedding sand:
- Lay two 1"-diameter screed pipes parallel across the compacted base, 4 to 6 feet apart
- Spread sand between and around them
- Pull your 2x4 across both pipes in one smooth pass to create a flat, even 1" sand layer
- Remove pipes carefully, fill the channels with sand, and smooth gently
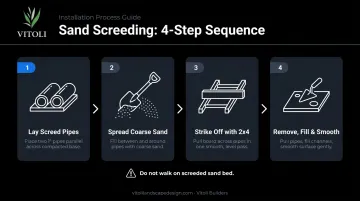
Critical: Once the sand bed is screeded, do not walk on it. Any footprint in the sand creates a low spot under a paver.
Step 3: Install Edge Restraints and Lay the Pavers
With your base and sand bed set, the next step is locking in the perimeter before a single paver goes down. Edge restraints keep your patio from spreading laterally over time — which is exactly what happens when sand-set pavers have nothing to push against. Spike polyethylene restraints into the base material around the entire perimeter every 6 to 12 inches. Your house foundation counts as one side's restraint if the patio abuts it directly.
Laying pavers:
- Start from a confirmed 90° corner or a string-guided line — not a wall, since walls aren't always square
- Place each paver flat onto the sand; do not tilt or slide it into position
- Work forward, away from yourself, without stepping on already-set areas
- Use the pavers' built-in spacers to maintain consistent joint width
- Check alignment with a string line every 3 to 4 rows
- Cut perimeter pavers with a diamond masonry saw — a circular saw with a masonry blade will work but produces rougher cuts
Step 4: Compact and Fill Joints
Once all pavers are placed, spread a thin layer of dry sand over the surface and make a first pass with the plate compactor. Use a rubber pad attachment on the compactor plate to avoid chipping paver faces. This initial pass seats pavers into the bedding sand and begins joint interlock.
Then apply polymeric joint sand:
- Pour polymeric sand across the paver surface
- Work it into joints thoroughly with a push broom — multiple passes, multiple directions
- Compact again
- Repeat until joints are filled to approximately ⅛" below the paver surface
- Blow all excess sand off paver faces with a leaf blower — this step matters
- Apply water per the manufacturer's activation instructions (Alliance Gator Maxx, for example, requires showering 100 sq ft sections for 2 to 3 minutes, repeated 3 times)
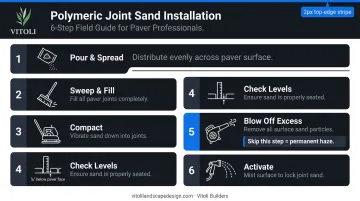
Do not skip the leaf blower step. Any polymeric sand residue left on paver faces will haze permanently once activated. Once it hazes, it does not come off easily.
Post-Installation Checks and Finishing Touches
Before calling the project done, run through these checks:
- Walk the entire surface — every paver should be stable underfoot with no rocking
- Run water across the patio — confirm it moves away from the structure without collecting in low spots
- Inspect edge restraints — all spikes should be fully driven, no gaps in the restraint sections
Sealing: Wait at least 72 hours after polymeric sand activation before applying sealer — Alliance Gator's guidance for their products. If you're using a film-forming sealer from Belgard or a similar manufacturer, check their specific wait time; some recommend up to 30 days to avoid trapping moisture. Apply sealer per the product label.
Sealing isn't mandatory, but in Southern California's intense sun, it meaningfully extends color life. Belgard's guidance notes that intense sunlight is a primary cause of paver fading, particularly for unsealed pavers. A sealed surface also resists staining and makes future cleaning easier.
Perimeter finishing: Once sealing is sorted, close out the perimeter. Backfill alongside edge restraints with soil, sod, gravel, or decomposed granite. Leaving edge restraints exposed creates a trip hazard and looks unfinished.
Common Paver Installation Problems and How to Fix Them
Even a carefully executed installation can run into problems. Here are the three most common issues — and how to correct them without starting over.
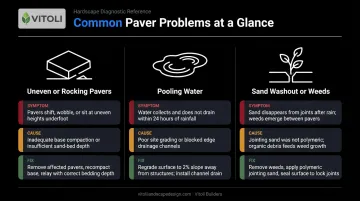
Uneven or Rocking Pavers After Installation
Symptom: A paver rocks underfoot or sits visibly higher than its neighbors.
Cause: Sand bed was disturbed before or during paver placement, or the base wasn't fully compacted in that area.
Fix: Remove the affected paver(s). Use a trowel to re-level the sand underneath — do not simply tap a high paver down. Compressing sand unevenly in one spot creates an adjacent low spot. Re-set the paver and check with a level.
Pooling Water on the Patio Surface
Symptom: Water collects in specific areas rather than draining off the edge.
Cause: Insufficient or inconsistent slope during base grading — often caused by skipping or rushing the string-line grade setup.
Fix: For minor pooling, check that edge restraints aren't blocking runoff. For significant pooling, lift the affected section, re-grade the base, and reset. Drainage problems originate in the base — no surface adjustment will resolve them.
Joint Sand Washing Out or Weeds Growing in Joints
Symptom: Sand erodes after rain, or weed growth appears between pavers.
Cause: Regular sand was used instead of polymeric joint sand, or polymeric sand wasn't properly activated.
Fix: Clear old joint sand with a leaf blower. Refill with fresh polymeric joint sand and activate correctly. Plan for dry weather — polymeric sand requires at least 24 rain-free hours before and after activation.
Most installation problems trace back to one of these three root causes: an unstable base, improper grading, or the wrong joint sand. Catching them early — or better yet, preventing them — saves significant time and material cost.
Pro Tips for a Professional-Quality Result
Order all pavers at once from the same production batch. Color and dimension can vary between batches — Pavestone explicitly states color matching is not guaranteed across production runs. If you need more pavers mid-project, a noticeable mismatch across the finished surface is difficult to correct.
On any sloped yard, establish your grade before excavating. The string line grid isn't a suggestion: it's how you verify slope before removing any soil. On sloped lots across LA and Ventura County, a misjudged grade can turn a simple patio into a drainage or erosion problem fast. For complex hillside terrain, a contractor like Vitoli Builders — with over 20 years of Southern California hillside construction experience — can engineer the base for the specific site rather than approximate it.
Schedule polymeric sand application on a dry day with a clear 24-hour forecast. Premature rain activates the sand before joints are fully filled, causing surface haze and incomplete joint hardening.
Rent the plate compactor. For any patio over 50 square feet, the daily rental cost (around $105 at Home Depot) is negligible compared to the labor involved in resetting a patio that settled unevenly from insufficient compaction.
Frequently Asked Questions
What is the average cost to install a paver patio?
Professional concrete paver patio installation typically runs $8 to $15 per square foot, with general paver work ranging up to $25 per sq ft depending on materials and site complexity. DIY costs are primarily materials — concrete pavers average around $2.60 to $6 per sq ft, plus base aggregate and sand at roughly $1 per sq ft. Sloped terrain, difficult access, or clay soil conditions add cost to either approach.
What do you put down before you put pavers down?
The correct layered system is: native soil → optional landscape fabric → compacted Class II road base aggregate (4" minimum for pedestrian use) → 1" of screeded coarse bedding sand → pavers. Skipping the compacted base and placing pavers directly on sand over native soil is one of the most common and consequential DIY mistakes.
How deep do I need to excavate for a paver patio?
Total dig depth equals paver thickness plus bedding sand plus compacted base. For a pedestrian patio with standard 2⅜" pavers, that's roughly 7 to 7½ inches total. In clay or weak soils, add 2 to 4 more inches to the base depth, pushing total excavation to 9–10 inches.
Do concrete patio pavers need to be sealed?
Sealing isn't strictly required, but it's strongly recommended — particularly in Southern California where intense sun accelerates color fading. Sealer also protects against staining and slows joint erosion. Apply after polymeric sand has fully cured; wait at least 72 hours, or per your sealer manufacturer's instructions.
Can concrete patio pavers be installed on a sloped yard?
Yes, but the slope must be carefully managed. The target drainage grade is 2% (¼" per foot). Steeper existing slopes require more complex base grading and may need retaining features to create a level patio platform. For hillside properties — especially in areas like the Santa Monica Mountains, Calabasas, or the Conejo Valley — professional assessment before excavation is advisable.
How long does a concrete paver patio last?
With proper base prep and drainage, concrete paver patios routinely last 25–30+ years. Longevity depends most heavily on base preparation quality, drainage, and periodic maintenance — re-sanding joints as needed and resealing every 3 to 5 years per Belgard's maintenance guidance. A poor base or inadequate drainage will surface problems within a few years, regardless of paver quality.