Introduction
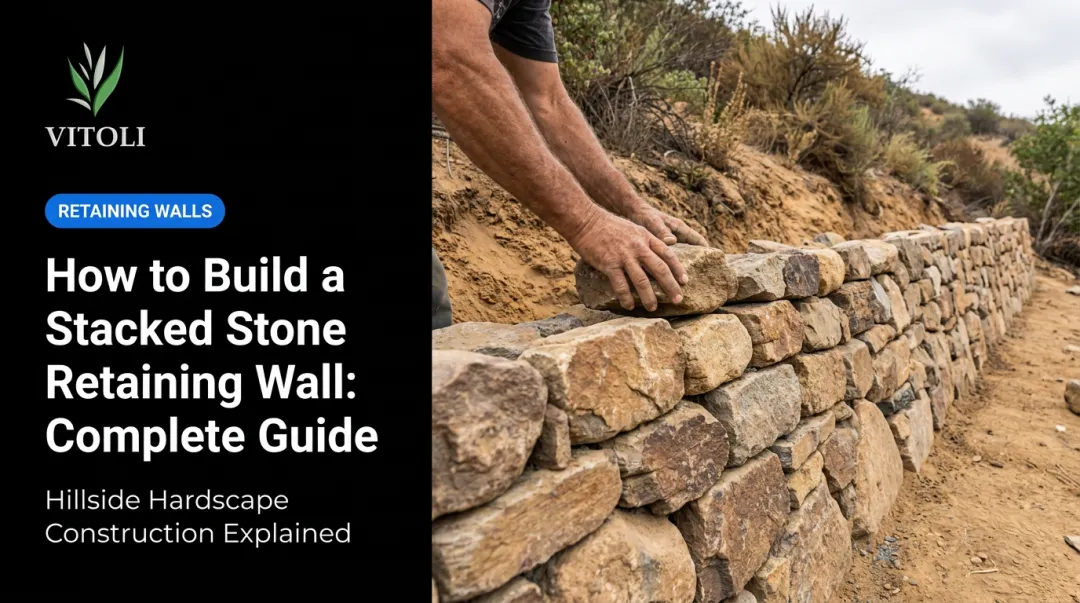
A stepped garden wall is a series of shorter tiered walls built in a staircase pattern down a slope. Rather than fighting gravity with one tall structure, you distribute the grade change across multiple lower walls — each one more manageable to build and easier to engineer correctly.
The concept is simple. Getting it right is harder than most people expect.
Long-term performance depends on four variables:
- Accurate tier setback calculations
- Sufficient foundation depth for each wall
- Proper drainage installed behind every tier
- Stable soil conditions capable of supporting the load
Many stepped walls that look fine after construction fail within two to three winters. The cause is almost always drainage problems or inadequate compaction — issues no amount of careful block-laying can fix after the fact.
This guide walks through the full build sequence — from site assessment and foundation prep to drainage, block placement, and the mistakes most likely to cost you the wall within a few years.
Key Takeaways
- Each tier should not exceed 3 feet of exposed height for non-engineered DIY builds.
- Tiers must be separated by at least twice the height of the lower wall (the 2:1 setback rule).
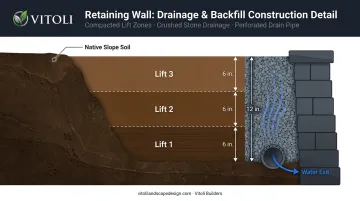
- Install a 12-inch drainage stone zone plus a perforated drain pipe behind each wall to prevent hydrostatic pressure buildup.
- Walls over 4 feet from footing bottom to top typically require a building permit in California — confirm requirements with your local building department before starting.
- On unstable hillside terrain, get a professional site assessment before breaking ground.
What You Need Before Building a Stepped Garden Wall
Preparation accounts for more wall failures than poor construction technique. A wall built on the right foundation with proper drainage will outlast a prettier wall built on unassessed ground.
Tools and Materials
Core tools you'll need:
- Mason's line and stakes for tier layout
- Spirit level (check both directions, every course)
- Rubber mallet and tamping bar or plate compactor
- Spade, pickaxe, and wheelbarrow
- Safety gloves and eye protection
Material considerations:
- Segmental retaining wall blocks (concrete interlocking blocks from manufacturers like Allan Block, VERSA-LOK, or Belgard) are the most forgiving for DIY — consistent sizing, engineered setback data, and clear installation specs
- Natural stone and timber are viable but require more skill; timber has a shorter lifespan in ground contact
- Whatever you choose must be rated for ground-contact and load-bearing applications — not decorative landscape edging
Site Assessment and Permits
Before any digging:
- Measure the total slope drop to determine how many tiers you'll need
- Identify soil type — clay-heavy soils hold water and increase lateral pressure on walls significantly
- Call 811 (California DigAlert) at least two working days before excavation — this is a legal requirement in California, not a suggestion
California permit requirements: The statewide threshold under the 2022 California Residential Code Section R105.2 is walls not over 4 feet measured from the bottom of the footing to the top of the wall — unless supporting surcharge. Note: that's footing bottom, not ground surface.
| Jurisdiction | Key Rule |
|---|---|
| Statewide (CRC/CBC) | 4 ft from footing bottom; surcharge triggers permit below that |
| City of Los Angeles (LADBS) | Grading permit required for any grading in hillside grading areas |
| Ventura County | Grading permit if elevation changes more than 1 ft or 50+ cubic yards moved |
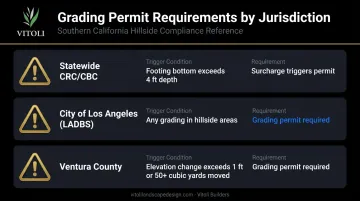
Always verify with your local building department before starting. In LA and Ventura Counties, hillside properties frequently require grading permits, soil reports, and sometimes a structural engineer's stamp — even for walls that appear modest in height.
For hillside properties with complex terrain or proximity to structures, Vitoli Builders — a hillside specialist with over 20 years of experience serving Los Angeles and Ventura Counties — offers professional site assessments to identify subsurface risks before any work begins.
How to Build a Stepped Garden Wall: Step-by-Step
The sequence below assumes segmental retaining wall blocks — the most forgiving system for DIY. The same principles apply to natural stone and timber, with minor adjustments.
Step 1: Plan and Mark Your Tiered Layout
Using stakes and mason's line, mark the horizontal line of each wall tier across the slope.
Tier spacing calculation:
- A widely referenced rule of thumb: the setback between tiers should be at least twice the exposed height of the lower wall (2:1 horizontal:vertical ratio)
- VERSA-LOK's Tiered Walls technical bulletin confirms that when this distance is less than 2:1, the lower wall must be designed to carry additional load from the upper wall
- Always follow the specific setback specifications for your chosen block system — manufacturer specs take precedence over generic rules
Tier count:
- Each individual tier should be no taller than 3 feet of exposed height for non-engineered DIY builds
- If your total slope requires walls taller than this, consult a structural engineer before proceeding
Step 2: Excavate and Prepare the Foundation Trench
Start with the lowest (first) wall.
Foundation trench specs (per Allan Block's residential installation manual):
- Depth: 6 inches plus 1 inch for every foot of wall height
- Add at least 6 inches of compacted crushed gravel (wall rock) to the trench base
- Check level in both directions before placing any block — errors here compound upward
- VERSA-LOK specifies a leveling pad at least 6 inches thick and 24 inches wide — follow your chosen manufacturer's spec, not a generic number
Step 3: Build and Level the First Wall Tier
- Lay the first course in the trench, checking level constantly
- Build courses upward with a slight backward batter (approximately 1 inch of lean per foot of wall height for segmental blocks) to counteract soil pressure
- Stagger vertical joints between courses for interlocking strength
- Use a torpedo level on every block in the first course; a half-inch error at the base becomes a visible lean by the third or fourth row
Step 4: Backfill, Compact, and Install Drainage
Note: drainage installation happens as the wall rises, not after it's complete. Start placing gravel and pipe at the base before building upper courses.
Proper drainage is what separates a wall that holds for decades from one that shifts within a few seasons.
Drainage zone:
- Place a minimum 12-inch-wide column of clean crushed stone (not native soil) directly against the back face of the wall — this is consistent across Allan Block, VERSA-LOK, and Belgard specifications
- Install a perforated drain pipe (minimum 4-inch diameter) at the base of the gravel zone where heavy water flow is expected — pipe should exit at wall ends or through weep holes
Backfill compaction:
- Fill remaining space with soil in 6-inch lifts maximum, compacting each lift before adding the next
- Never dump a full load of fill at once — uncompacted backfill is a primary cause of wall movement and failure
Step 5: Build Each Subsequent Tier and Finish
With the first tier complete and properly drained, work upslope one tier at a time using the same process.
- Repeat Steps 2–4 for each tier, moving up the slope
- The base of each upper wall should sit on compacted fill at the correct setback distance from the top of the wall below
- Once all tiers are complete, cap the top course of each wall with capstones or flush-set finish blocks
- Finish terraced zones between tiers with topsoil and ground cover plants, decomposed granite, or gravel — in hillside settings, low-water erosion-control plantings are worth prioritizing over bare soil
Key Variables That Affect the Result
Even a correctly executed build can fail if these four variables aren't controlled throughout.
Tier Height
Lateral soil pressure doesn't increase linearly with wall height — it follows a height-squared relationship. As Caltrans' Earth Pressure Theory chapter shows, the resultant lateral load equation includes an H² term: P = ½ × K × γ × H². A wall at 4 feet tall doesn't face twice the force of a 2-foot wall — it faces roughly four times as much.
Keep each tier to 3 feet of exposed height maximum for non-engineered DIY builds. In seismically active Southern California, anything taller should involve a structural engineer.
Setback Distance Between Tiers
Insufficient setback means the upper wall's load zone overlaps with the lower wall's, forcing the lower wall to carry more weight than it was built for. The 2:1 minimum (setback at least double the height of the lower wall) is the threshold where most manufacturers allow tiers to be treated as independent structures. Below that ratio, additional engineering is required.
Drainage Quality
Poor drainage is the most common reason retaining walls collapse after heavy rain. Water accumulating behind a wall creates hydrostatic pressure — a force that compounds quickly and has no visible warning signs until the wall moves.
The 12-inch drainage stone zone and perforated pipe described in Step 4 are required by every major SRW manufacturer (Allan Block, VERSA-LOK, Belgard). Southern California's seasonal rainfall patterns make this especially critical:
- Install drainage aggregate immediately behind the wall face, not just at the base
- Slope the perforated pipe at minimum 1% grade toward a daylight outlet
- Never allow native clay soil to contact the wall's back face directly
Foundation Depth and Compaction
No amount of careful above-ground work compensates for a foundation built on uncompacted or unstable ground. The NCMA's Segmental Retaining Walls Best Practices Guide specifies that reinforced soil and gravel fill must be compacted in lifts not exceeding 8 inches, and that foundation soils must meet geotechnical-report requirements.
In practice, skipping this step shows up fast: walls begin to tilt within the first rainy season, courses separate at the joints, and the base shifts laterally even under moderate loads. Getting compaction right at the start is cheaper than any repair later.
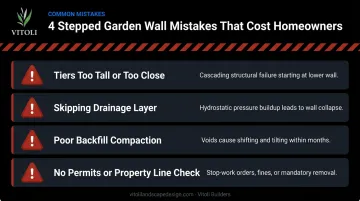
Common Mistakes When Building a Stepped Garden Wall
Most stepped wall failures trace back to a handful of preventable errors. Catching these before you break ground saves far more time and money than fixing them after.
- Tiers too tall or too close together. Exceeding 3 feet per tier, or crowding walls without adequate setback, transfers excessive lateral load between levels. That load transfer causes cascading structural failure, typically starting with the lower wall pushing outward.
- Skipping or undersizing the drainage layer. Placing native soil directly against the wall face — or omitting perforated drain pipe on high-flow slopes — lets hydrostatic pressure build unchecked. No wall material handles prolonged hydrostatic pressure without proper drainage relief behind it.
- Poor compaction between lifts. Dumping fill in a single large load leaves voids that consolidate under the first heavy rain. Walls begin shifting and tilting, often within months of completion.
- Starting without permits or property line verification. In California, grading and retaining wall work on sloped lots typically requires permits. Starting without them can trigger stop-work orders, fines, or mandatory removal of completed work. On Los Angeles hillside grading areas, this risk is especially high.
Frequently Asked Questions
How far apart should the tiers in a stepped garden wall be?
The minimum setback is generally at least twice the exposed height of the lower wall (2:1 horizontal:vertical). For a 2-foot wall below, that means at least 4 feet of horizontal distance before the upper wall begins. Always follow the specific setback specification for your chosen block system — manufacturer specs take precedence.
Do I need a permit to build a stepped garden wall in California?
Under the California Residential Code, retaining walls not over 4 feet (measured from the bottom of the footing) are typically exempt from a building permit unless supporting surcharge. However, hillside properties in LA and Ventura Counties often trigger grading permits for much smaller grade changes. Verify with your local building department before starting anything.
What is the best material for a stepped garden wall?
Segmental retaining wall blocks are the most forgiving for DIY — consistent sizing, interlocking design, and manufacturer-provided engineering data make them the most predictable system to work with. Natural stone requires more skill to achieve a stable batter; timber is viable but has a shorter ground-contact lifespan.
How tall can each tier of a stepped garden wall be?
For non-engineered DIY builds, each individual tier should not exceed 3 feet of exposed height. Some segmental block manufacturers apply this same threshold even more conservatively. Any wall above this height requires structural engineering review in most California jurisdictions.
Can I build a stepped garden wall without installing drainage?
No — omitting drainage is one of the most common and costly mistakes on any retaining wall project. Hydrostatic pressure from water pooling behind the wall is a leading cause of structural failure, particularly after heavy rain. A 12-inch crushed stone drainage zone and perforated pipe are required by every major block manufacturer.
When should I hire a professional instead of building it myself?
Hire a professional when total slope height exceeds 4–5 feet, when the site is on unstable hillside terrain, when walls are near structures or property lines, or when local code requires engineered drawings. In Southern California, Vitoli Builders specializes in these exact situations, including navigating LADBS and Ventura County permit requirements.