This guide covers everything you need to build or commission a terrace wall that lasts: how to plan your layout, compare materials, get the drainage right, follow California's permit rules, and decide whether to pick up a shovel yourself or call a licensed specialist.
Key Takeaways
- Terrace walls create flat, usable tiers from sloped land — addressing erosion and outdoor living in one system
- Material choice drives both aesthetics and structural longevity — timber and railroad ties are not recommended for hillside use
- Walls over 4 feet trigger California building permit requirements — and local surcharge or seismic conditions can lower that threshold further
- Drainage and footing preparation are the two most common failure points in DIY and professional walls alike
- Multi-tiered or steep hillside installations warrant professional engineering input from the start
What Is a Garden Terrace Wall?
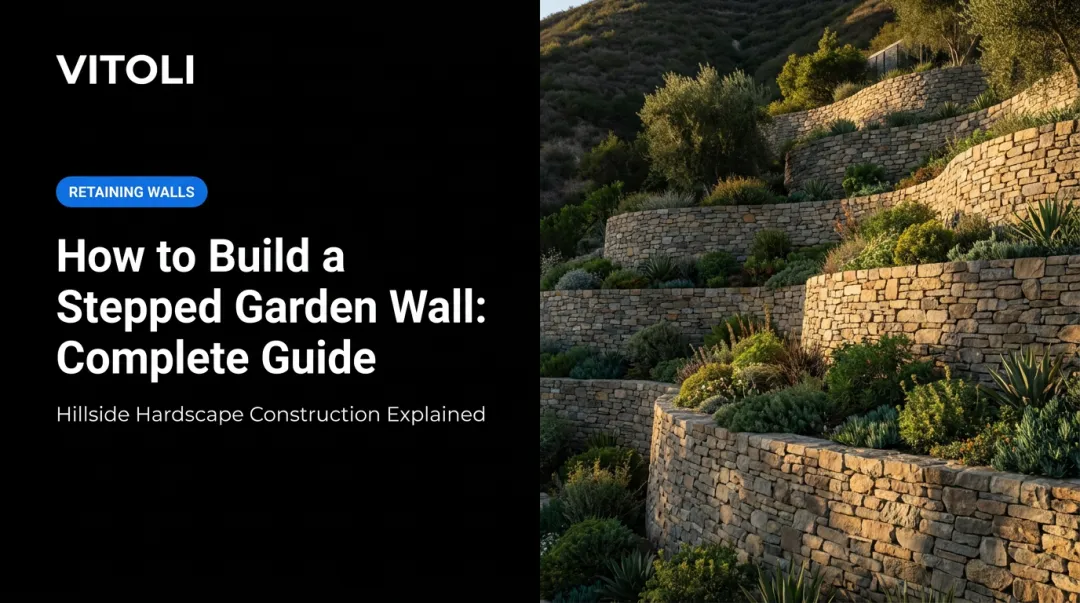
A garden terrace wall is a retaining structure — or more accurately, a system of retaining structures — built across a slope to create a series of level, step-like platforms. Per the Concrete Masonry and Hardscapes Association (CMHA), a terraced or tiered retaining wall consists of two or more walls where the upper wall is set back from the lower wall, with each tier holding back its own section of earth.
This distinguishes terrace walls from two things people often confuse them with:
- Decorative garden borders — low edging walls with no structural soil-retention function
- Single standalone retaining walls — one tall wall doing all the work, rather than a distributed tiered system
A terrace wall system turns sloped, unusable land into flat, functional space — while also controlling water runoff and stopping soil erosion in the process. For hillside properties in places like Calabasas, Malibu, and Westlake Village, where significant grade changes are the norm, it's one of the highest-impact improvements available to a homeowner.
These structures go by several names — terraced retaining wall, garden terrace wall, tiered garden wall, tiered planter wall. The label reflects the primary use: "garden wall" for aesthetic-forward applications, "retaining wall" when the structural function takes priority.
Planning Your Garden Terrace Wall: Design, Layout, and Materials
Slope Assessment and Tier Layout
Start by measuring your slope's total elevation change and horizontal run. That tells you how many tiers you'll need and what height each wall should be. The goal is to divide the total height across several shorter walls rather than building one tall one — shorter walls are structurally simpler, easier to drain, and far easier to build correctly.
The "2H" spacing rule governs how tiers relate to each other structurally. According to both CMHA and Allan Block, tiers function as independent structures only when the horizontal distance between wall faces is at least twice the height of the lower wall. When tiers are closer together, the upper wall adds surcharge load to the lower one — and the entire system must be treated structurally as a single, taller wall with a more demanding engineering design.
Layout basics:
- Run stakes and string along each contour line to mark tier positions
- Confirm each line is level across the slope before marking the next
- Sketch a top-down plan showing wall positions, platform widths, and intended use per tier
- Keep platforms wide enough for their purpose — narrow pockets work for plantings, but seating areas or pathways need meaningfully more depth
Once your tier layout is mapped, material choice follows directly from the site's structural demands and aesthetic goals.
Material Options
| Material | Structural Use | Key Considerations |
|---|---|---|
| Concrete segmental blocks (SRW) | Excellent — engineered for hillside performance | Consistent sizing, deepest standards support, best for taller reinforced walls |
| Natural stone | Good — dry-stack works well for smaller walls | Excellent drainage, organic look, no mortar needed; requires skill to lay well |
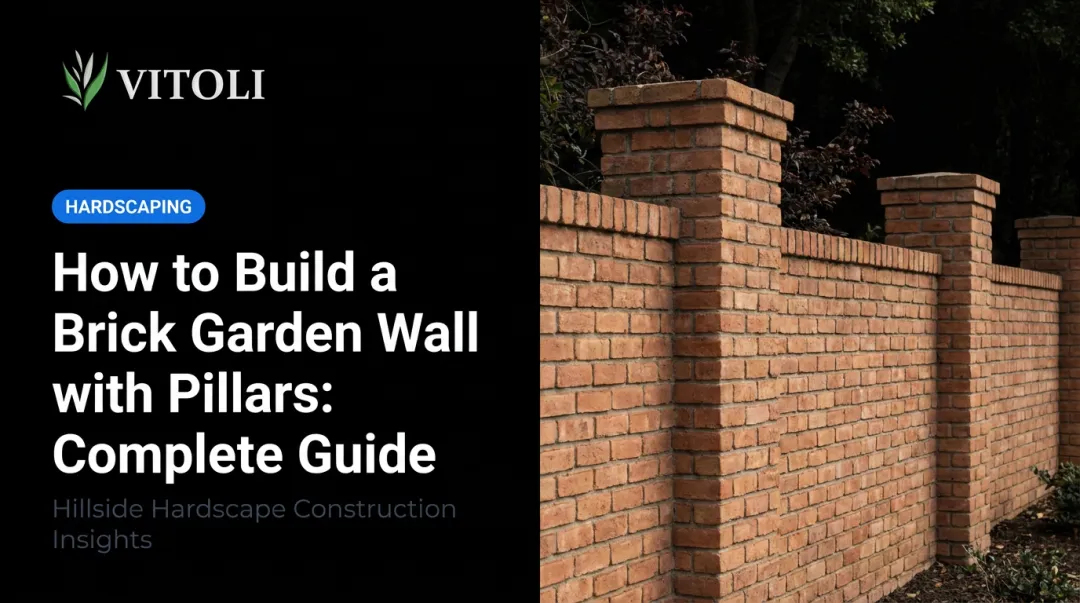
| Brick | Moderate — best with mortar | Classic aesthetic for formal garden styles; needs structural design for hillside use |
| Timber / railroad ties | Not recommended | LA County prohibits wood in retaining walls; EPA notes creosote is not approved for residential use |
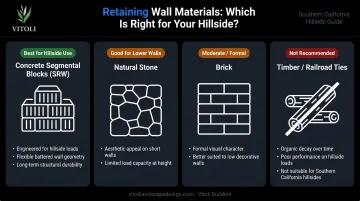
For Southern California hillside properties — clay-heavy soils, periodic atmospheric-river rain events, and seismic activity — concrete segmental retaining wall (SRW) blocks carry the most rigorous technical specifications for hillside use. Allan Block's guidelines call for units with 3,000 psi minimum compressive strength, directly addressing these load conditions.
Natural stone is a practical option for lower walls and purely decorative terrace pockets. Vitoli Builders works with concrete, masonry block, and natural stone across its hillside projects, selecting materials based on a site-specific soil and slope assessment.
Engineering Considerations for a Stable Terrace Wall
Drainage: The Non-Negotiable
The most common cause of terrace wall failure is hydrostatic pressure — water saturating the soil behind a wall with nowhere to go, until the wall buckles outward. Every terrace wall needs an active drainage system. Per NCMA Best Practices, the standard includes:
- 12 inches minimum of free-draining compactable gravel directly behind the wall units
- 4-inch minimum perforated or slotted PVC/HDPE drain pipe along the wall base, vented to daylight
- Filter fabric between native soil and gravel backfill to prevent fine soil migrating into the drainage layer
Allan Block additionally requires the drain pipe to vent to daylight every 50 feet and recommends it for any gravity wall over 4 feet tall. LA County's design manual independently requires fill behind retaining walls to be fully drained by subdrains, weep holes, or approved methods.
Vitoli Builders builds in all three drainage components — gravel backfill, perforated drain lines, and weep systems — as standard practice across their terrace wall projects, not as a finishing detail tacked on at the end.
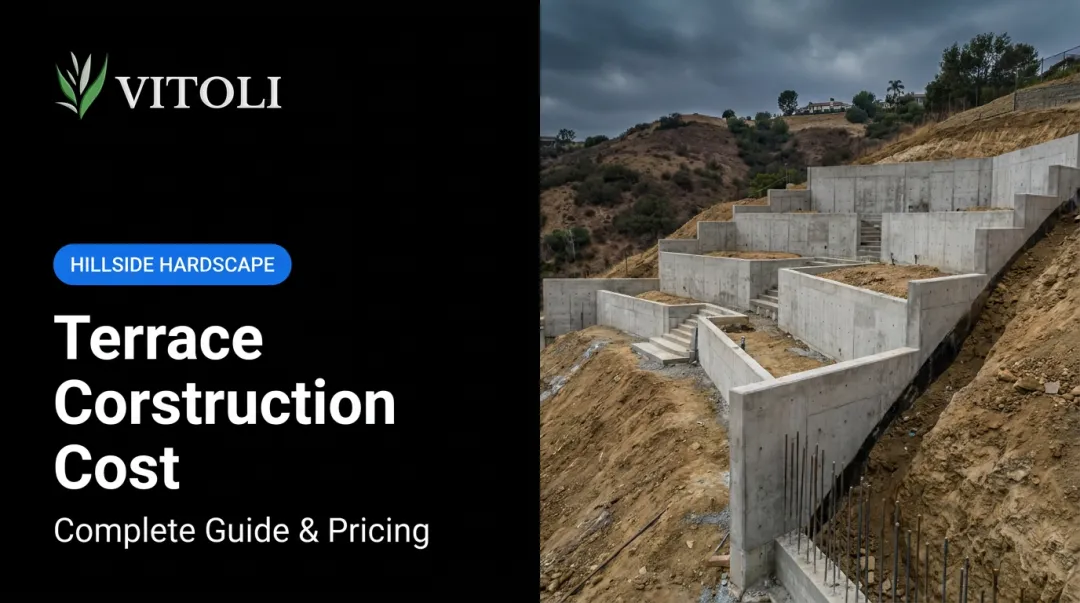
Footing Depth and Base Preparation
The base course must be buried below grade and set on a compacted gravel leveling pad. Specific benchmarks:
- NCMA: 6-inch minimum leveling pad, 6-inch minimum wall embedment
- Allan Block: 4-inch base depth for walls under 4 feet; 6-inch base for taller walls; at least one full course buried
- VERSA-LOK: Trench 24 inches wide, 6–18 inches deep depending on wall height
Failing to properly bury and level the base course is one of the most common DIY mistakes — every course above compounds the error. Southern California's frost-free climate eliminates freeze-thaw heave, but expansive clay soils and seismic zone requirements introduce their own demands: proper embedment depth, compacted base material, and in many cases, a geotechnical review before breaking ground.
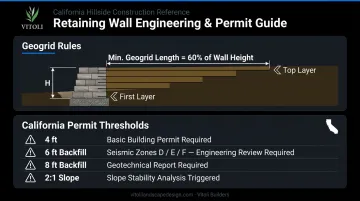
Geogrid Reinforcement and Height Thresholds
For taller walls or those that don't meet the 2H spacing rule, geogrid reinforcement is required. NCMA Best Practices specifies:
- Minimum geogrid length = 60% of total wall height, or 4 feet, whichever is greater
- First layer placed on the first or second course; top layer no deeper than 24 inches from the wall top
- Geogrid must not extend beyond adjacent property lines
California permit thresholds to know:
- 2025 California Building Code Section 105.2 exempts retaining walls not over 4 feet (measured from bottom of footing to top of wall) — but only when they don't support surcharge loads
- Walls supporting more than 6 feet of backfill in Seismic Design Categories D, E, or F require dynamic seismic lateral earth pressure analysis
- LA County requires a geotechnical investigation for walls with backfill heights over 8 feet, or walls supporting slopes steeper than 2:1
- Ventura County follows similar triggers but applies them independently — confirm permit thresholds with your local building department before finalizing wall height or design
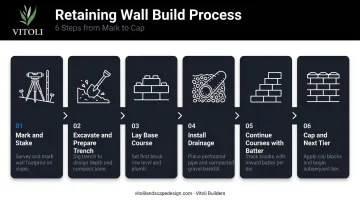
How to Build a Garden Terrace Wall: Step-by-Step
Step 1 — Mark and stake. Use an A-frame level or laser level to establish contour lines at each tier position. Any error in the base course compounds through every course above it, so get this right before you dig.
Step 2 — Excavate and prepare the trench. Dig to the required embedment depth, remove loose material, and compact the subgrade. Add a 4–6 inch layer of crushed gravel and compact it before placing any stone or block. As you prepare the trench, plan for batter — a slight inward lean of the wall face toward the hillside that counteracts outward soil pressure as the wall rises.
Step 3 — Lay the base course. For natural stone, select the largest, flattest pieces for the foundation row. For segmental blocks, follow manufacturer embedment specs. Offset joints like brickwork — staggered seams distribute load and prevent vertical fault lines from forming through the wall. Fill voids behind face stones with smaller rubble.
Step 4 — Install drainage as you build. Don't wait until the wall is finished to address drainage — it has to be built in as you go:
- Backfill with gravel (not native soil) directly behind each course
- For walls taller than 2–3 feet or retaining clay soil, install perforated drain pipe along the base
- Place filter fabric at the interface between native soil and gravel backfill
Step 5 — Continue courses with batter. Step each course back slightly to maintain the batter angle. Heavier, flatter stones or blocks face outward; mass goes toward the hill. Check level frequently. For taller walls, insert geogrid layers at manufacturer-specified intervals — typically every 18–24 inches of height — to tie the wall back into the hillside.
Step 6 — Cap and move to the next tier. The top course should be flat, tight, and slightly larger to protect against water infiltration at the wall crown. Then move uphill and repeat from Step 1 for the next tier. Once all tiers are complete, finish grading, seed or plant the terraced beds, and establish drainage outlets before the first heavy rain season.
Finishing Touches: Planting and Landscaping
Plants serve a structural role on terrace walls beyond aesthetics: root systems stabilize soil between tiers and reduce surface erosion. For Southern California's climate, the California Native Plant Society recommends slope plants that control erosion, hold the hillside, tolerate drought, and account for fire risk.
Good candidates for terrace planting:
- Wall faces and pockets — trailing drought-tolerant ground covers like creeping thyme or ice plant
- Terrace platforms — native flowering plants, ornamental grasses, or low-maintenance succulents
- Upper tiers — small drought-tolerant shrubs that add structure without significant root pressure on walls
Beyond planting, wider terrace platforms open up possibilities most hillside homeowners don't initially consider:
- Paver pathways connecting tiers
- Raised garden beds for herbs or vegetables
- Seating walls created by capping the wall top with smooth flat stone
- Fire pit areas or small patios on the broadest, most level tier
Vitoli Builders' hillside terrace projects in communities like Calabasas and Hidden Hills show what's possible when these elements come together. Multi-tiered systems with integrated stone steps, succulents, seating areas, and water features can turn an eroded slope into a polished, fully functional outdoor living space.
Match wall material to your home's exterior where possible. Stucco or concrete walls can be finished in tones that complement the landscaping. Exterior lighting recessed into wall faces adds significant nighttime impact at a relatively low installation cost.
Should You DIY or Hire a Professional?
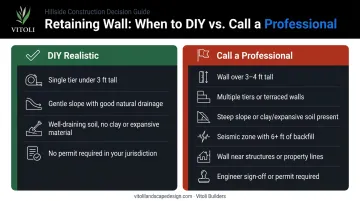
When DIY Is Realistic
A single-tier dry-stacked wall under 2–3 feet on gently sloping ground with good natural drainage can be a manageable DIY project — assuming no permit is required and the soil is stable. Tools needed: pickaxe or mattock, plate compactor or hand tamper, A-frame or line level, wheelbarrow, and significant time. Even a modest 20-foot wall involves hundreds of pounds of stone and gravel. Plan for a weekend minimum, and more likely two.
When to Call a Professional
Get professional help when any of the following apply:
- Wall height exceeds 3–4 feet or requires a permit
- The project involves multiple tiers or the 2H spacing rule cannot be met
- Terrain is steep, unstable, or has expansive clay soils
- The property is in a seismic zone with more than 6 feet of backfill
- Walls are near structures, property lines, or drainage infrastructure
- Local code requires an engineer's sign-off
Wall failures on hillside terrain aren't just expensive to fix — they can cause erosion events, damage foundations, or threaten neighboring properties. In LA County and Ventura County, where hillside conditions add seismic, soil, and drainage complexity, the cost of a professional who gets it right the first time is almost always less than the cost of repairing a failure.
Vitoli Builders brings over 20 years of experience to hillside projects across Los Angeles and Ventura Counties. Their in-house design and engineering team handles site evaluation, structural design, drainage integration, and code compliance under one roof.
Project Manager Oz Tzalalihin oversees every build with a focus on identifying cost-reduction opportunities early — before they become expensive corrections mid-construction. If your property involves any of the conditions above, a site evaluation is the right next step.
Frequently Asked Questions
What is a garden wall called?
Garden walls go by several names depending on function: decorative garden borders, retaining walls, terrace walls, or tiered garden walls. "Terraced retaining wall" is the most precise term when the structure retains soil across multiple tiers on a slope.
How deep should the foundation be for a garden terrace wall?
NCMA specifies a 6-inch minimum leveling pad and 6-inch minimum embedment depth; Allan Block requires 4 inches for walls under 4 feet and 6 inches for taller walls, with at least one full block course buried. Exact depth depends on wall height, soil conditions, and manufacturer specifications.
What is the best material for a garden terrace wall?
Concrete segmental retaining wall blocks and natural stone are the most widely supported options. SRW blocks offer consistent sizing and engineered performance for taller walls; natural stone provides excellent drainage and organic aesthetics for dry-stack construction and lower tiers.
Do I need a permit to build a retaining wall in California?
The 2025 CBC exempts walls not exceeding 4 feet (footing bottom to wall top) without surcharge loads — but hillside properties, walls near structures, or seismic backfill conditions can require permits below that height. Always confirm with your local building department in LA or Ventura County before starting.
How tall can a garden terrace wall be before I need an engineer?
In most California jurisdictions, walls over 4 feet require an engineer's review. For tiered systems, an engineer should evaluate the entire terraced system for global stability — not just each individual wall in isolation.
How do I prevent my terrace wall from collapsing?
Three factors matter most:
- Drainage: 12 inches of gravel backfill plus a perforated drain pipe to eliminate hydrostatic pressure
- Base course: buried, compacted, and set on a gravel leveling pad
- Batter: a slight inward lean toward the hillside for structural stability
Taller walls also require geogrid reinforcement with minimum length equal to 60% of wall height.