That said, outcomes vary significantly. A wall built on a weak base, without drainage, or past a safe height can fail spectacularly — usually after the first heavy rain. This guide covers every critical variable: base preparation, stone selection, drainage design, batter, and the point at which DIY becomes genuinely risky.
If you're in Los Angeles County or Ventura County, there's an added layer of complexity. Local permit thresholds, clay-heavy hillside soils, and seismic activity mean that what works elsewhere may not be enough here.
Key Takeaways
- A compacted gravel base — minimum 4–6 inches — is one of the most important factors in wall longevity
- Angular, flat-faced stone outperforms rounded fieldstone for structural retaining walls
- Every course should lean slightly backward (batter) to counteract soil pressure
- Dry-stacked walls should not exceed 3 feet without professional engineering review
- Trapped water behind the wall accelerates structural failure; drainage is not optional
What You Need Before Building a Stacked Stone Retaining Wall
Preparation determines performance. Rushing this phase is the single most avoidable reason walls fail.
Tools
- Flat spade or straight-edged shovel
- Mattock (for breaking compacted earth)
- Hand sledgehammer or rubber mallet
- Plate compactor (available at most equipment rental yards)
- 4- to 8-foot level and line level
- Stakes, string, and flour or marking paint for layout
Materials and Supplies
| Material | Purpose |
|---|---|
| Angular wall stone | Primary structure; calculate cubic feet: height × depth × length |
| Crushed gravel or traffic bond | Compacted base layer |
| ¾" clear chip drainage stone | Drainage backfill behind wall |
| 4" perforated drain tile | Water collection and redirection |
| Landscape filter fabric | Separates drainage stone from backfill soil |
| Landscape adhesive | Securing the capstone row |
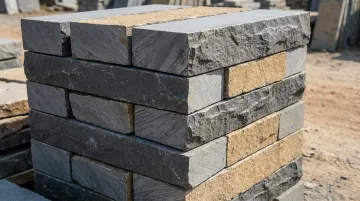
Visit a local stone yard before purchasing — angular stone with two parallel faces (slate, sandstone, basalt, quartzite) stacks far more securely than rounded river rock.
Site and Permit Considerations
Check local codes before breaking ground. Permit thresholds differ by jurisdiction:
- Los Angeles County: Walls under 4 feet are generally exempt (measured footing-to-top), but surcharge or slope conditions can trigger a permit at any height
- Ventura County (unincorporated): Walls under 3 feet are exempt, with the same surcharge exceptions applying
- City of Ventura: Walls under 4 feet are exempt, though a separate grading permit may still be required
Clay-heavy or sandy hillside soils may also require a soils engineer's assessment before construction begins. Southern California's geologically complex terrain — documented by USGS as landslide-prone and tectonically active — makes a soils assessment a sound investment before the first shovel breaks ground.
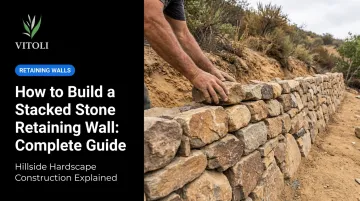
How to Build a Stacked Stone Retaining Wall
Step 1: Mark the Layout and Assess the Grade
Define the wall's front face using stakes and string. For curved walls, a garden hose works well as a flexible layout guide. Mark the line with flour or marking paint.
The most stable approach is cut-and-fill: cut into the slope and use the excavated soil to level the terrace behind the wall. This keeps the wall backed by undisturbed earth rather than loose fill.
Before digging, confirm your finished wall height falls within safe DIY limits. If it doesn't, stop here and consult a professional.
Step 2: Excavate the Trench and Compact the Base
The trench should be at least twice the width of your wall stone — Fine Gardening recommends at least 2 feet wide for a dry-stacked stone retaining wall. Depth should be enough to fully bury the base course below finished grade.
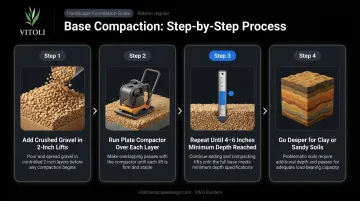
Base compaction process:
- Add crushed gravel in 2-inch lifts
- Run the plate compactor over each layer until it stops compressing
- Repeat until you reach a minimum 4–6 inches of compacted base depth
- In clay or sandy soils, go deeper — the ASLA identifies this hidden base as one of the most critical factors in dry-stacked wall construction
Step 3: Set the Base Course
The base course bears the load of every stone above it, so placement here affects the entire wall's long-term stability.
- Use the largest, flattest stones for this layer
- Fit them tightly; test each stone for wobble before moving on
- Stones should lie flat or pitch slightly inward — never outward
- Backfill behind the base course with rubble and soil, tamping firmly
Step 4: Build Subsequent Courses with Batter and Broken Joints
Every course above the base follows the same two principles:
Rule 1 — Break the joints. Stagger vertical seams so they never line up with the course below. Each stone should sit across the joint beneath it, distributing load laterally. The principle is the same as bricklaying: one-over-two, two-over-one.
Rule 2 — Build with batter. Set each course back toward the hillside to create a backward lean. Per Fine Gardening, 1 inch per vertical foot is the standard for tightly fitted dry-stone walls. Fieldstone walls — with less interlocking surface contact — often need 2–3 inches per foot according to ASLA.
Every 2–3 feet, place a tie-through stone that runs the full depth of the wall. This binds the front face to the backing fill and prevents the face from peeling away under soil pressure.
Step 5: Manage Drainage Behind the Wall
Install the 4-inch perforated drain tile along the base of the wall behind the first course. Pitch it slightly toward a safe outlet — a slope of around 0.5% works well if discharging to stormwater piping.
The full drainage system includes three layers working together:
- Clear chip drainage stone surrounding the pipe
- Landscape filter fabric separating the drainage stone from backfill soil
- Compacted backfill above the fabric layer
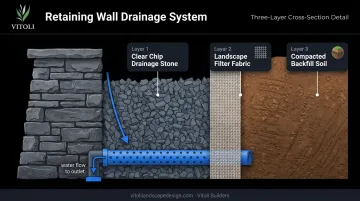
Hydrostatic pressure from trapped water is the primary cause of retaining wall blowout — especially on clay hillsides where water has nowhere to go. Skipping drainage on clay-heavy terrain is the single most common reason dry-stacked walls fail within a few seasons.
Step 6: Lay the Capstone and Finish the Wall
With drainage and backfill complete, the final step is locking in the top course. Capstones should be wide, flat stones that span the joints of the course below. Apply landscape adhesive beneath the capstone layer for added security.
Height guidelines for dry-stacked walls:
- 18–24 inches: Ideal finished height; doubles as casual seating
- 3 feet: Maximum recommended height without engineered support
- Above 3 feet: Moves beyond standard DIY scope — professional assessment required
Key Variables That Determine Wall Strength and Longevity
Stone type matters, but it's rarely why walls fail. Most premature failures trace back to the same four variables — regardless of material.
Wall Batter
Batter isn't cosmetic — it lowers the wall's center of gravity and redirects its weight into the slope. A wall built perfectly plumb will tip forward over time under sustained soil pressure.
- Tightly fitted cut-stone walls: 1–2 inches of batter per vertical foot
- Fieldstone walls: 2–3 inches per foot (less interlocking contact means more lean is needed)
Joint Integrity
Running joints — where seams line up vertically from one course to the next — create a structural fault line that concentrates load. The one-over-two rule distributes that load laterally across the wall face instead of channeling it downward.
Drainage Design
Even dry-stacked walls with natural gaps can be overwhelmed by high-volume water events. On hillside properties where water collects and channels, an engineered drainage solution (drain tile, clear chip backfill, filter fabric) is essential — not a nice-to-have.
Stone Quality and Fit
Angular, flat-faced stone creates more surface contact and better interlocking. Rounded river rock acts more like ball bearings, relying almost entirely on weight for stability with little interlocking benefit.
Before committing to a material, visit a stone yard and test how pieces stack together. Good candidates include:
- Slate and sandstone — flat faces, easy to course
- Basalt and quartzite — dense, angular, excellent contact
- Avoid smooth river rock for load-bearing walls; reserve it for decorative applications
Common Mistakes When Building Stacked Stone Retaining Walls
Even well-placed stone can't save a wall built on a weak foundation. These are the mistakes that cause stacked stone walls to fail.
Skipping or under-compacting the base. No amount of careful stone placement compensates for a weak footing. Soil settlement under the wall is irreversible without dismantling the structure. Add gravel in lifts and compact each one fully before adding the next.
Building past 3 feet without engineering support. Lateral soil pressure increases exponentially with wall height, not proportionally. California hillside properties often carry surcharge loads from structures or slopes above the wall, which compounds this risk significantly.
Ignoring drainage. Even a wall that looks solid can fail when water infiltrates the backfill. Watch for these warning signs:
- Bowing or bulging face stones
- White mineral deposits (efflorescence) on the wall surface
- Base of the wall pushing outward
Using rounded stone without tie-throughs. Rounded stone has minimal contact surface and relies entirely on weight for stability. Without tie-through stones binding the wall's depth, the face can gradually peel away from the backing fill, often with little visible warning before it separates.
When to DIY vs. Hire a Professional
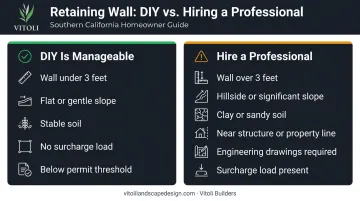
DIY Is Manageable When:
- Wall height is under 3 feet
- Ground is relatively flat or gently sloping
- Soil is stable (not clay-dominant or sandy)
- No surcharge load above the wall (no structures, no steep slope above)
- The project falls below the local permit threshold
With the right tools, patience, and a commitment to proper base prep and drainage, an experienced homeowner can build a solid, lasting wall under these conditions.
Once any of those conditions change, though, the risk profile shifts considerably.
Hire a Professional When:
- Wall exceeds 3 feet in height
- The site is a hillside or significant slope
- Soil is clay-heavy or sandy (both common on Southern California hillsides)
- The wall is near a structure or property line
- Local jurisdiction requires stamped engineering drawings
- There's any surcharge load above the wall
For hillside properties in Los Angeles and Ventura County, soil variability, seismic activity, and local permit requirements add layers of complexity that go well beyond standard wall construction. Vitoli Builders specializes in exactly these conditions — with over 20 years of experience, an in-house design and engineering team, and site-specific evaluation built into every project. They can determine upfront whether your wall requires a permit, a licensed engineer, or both.
Frequently Asked Questions
How much does a stacked stone retaining wall cost?
Professionally installed stone retaining walls typically run between $20 and $340 per linear foot for 2–4 foot walls, depending on stone type, wall height, drainage requirements, and site access. DIY material costs are lower but don't account for tool rental, base material, or drainage components.
What is the 1:3 rule for retaining walls?
The 1:3 rule is a general guideline suggesting that a wall's buried base depth should be roughly one-third of its total exposed height — so a 3-foot wall needs about a 1-foot foundation depth. This isn't a universal engineering standard, but it reflects the principle that deeper footings resist overturning more effectively.
Are stacked stone retaining walls still popular?
Dry-stacked stone remains a popular choice for its natural aesthetics, drainage flexibility, and longevity. Southern California homeowners in particular favor it because it integrates well with hillside terrain and requires no mortar to manage water pressure behind the wall.
What is the maximum height for a dry-stacked stone retaining wall?
The generally recommended DIY maximum is 3 feet. Above this height, lateral soil forces typically require engineered reinforcement. Professional assessment or a permitted design is strongly advised for anything taller.
Do I need a permit to build a retaining wall in California?
Los Angeles County generally exempts walls 4 feet and under (measured from footing bottom to wall top); unincorporated Ventura County sets that threshold at 3 feet and under. Walls supporting a surcharge or sitting adjacent to a slope may require a permit at any height. Always confirm with your local building department before starting.
What type of stone is best for a stacked stone retaining wall?
Angular, flat-faced stone — slate, sandstone, basalt, or quartzite — is preferred over rounded river rock. It provides more surface contact, better interlocking between courses, and a tighter overall wall face. Locally sourced stone typically costs less and tends to complement the surrounding landscape more naturally.