The challenge is that this structure is actually two systems working in parallel. The pillars and the wall sections between them have different footing requirements, different coursing patterns, and different structural behaviors. Getting both right—and making them work together—is where most DIY projects either succeed or fall apart.
This guide walks through every stage, from layout and footing excavation through capping and joint finishing, with the variables that actually determine whether your wall stands straight in ten years or starts leaning in two.
Key Takeaways
- Build pillars before connecting wall sections—each pillar needs its own reinforced footing
- Most local building codes require a minimum footing depth of 18–24 inches for freestanding brick walls — verify with your county's building department
- Mortar joint consistency matters: a standard 10mm joint is the benchmark for uniform coursing
- Walls retaining soil need drainage built in: weep holes and gravel backfill prevent pressure buildup behind the wall
- In California, always call 811 before any excavation—it's legally required
- Any paid masonry work totaling $1,000 or more in California requires a licensed contractor
What You Need Before You Start: Planning, Tools & Materials
Planning and Permits
The layout and permit research phase shapes your wall's long-term performance more than any single construction step. A poorly planned footing or a wall built over an unmarked utility line creates problems that no amount of good bricklaying can fix.
Before breaking ground:
- Call 811. Under California Government Code 4216, calling 811 before any excavation is a legal requirement—covering grading, trenching, digging, and similar earth-moving work.
- Check local building codes. Under the 2022 California Building Code, retaining walls exceeding 4 feet (measured from the bottom of the footing to the top of the wall) require a permit. In Los Angeles County, masonry or concrete fences require a permit if they exceed 6 feet or aren't set back from public ways by at least the wall height.
- Run string lines to define the wall's exact footprint, confirm it's straight, and mark pillar positions.
Essential Tools
- Shovel and post hole digger
- Spirit level and line level with string
- Trowel, bolster chisel, jointing tool
- Rubber mallet and tape measure
- Safety gloves and goggles
Materials
- Bricks: Standard clay bricks (7-5/8 in. × 2-1/4 in. × 3-5/8 in.) or engineering bricks for exposed or damp locations; for coastal or high-moisture sites, look for bricks rated for severe weather exposure.
- Mortar: Pre-mixed Type N mortar or site-mixed sand and cement
- Concrete: Ready-mix for footings (standard 80 lb bags work well for residential footings)
- Reinforcement: ½ in. × 10 ft #4 rebar for pillar cores; wire mesh for wall courses
- Capstones: Sized to overhang pillar and wall faces on all sides (concrete wall caps from around $7.97 each)
How to Build a Brick Garden Wall with Pillars: Step-by-Step
Step 1: Mark the Layout and Excavate the Footings
Use stakes and string to mark pillar positions. Standard garden wall design spaces pillars every 6 to 8 feet along the run; use closer spacing for exposed sites or taller walls.
Excavation requirements:
- Pillar footings: Individual square holes, minimum 500mm (approximately 20 inches) deep per BDA guidance for freestanding brick walls, and at least 4 inches wider on each side than the pillar's finished footprint
- Wall section trench: At least as wide as the wall thickness, connecting pillar positions
Check the base of every trench for level before pouring. An unlevel footing cannot be corrected after concrete sets, and any deviation compounds with every course above it. Use a spirit level across a straight board laid in the trench.
Step 2: Pour the Concrete Footings
Pour concrete into both pillar holes and the connecting wall trench. Packed hardcore or gravel alone is not a substitute. Set vertical rebar into each pillar footing hole so it extends upward through the hollow pillar core.
Allow concrete to cure fully before laying any bricks. Check the manufacturer's guidance; fast-set concrete may allow work to resume in 24–48 hours, while standard concrete requires longer.
Dry-lay test: Once footings are cured, arrange the first course of bricks without mortar. Confirm spacing matches your string lines, identify any fit issues, and mark reference guidelines on the concrete before applying mortar.
Step 3: Build the Brick Pillars
A standard 2-brick-square pillar (approximately 13 inches × 13 inches with a mortar joint) creates a hollow core through which the vertical rebar runs. With your footings cured and rebar in place, you're ready to start building up.
Fill the core with concrete or grout as the pillar rises. Per BIA guidance, grout for reinforced brick masonry should comply with ASTM C476, be fluid enough to surround the steel reinforcement without voids, and can be placed in lifts up to 5 feet with consolidation. An unfilled core makes the rebar useless.
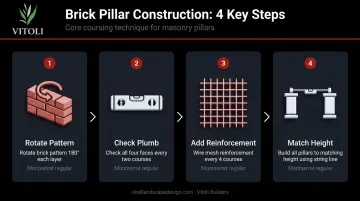
Coursing discipline:
- Rotate the brick pattern 180° each layer to interlock bricks and eliminate continuous vertical joints
- Check plumb on all four pillar faces with a spirit level after every two courses
- Add wire mesh reinforcement every 4 courses
- Build all pillars in a run to the same height before connecting wall sections; use a line level and taut string between finished pillars to confirm matching elevation
Step 4: Lay the Wall Sections Between Pillars
Once all pillars are built to matching height, the wall sections between them can go in.
A standard garden wall between pillars is half-brick thick, one brick wide, approximately 102.5mm (about 4.5 inches) per MPA Masonry standard dimensions.
Critical connection detail: The wall cannot simply butt against the pillar face without a mechanical tie. Use one of two approaches:
- Galvanized wall ties: Embed them in pillar mortar joints at regular intervals
- Toothed indentation cut into the pillar face so wall bricks interlock directly
For drainage, leave one vertical mortar joint unmortared in the base course of each wall section to create a weep hole. This matters especially where the wall retains soil; trapped water builds hydrostatic pressure that will eventually push the wall outward.
Maintain level horizontal courses across the full run using a taut string guide at each course height.
Step 5: Add Capstones and Finish the Joints
Cap each pillar with a single oversized coping stone, typically 3 inches wider on all sides than the pillar face, bedded in mortar. Cap wall sections with a continuous run of coping bricks or flat stones.
The overhang isn't decorative. It directs rainwater away from the wall face and reduces mortar erosion at the top of the wall over time.
Joint finishing: Once mortar has firmed to thumbprint-hard (Quikrete describes this as the correct point to tool joints), run a jointing tool along every horizontal and vertical joint to compress and profile the mortar. Brush the wall with a stiff masonry brush to remove crumbs before it fully cures.
Work in manageable sections. BIA notes mortar should be used within 2.5 hours of initial mixing (or 2 hours in hot weather).
Key Variables That Determine Wall Quality and Longevity
Three variables consistently separate walls that last decades from those that fail within a few years: mortar mix consistency, footing depth, and drainage. Getting any one of these wrong can undermine an otherwise well-built wall.
Mortar Mix Consistency
Mortar that's too wet reduces compressive strength and lets bricks slip during laying. Too dry, and it crumbles without bonding. The Quikrete Type N Mortar Mix has a minimum compressive strength of 750 psi per their data sheet; Type S reaches 1,800 psi for more demanding applications.
A simple field test: mortar should hold its shape when squeezed into a ball but not feel stiff or crumbly. BIA specifies that brickwork mortar comply with ASTM C270.
Footing Depth Relative to Wall Height
California Building Code and ACI 530 guidelines generally require footings to extend at least 12–18 inches below grade for freestanding garden walls, with greater depth required on sloped or clay-heavy ground. A soils report from a licensed geotechnical engineer can establish the correct depth for your specific site. Footing failure — too shallow, too narrow, or poured onto unprepared ground — is one of the most consistent causes of leaning or collapsing garden walls.
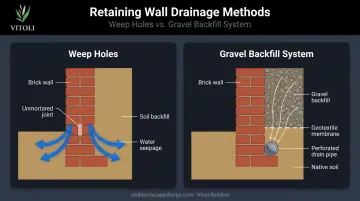
Drainage Behind the Wall
Any wall retaining soil is subject to hydrostatic pressure when water accumulates behind it. Two practical approaches:
- Weep holes at the base course — unmortared vertical joints that create a controlled seepage path
- Gravel backfill with perforated drain pipe behind the wall, with a geotextile membrane to prevent fine soil migration into the drainage layer (per NCMA Best Practices guidance)
Common Mistakes to Avoid
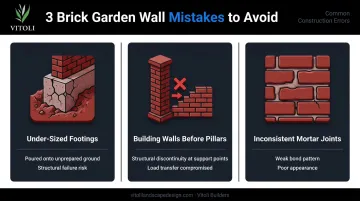
Most brick wall failures trace back to three preventable errors. Catch them early and they cost nothing to fix — miss them, and they're expensive to undo.
Under-sized footings. Pouring onto unprepared ground or relying on gravel alone invites early structural failure. The footing carries the heaviest structural load in the entire wall — don't cut corners there.
Building wall sections before pillars. Pillars require different footing dimensions and a different coursing pattern than wall sections. Installing them after wall sections are already in place creates structural discontinuity at exactly the points that need the most support.
Inconsistent mortar joint thickness. Varying joint thickness disrupts the bond pattern, creates weak points, and produces an uneven appearance. The standard is a 10mm (3/8-inch) joint across every course. A brick gauge rod or story pole — a marked pole used to measure masonry coursing — keeps joints consistent across long runs without eyeballing each one.
When Should You Hire a Professional?
A freestanding decorative garden wall on flat, stable ground is achievable for an experienced DIYer who's willing to be methodical about footings and mortar. But certain site conditions change the project scope significantly.
Get professional help when:
- The wall is taller than 3 feet
- The site is sloped or the wall will function as a retaining structure
- Soils are expansive clay or show signs of instability
- The site is in a seismic zone (BIA specifically notes Type N mortar restrictions for structures in Seismic Design Categories D, E, and F)
In Southern California—particularly on hillside properties across Los Angeles and Ventura County—these conditions are the norm, not the exception. Sites in Calabasas, Hidden Hills, Malibu, and Westlake Village frequently involve steep grades, clay soils, and drainage challenges that require engineering assessment before any masonry structure goes in.
That's where a hillside specialist becomes critical. Vitoli Builders (CA License #1043914) specializes in this type of hillside hardscaping and retaining wall construction, and their process begins with a complimentary site evaluation covering soil composition, slope grade, drainage patterns, and load requirements.
For projects over $25,000, they include a free 3D design package. They also integrate caisson foundations beneath wall systems where standard footings aren't sufficient, and drainage planning addresses hillside runoff and erosion risk on every project.
For any paid masonry work in California totaling $1,000 or more in labor and materials, a licensed contractor is legally required. The relevant classification is C-29 Masonry, which covers brick, clay products, concrete units, stone, and related masonry work. Confirm any contractor's license through the CSLB before committing.
Frequently Asked Questions
How much does a garden brick pillar cost?
According to Angi's 2026 data, ornamental brick columns typically run $500–$2,000 each, while structural columns cost $2,000–$7,000 or more. Cost varies based on pillar height, brick type, and whether a reinforced footing is included.
Does a garden brick wall need piers?
Yes, once a half-brick-thick wall spans any significant distance without support, it becomes vulnerable to wind loading and lateral movement. Most building guidance recommends a pier every 6–8 feet at minimum. Without them, the wall section behaves like a thin panel with no lateral bracing.
How thick should a garden brick wall be?
A half-brick wall—one brick wide, approximately 102.5mm (4.5 inches)—is standard for low decorative garden walls. Walls above approximately 3 feet, or in exposed locations, should be a full brick thick (approximately 215mm / 9 inches) for adequate stability.
Can I build a brick garden wall on a slope?
Yes, but it requires stepped footings, with each section set at a different level following the slope grade. BDA confirms this stepped approach is standard for sloping sites. If the wall will also retain soil, a retaining wall design may be needed rather than a freestanding structure.
What type of mortar should I use for a garden brick wall?
A Type N or Type S mortar complying with ASTM C270 is appropriate for most garden walls. Type N (750 psi minimum) suits general decorative walls; Type S (1,800 psi) is better for structural applications or exposed conditions. For older or softer bricks, a slightly weaker mix is preferable to avoid cracking the brick face under frost expansion.
How long does mortar take to cure between courses?
Quikrete advises tooling joints when mortar reaches "thumbprint hard" consistency, though timing varies with temperature and humidity. Full structural curing takes much longer. To prevent bricks from shifting under added weight, work in manageable daily lifts and let the wall rest overnight before adding more courses.