This guide covers the full construction process — stone selection, site prep, step-by-step stacking, common failure modes, and the specific conditions where professional help isn't optional.
Key Takeaways
- Fieldstone retaining walls rely on mass, friction, and backward lean; no mortar means drainage is built-in, but placement technique must be exact
- The foundation trench is the single most critical step; it's also where most DIY walls fail
- Every course needs a slight backward tilt (batter) to resist soil pressure — skipping this is a structural error, not just a style choice
- California's 2022 Building Code exempts walls under 4 feet from permits, but surcharge loads and hillside grading rules can lower that threshold
- Dry-stacked fieldstone is not appropriate for very steep slopes or walls retaining soil near structures, pools, or driveways
Building a Fieldstone Retaining Wall
Construction follows four sequential phases: site assessment → base preparation → coursing and stacking → finishing and validation. Each phase sets the conditions for the next. Rushing the base to get to the visible work is the most common and most expensive mistake.
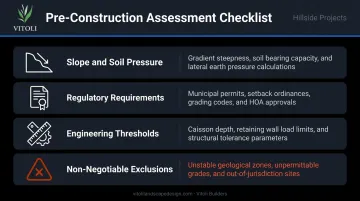
Prerequisites and Site Assessment
Before ordering stone or breaking ground, assess these four factors:
Slope and soil pressure. The angle of your slope directly determines how much lateral force the wall must resist. In Southern California, clay-rich soils compound this — they swell when wet and contract when dry, cycling pressure against a wall in ways that sandy or loamy soils do not. CalGeo warns that placing additional soil behind walls on expansive clay sites can cause serious structural problems.
Regulatory requirements. Under the 2022 California Building Code Section 105.2, retaining walls under 4 feet (measured from the bottom of the footing to the top) are generally exempt from building permits — unless supporting a surcharge load. That's only the state baseline, though. Local rules tighten it further:
- City of Calabasas: exemption drops to walls under 3 feet
- City of Los Angeles hillside grading areas: LADBS may require a grading permit regardless of wall height
Always verify with your specific jurisdiction before starting.
Engineering thresholds. California Residential Code Section R404.4 requires engineering review for walls retaining more than 48 inches of unbalanced fill, or walls over 24 inches resisting added lateral loads. Seismic considerations apply in Seismic Design Categories D–F (which covers Los Angeles and Ventura Counties).
Non-negotiable exclusions. Dry-stacked fieldstone is not an appropriate solution for:
- Very steep grades where dynamic soil movement is likely
- Walls retaining soil directly above structures, pools, or driveways
- Sites where a geotechnical report has identified unstable or highly expansive soils
For walls over 2.5 feet on hillside lots, a site evaluation by a qualified hillside specialist can identify risks before a single trench is dug. Vitoli Builders, based in Calabasas and serving LA and Ventura Counties, offers free initial consultations covering soil composition, slope grade, drainage patterns, and load requirements.
Tools and Materials Required
With your site conditions confirmed, gather your materials and tools before breaking ground. Improvising mid-excavation adds time and risk.
Essential tools:
- Flat-bladed spade and mattock for trench excavation
- 4-foot level, line level, stakes, and string
- Small sledgehammer for tamping and breaking stone
- Mason's hammer and cold chisel for shaping
- Wheelbarrow for moving material
- Plate compactor (highly recommended — hand tamping is not equivalent)
Calculating stone quantity. Use this formula: Wall height × wall depth (18–24 inches typical) × wall length = cubic feet. Add 15% for waste and irregulars. Fieldstone is sold by the ton or pallet. As a reference point, Sonoma Fieldstone runs approximately $440 per ton from California suppliers, though pricing varies by stone type, source, and delivery distance.
Base material. A 4–6 inch layer of compacted ¾-inch clean crushed gravel in the trench is required. The Stone Trust specifies clean angular aggregate in the ¾-inch to 1½-inch range for drainage and backfill. Setting directly on compacted soil — without gravel — dramatically shortens wall lifespan.
How to Build a Fieldstone Retaining Wall: Step-by-Step
With materials staged and the site assessed, construction moves in four clear steps.
Step 1 — Mark and excavate the trench. Set stakes and string to mark the wall face line. Excavate a minimum of 6 inches deep (add 2 inches per additional foot of wall height for taller walls). Width should fit two stones side-by-side — 18 to 24 inches minimum. Fill with crushed gravel and tamp firmly with a plate compactor.
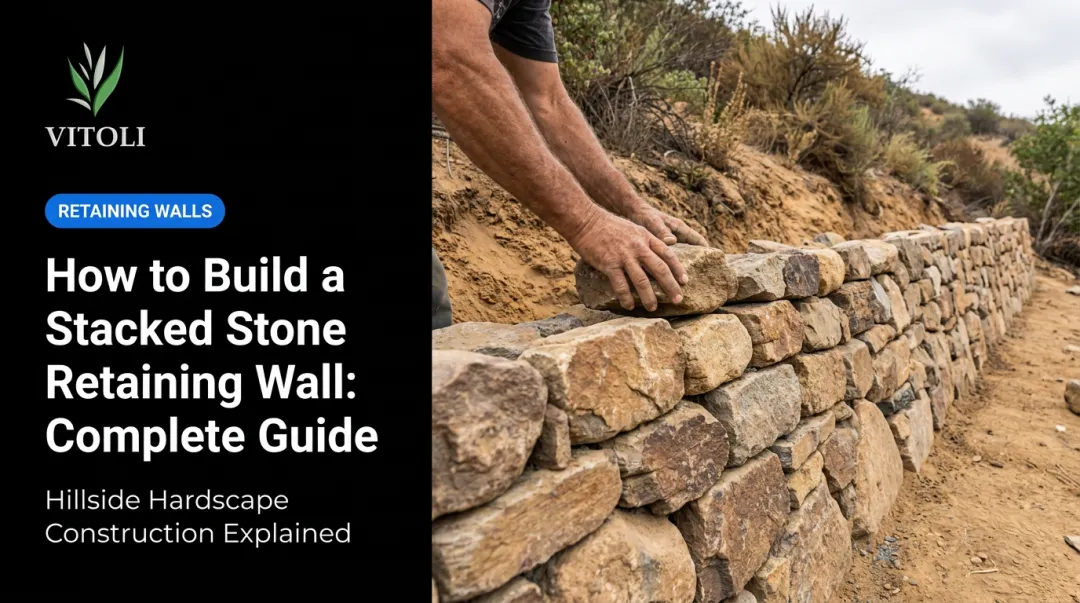
Step 2 — Lay the base course. Select the largest, flattest stones for this course. Set them tightly together, flattest face down, with each stone tilted very slightly backward toward the slope — this establishes your batter angle from course one. Backfill behind the base stones with rubble and compacted soil before moving up. Walk gently across the finished course: no stone should shift.
Step 3 — Build successive courses using proper stacking technique. Three structural rules govern every course above the base:
- Span the joint below with every stone you place. Vertically stacked joints — "running joints" — are the most common structural error in amateur walls and the direct cause of most splits and slumps.
- Lean the face backward consistently. The Stone Trust specifies a batter of 1:12 to 1:6; ASLA notes that fieldstone walls often require 2–3 inches of lean per vertical foot given their irregular mass. Do not course level.
- Set tie stones every 3–4 feet along each course — stones that run the full depth of the wall for cross-wall stability. Fill voids between face stones and backfill with hearting (smaller stones packed firmly). Tamp hearting and backfill after every two courses.
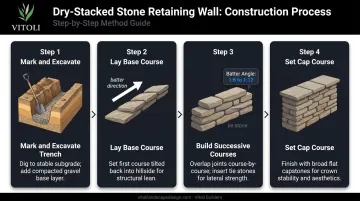
Step 4 — Set the cap course. Eighteen to 22 inches is a practical functional height: comfortable as a seat wall and structurally sound without engineering review. For the cap, use the flattest, widest stones available. Set them with careful placement and packed soil — not mortar. Above 3 feet, engineering review becomes strongly advisable regardless of local permit thresholds.
Post-Construction Checks and Validation
Visual check. Walk the entire face of the wall. Look for:
- Stones that rock under light hand pressure
- Gaps wider than 2 inches without hearting fill
- Any section where the batter appears to reverse (leaning toward the slope rather than away from it)
Correct these before calling the wall complete.
Drainage test. After the first significant rainfall — or simulate with a garden hose run behind the wall — confirm that water passes through and around the structure rather than pooling behind it. Standing water behind a dry-stacked wall signals inadequate drainage during backfilling. USGS research confirms that high groundwater pressure can build behind any retaining wall and must be actively managed. Address drainage failures before they create structural pressure.
Common Fieldstone Wall Problems and Fixes
Most fieldstone wall failures trace back to three root causes: inadequate base preparation, poor coursing technique, or insufficient drainage. Which problem you're dealing with determines whether a targeted repair will hold — or whether a partial rebuild is the only real fix.
Leaning or Bulging Wall
When one or more sections lean outward or develop a visible bulge within the first season or two, the cause is almost always a batter problem. Courses were laid level rather than tilted backward, eliminating the inward lean that resists soil pressure. Backfill added too quickly — without adequate tamping — can also create uneven lateral load that pushes the face out.
Leaning sections cannot be stabilized from the outside. The affected section must be dismantled back to the course where the batter error originated and rebuilt with correct backward lean. Surface patching addresses appearance, not pressure.
Stone Settlement and Surface Gaps
Stones that shift, settle unevenly, or open gaps after the first dry-wet cycle usually point to two causes:
- Base course set on soil rather than compacted gravel, allowing differential settling
- Hearting stones not packed firmly enough to transfer load evenly across face stones
Reset shifted stones and repack hearting material. If soil movement is driving the problem — common in Southern California where clay soils expand and contract with seasonal rainfall — installing a gravel drainage blanket behind the wall is the most reliable long-term correction.
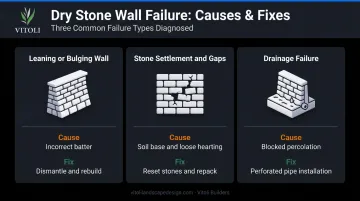
Drainage Failure and Water Damage
Water pooling behind the wall, uneven seepage through the face, or soil erosion at the base all signal drainage failure. The usual cause: backfill soil is too fine or over-compacted, blocking natural percolation — often because no gravel drainage layer was installed during construction.
If caught early, the fix is straightforward:
- Excavate a narrow trench behind the wall base
- Install a 4-inch perforated PVC pipe wrapped in geotextile filter fabric to redirect water away from the foundation
Severe cases require partial reconstruction with proper drainage integration from the base up.
Pro Tips for Building a Lasting Fieldstone Wall
Sort your stone before you start. Spread the entire delivery and sort it into categories — largest and flattest for base and tie stones, medium for coursing, small for hearting, and the widest pieces for capstones. Building from a pre-sorted spread produces better structural decisions and moves faster than digging through a pile mid-course.
Build during the dry season. In Southern California, plan construction between May and October. This allows the base to be properly compacted and backfill added under controlled conditions. Starting a wall immediately before or during the rainy season risks soil movement before the structure is fully established.
Know When to Call a Professional
Some projects cross the line from DIY-manageable into professional territory. If any of the following apply, bring in a licensed contractor:
- Wall height exceeds 3 feet
- Slope angle greater than 15 degrees
- Wall will retain soil adjacent to a structure, pool, or driveway
- The project triggers a permit requirement in your jurisdiction
All four of those conditions are common on Southern California hillside properties — which is exactly where professional engineering matters most. Vitoli Builders is a hillside specialist serving Los Angeles County and Ventura County, with an in-house design and engineering team that has over 20 years of experience on complex terrain. They assess slope grade, soil composition, drainage patterns, and load requirements before any design decisions are made. The initial consultation is free — reach them at 866-575-5795 or through their Calabasas office.
Frequently Asked Questions
How much does fieldstone cost?
Fieldstone is sold by the ton or pallet. In Southern California, Sonoma Fieldstone runs approximately $440 per ton from regional suppliers, though pricing varies by stone type, source, and delivery distance. Quarried or delivered stone consistently costs more than locally sourced material.
What is the cheapest retaining wall to build?
Dry-stacked fieldstone and railroad tie walls are among the lower-cost options when labor is DIY. But material costs, wall height, and site complexity all affect the total significantly — and inexpensive construction on a hillside often produces expensive repairs within a few seasons.
What's the difference between fieldstone and flagstone?
Fieldstone refers to naturally occurring, irregularly shaped stones gathered from fields or riverbeds. Flagstone is hard, flat-cut stone used primarily for paving surfaces. Fieldstone's mass and irregular shape make it suitable for retaining walls; flagstone generally lacks the structural depth for wall construction.
How tall can a fieldstone retaining wall be without mortar?
Dry-stacked fieldstone walls are generally manageable up to approximately 3 feet without engineering review. Beyond that, lateral earth pressure increases significantly. California permit requirements and seismic considerations vary by jurisdiction, so verify thresholds with your local building department.
Do I need a permit to build a retaining wall in California?
The 2022 CBC exempts walls under 4 feet (bottom of footing to top) from building permits, unless supporting a surcharge load. Some jurisdictions use a lower 3-foot threshold — Calabasas is one example — and hillside properties in Los Angeles may require a grading permit regardless of height. Confirm current requirements with your local building department before starting.
How long does a fieldstone retaining wall last?
According to ASLA, properly built dry-stacked stone walls can last hundreds of years. The main threats to longevity are inadequate drainage, soil movement from expansive clay cycles, and base course errors — all preventable with correct technique.