Low decorative walls under 3 feet on flat, stable ground are realistic for experienced DIYers. Anything taller, anything on a slope, or any wall meant to hold back soil crosses into territory that demands professional engineering. The consequences of getting it wrong aren't cosmetic: poor drainage creates hydrostatic pressure that pushes walls outward over time, an unlevel foundation leads to cracking and bowing, and unpermitted structural walls can trigger forced demolition in California jurisdictions.
This guide walks through what proper brick patio wall construction actually involves — foundation to cap — so you understand the full scope before deciding whether to build it yourself or bring in a specialist.
Key Takeaways
- Retaining walls, sloped sites, and heights above 3–4 feet require professional-grade engineering — not DIY methods
- Prioritize foundation depth and drainage design; these two factors determine whether a wall lasts decades or fails within seasons
- Pull permits before breaking ground — most California jurisdictions require them for walls over 4 feet
- Specify ASTM C62 or C216, Grade SW bricks for any ground-contact application
- Hillside properties and unstable soil call for a licensed contractor with structural engineering expertise
Planning and Prerequisites for Your Brick Patio Wall
Before ordering bricks, two decisions shape everything that follows: what the wall is for, and whether it needs a permit.
Decorative vs. Structural: Different Engineering, Different Stakes
A decorative border wall or low seating wall carries minimal lateral load. A retaining wall holds back soil and manages water movement. That's a fundamentally different engineering challenge, and conflating the two is how walls fail.
If your wall will retain soil on any side, treat it as structural. That means engineered drainage, reinforced footings, and likely a permit.
Permit Requirements in Southern California
The 2021 International Residential Code exempts retaining walls only when they are not over 4 feet, measured from the bottom of the footing to the top of the wall, and do not support a surcharge. Los Angeles County and Ventura County both use this same 4-foot/surcharge benchmark.
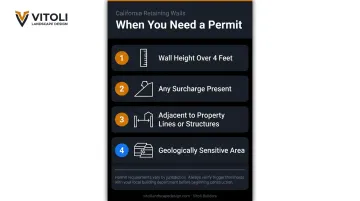
Key permit triggers to know:
- Wall height over 4 feet (measured from footing bottom)
- Any surcharge — a slope, structure, or driveway above the wall
- Walls adjacent to property lines or existing structures
- Any retaining application in a geologically sensitive area
Non-permitted structural walls expose you to fines, liability, and forced removal. Verify with your local building and safety department before starting.
Soil and Drainage Assessment
Southern California's expansive soils — particularly the clay-heavy profiles common across Los Angeles and Ventura Counties — shift with moisture changes. LA County's foundation requirements mandate that foundation systems on expansive soils be specifically designed to minimize damage. On these sites, skipping a soil assessment means designing to unknown conditions — a direct path to footing failure or wall movement over time.
Material Selection
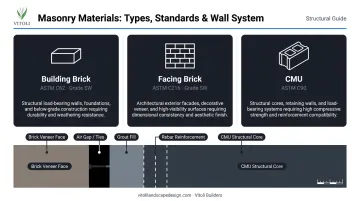
For any outdoor or ground-adjacent application, brick specification matters:
| Brick Type | ASTM Standard | Best Use |
|---|---|---|
| Building Brick | ASTM C62, Grade SW | General exterior, ground contact |
| Facing Brick | ASTM C216, Grade SW | Exposed wall faces |
| Concrete Masonry Unit (CMU) | ASTM C90 | Structural core backing |
Grade SW (Severe Weathering) is the minimum for ground-contact and wet exterior exposure. It carries a 3,000 psi minimum compressive strength, the benchmark set by the Brick Industry Association Technical Note 9A.
For structural walls, the most practical modern approach is a block core system: a CMU structural core, reinforced and grouted, with a brick veneer face. It costs less than a true multi-wythe cavity wall and is the standard approach in residential landscape construction across Southern California.
Tools and Materials Checklist
Essential Tools
- Shovel and spade
- Spirit level (4-foot minimum length)
- Mason's line and stakes
- Brick trowel and pointing trowel
- Rubber mallet
- Masonry saw (angle grinder with diamond blade works for small jobs)
- Plate compactor (rent for larger projects)
- Wheelbarrow
- Safety glasses and gloves
Primary Materials
- Bricks rated for ground contact (ASTM C62 or C216, Grade SW)
- Mortar mix per ASTM C270:
- Type S (1 cement : ½ lime : 2¼–3 sand) — required for below-grade and retaining applications
- Type N (1 : 1 : 2¼–3 sand) — for above-grade exposed work
- Gravel (¾-inch crushed stone) for drainage backfill
- Landscape fabric (soil-side barrier)
- Perforated drainage pipe
- Rebar or steel mesh — non-negotiable for walls over 3 feet
- Capstones for the top course — prevents water infiltration at the wall's most vulnerable point
- Brick sealer (recommended in high-moisture environments)
- Construction adhesive for caps, used alongside mortar for added hold
How to Build a Brick Patio Wall: Step-by-Step
Every phase of brick patio wall construction follows a defined sequence. Cutting corners on the foundation or drainage doesn't save time — it creates failures that are expensive to fix after the fact.
Site Preparation and Excavation
Mark the wall perimeter with stakes and string lines, then excavate a trench. For a freestanding decorative wall, footing depth should equal at least the wall thickness.
For retaining walls, requirements are determined by wall height and load. LA County requires walls to resist overturning, sliding, excessive foundation pressure, and water uplift — footing design must be engineered for site-specific conditions, not estimated from a standard table.
On sloped ground, step the footing to maintain even wall height. A level trench bottom on a slope means the footing itself must descend in uniform steps — not follow the grade.
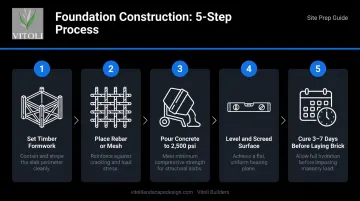
Foundation Construction
- Set timber formwork along the trench edges to contain the pour
- Place rebar or mesh — this gives the footing tensile strength; concrete alone is brittle under lateral loads
- Pour concrete to a minimum compressive strength of 2,500 psi (the benchmark from Ventura's published CMU retaining wall standard)
- Level and screed the surface before it stiffens
- Cure fully before laying brick — curing typically takes 3–7 days; starting brickwork too early compromises the entire structure
Laying the First Course and Building Up
- Begin at the lowest point of the trench
- Build corners first and keep them 2–3 courses ahead of the middle — this gives you reference points for alignment
- Apply a mortar bed approximately 3/8 inch thick
- Lay bricks in a running bond (staggered half-brick offset per course) — never align vertical joints between rows
- Check level and plumb every 3–4 courses with a spirit level
- Tap bricks into position with a rubber mallet, not a hammer
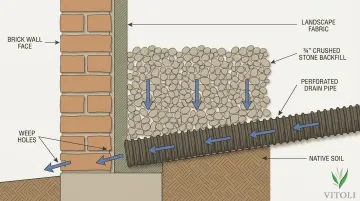
Installing Drainage
For any retaining wall, drainage is a structural requirement.
- Place landscape fabric against the soil side of the wall before backfilling; this prevents fine particles from migrating into and clogging the gravel layer
- Backfill with ¾-inch crushed gravel as courses go up — never use native soil directly behind a retaining brick wall
- Install a perforated pipe at the wall base, sloped to drain away from the structure
- Include weep holes at the base of the wall — the Brick Industry Association recommends open head joint weeps no more than 24 inches on center, with a minimum 3/16-inch opening
Capping, Finishing, and Post-Build Validation
Once drainage is confirmed clear and backfilling is complete, the wall is ready to cap. Apply mortar or construction adhesive and set capstones across the full top course — this seals the wall's most water-vulnerable point.
Clean mortar spills from brick faces with a stiff brush before they cure hard (within 30–60 minutes of placement).
Post-build checks before calling the job done:
- Visually confirm the wall is plumb and level from end to end
- Verify weep holes and the drain pipe outlet are unobstructed
- Confirm no mortar has spilled into the gravel drainage layer during backfilling
- Check that capstones are fully bedded with no gaps at joints
Common Brick Patio Wall Problems and How to Fix Them
Poor Drainage and Hydrostatic Pressure
What you'll see: Outward bowing, cracking at mortar joints, or visible wall movement after heavy rain.
Why it happens: Missing drainage pipe, inadequate gravel backfill, or clogged weep holes allow water to accumulate behind the wall and build lateral pressure.
Fix:
- Install the full gravel layer and perforated pipe before backfilling during construction
- On an existing wall, chisel weep holes in at the base to relieve trapped pressure
- For a fully backfilled wall with no drainage, excavation and a drainage retrofit are the only reliable fix
Unlevel or Failing Foundation
What you'll see: Courses beginning to lean, mortar joints cracking diagonally, or sections bowing outward over time.
Why it happens: Foundation poured on uncompacted or unstable soil, or insufficient footing depth for the wall's height and load.
How to fix it: Early-stage issues can sometimes be corrected by rebuilding the affected section from the footing up. Partial repairs to a structurally compromised brick wall rarely hold — if the foundation has moved, the wall above it typically needs to come down entirely.
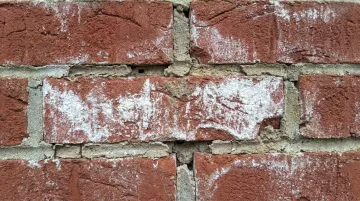
Mortar Joint Deterioration and Efflorescence
What you'll see: White powdery deposits on brick faces (efflorescence), or crumbling mortar joints.
Why it happens: Efflorescence forms when water-soluble salts migrate through masonry and crystallize on the surface as water evaporates — a process documented by the Brick Industry Association. Deteriorating joints typically stem from water infiltrating through the wall top or poorly finished joint work.
Fix:
- Remove efflorescence with a stiff brush and water, or a diluted masonry cleaning solution — confirm the deposit type before treating
- Repoint deteriorating joints before full joint failure occurs (cut out the damaged mortar and replace with fresh mix)
- Install capstones if not already present; consider a penetrating brick sealer
Pro Tips for Building a Lasting Brick Patio Wall
Timing and conditions:
- Never start brickwork on freshly poured concrete — allow 3–7 days minimum for curing
- Build in dry weather; mortar that gets rained on before it sets loses bond strength
- In Southern California's heat, BIA Technical Note 1 triggers hot-weather masonry protocols above 100°F, or above 90°F with wind over 8 mph — at those thresholds, mortar must be used within 2 hours of mixing and newly laid masonry should be fog-sprayed at least three times daily to prevent premature moisture loss
Documentation and compliance:
- Photograph the foundation, drainage layer, and reinforcement before covering them — these images protect you during future inspections or property sales
- California building departments may require inspections at specific construction milestones for permitted walls; confirm the inspection schedule with your local department before proceeding
When to call a professional:
- Any wall on a slope
- Retaining walls over 3 feet
- Walls adjacent to structures, driveways, or property lines
- Properties with challenging soil conditions — especially the expansive clay soils common across LA and Ventura Counties
For homeowners on hillside properties across Southern California, the structural stakes on a retaining wall are too high to treat as a weekend project. Vitoli Builders specializes in exactly these conditions: engineered retaining walls, drainage integration, and hillside construction across Los Angeles County and Ventura County, backed by over 20 years of experience.
Their process begins with a comprehensive site evaluation covering soil composition, slope grade, drainage patterns, and load requirements before a single brick is placed.
Frequently Asked Questions
Is a brick patio a good idea?
Brick patios are durable, visually versatile, and hold long-term value well. Whether they perform comes down to installation quality — a level compacted base, adequate drainage, and properly rated materials determine whether a brick patio lasts decades or starts shifting within a few years.
What is the 1/3 rule for retaining walls?
The 1/3 rule refers to burying approximately one-third of a retaining wall's total height below grade as embedment depth, providing stability against lateral forces. It's a general rule of thumb, not a codified standard — engineered designs for taller or loaded walls will specify actual footing depth based on site-specific conditions.
How deep should a brick patio wall foundation be?
For a freestanding decorative wall, the footing depth should at minimum equal the wall thickness. Retaining walls require deeper footings determined by wall height, load, and soil conditions. Southern California generally doesn't have a frost depth concern, but local engineering requirements — particularly on expansive soils — still govern footing design.
Do I need a permit to build a brick patio wall in California?
Most California jurisdictions require permits for retaining walls over 4 feet, measured from the bottom of the footing to the top of the wall. Walls with any surcharge — a slope, structure, or driveway above — may trigger permit requirements at lower heights. Always verify with your local building and safety department before starting.
How long does a brick patio wall last?
The Brick Industry Association states brick has an average lifespan of 100 years. In practice, a properly built wall with solid footing, correct drainage, and quality mortar will last several decades — early failures almost always trace back to drainage problems or a poor foundation, not the brick itself.
What type of brick is best for outdoor patio walls?
Fired clay bricks and concrete bricks rated for exterior exposure and ground contact are the best choices. Look for ASTM C62 or C216, Grade SW (Severe Weathering) — these are specifically designed to withstand moisture cycling and, in harsher climates, freeze-thaw conditions. SW bricks carry a minimum 3,000 psi compressive strength and a maximum saturation coefficient of 0.78.