When hillside steps fail, the sequence is predictable: one heavy storm undermines a base that looked fine during installation, a step shifts forward, erosion channels open up alongside the treads, and within a season or two the entire flight is a trip hazard. The root cause is almost always inadequate planning — poor drainage routing, shallow base work, or no consideration for how the slope behaves under load and saturation.
This guide covers what professional hillside stone step installation actually involves: design decisions, site preparation, the installation sequence, and the failure modes you can avoid by getting the foundation right from the start. For Southern California homeowners in particular — where expansive clay soils, seasonal rain-then-drought cycles, and steep grades compound the challenge — understanding these factors before breaking ground is what separates a 30-year installation from one that fails in 36 months.
Key Takeaways
- Hillside stone steps involve slope hydrology, soil instability, and drainage challenges that flat-surface work never requires
- Stone type and finish selection directly affect installation difficulty and long-term traction — textured finishes are non-negotiable on outdoor hillside treads
- Every step needs a compacted crushed stone base — depth should be dictated by site conditions, not a one-size-fits-all number
- Drainage must be engineered before installation begins — water runoff is the leading cause of hillside step failure
- Bring in a hillside specialist early on steep grades, unstable soils, or projects that need retaining walls or caissons
Design Considerations for Hillside Stone Steps
Design planning is the most overlooked phase of any hillside step project. Homeowners tend to focus on the stone itself — the look, the color, the material — while the geometry, drainage logic, and structural layout get resolved on-site. That approach fails on hillsides, where mistakes in the planning phase get buried under tons of stone and compacted gravel before anyone realizes something is wrong.
Choosing the Right Stone Type
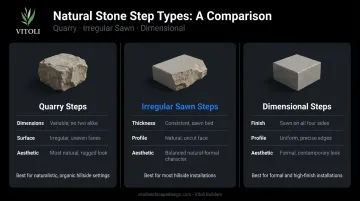
Three primary natural stone step categories are used in hillside applications, each with different installation demands:
- Quarry steps — cut directly from the quarry face, with variable dimensions and irregular surfaces. The most natural-looking option, but harder to set at consistent riser heights because no two pieces are identical.
- Irregular sawn steps — quarry stone with top and bottom faces sawn flat, producing a consistent rise while retaining a natural profile. The most practical choice for most hillside installations because uniform thickness simplifies base work and riser consistency.
- Dimensional (guillotined) steps — sawn on all four sides to precise dimensions. Easiest to set uniformly, best suited to formal installations or where steps connect retaining wall levels at specific heights.
By contrast, flagstone suits informal, shallow-grade garden paths with light foot traffic. Its variable thickness and irregular edges make it a poor choice for longer hillside flights where consistent footing matters.
Finish selection matters for safety. The Natural Stone Institute's Dimension Stone Design Manual explicitly states that polished finishes are not recommended for exterior use due to slip risk. For hillside treads, specify thermal, flamed, or bush-hammered finishes — these add real traction without sacrificing appearance. Southern California's combination of dry periods, sudden rain, organic debris, and algae growth makes smooth stone surfaces genuinely dangerous.
Mapping Rise, Run, and Layout
Before a single step location is staked, measure the total vertical rise of the slope from bottom to top. Divide that figure into a consistent riser height — the 2022 California Building Code sets residential stair risers at a maximum of 7.75 inches, and USDA trail guidance targets a 6–8 inch rise for outdoor stone steps. Tread depth should be a minimum of 10–11 inches.
The critical rule: riser heights must be consistent throughout the entire flight. Variations of even half an inch are noticeable underfoot and cause users to misjudge their step.
Layout options depend on slope geometry:
- Straight flights — best for steeper, more confined slopes with a clear top-to-bottom path
- Meandering or traversing layouts — cross the slope diagonally, reducing the perceived grade and integrating more naturally with surrounding planting
- Switchback layouts — appropriate for sideslopes in the 15–45% range per USDA Forest Service trail construction guidance; they reduce grade aggressiveness and provide built-in landing points
Incorporate landings every 5–8 steps on longer runs, at grade changes, and at every turning point in a switchback layout. Landings serve structural and safety functions, and on a hillside they can double as small terraced areas or planting pockets that stabilize adjacent soil.
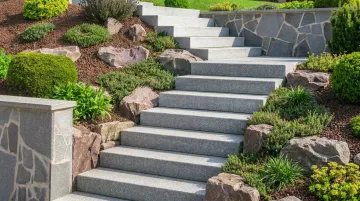
Integrating Steps with the Hillside Landscape
Well-designed hillside steps look like they belong on the slope, not placed on top of it. Four integration strategies accomplish this:
- Match the stone palette to existing boulders, retaining walls, or hardscape materials for visual continuity across the site
- Set edge stones or embedded rocks alongside the step run to define the stairway boundary and reduce runoff concentration
- Plant groundcover or low shrubs between and beside steps to stabilize soil over the long term
- Leave soil pockets at landings for planting — these double as erosion control points where exposed cuts are most vulnerable
According to NRCS erosion control guidance, narrow vegetative strips slow runoff and trap sediment — which is exactly what the exposed cuts beside a hillside step run require.
Site Preparation and Prerequisites
Site preparation is the most consequential phase of any hillside steps project. What happens before the first stone is set determines whether your steps last decades or fail in the first rainy season.
Assessing Hillside Conditions Before You Start
A proper site assessment covers three areas:
Slope and soil evaluation:
- Total grade and whether the chosen layout is appropriate for that grade
- Soil type — Southern California hillside soils commonly include expansive clay, loose fill, and hardpan layers, each of which behaves differently under load and during rain events
- Evidence of previous movement, erosion channels, or slumping
USGS research on Southern California landslides shows shallow slope failures here are typically under 15 feet deep, triggered by rainfall rates as low as 0.2–0.25 inches per hour once soil is saturated. That threshold is a moderate Southern California winter rain, not an extreme weather event.
Drainage evaluation:
- Trace water flow paths during and after rain
- Identify pooling areas or concentrated flow channels
- Determine whether French drains, perforated pipe, swales, or catch basins are needed before steps are built
LA County's homeowner flood and erosion guide identifies poorly maintained hillside drainage devices as a frequent source of flooding problems. Drainage must be both well-designed and accessible for maintenance after installation.
When professional assessment is required:
- Slopes requiring retaining walls or caissons before steps can be safely anchored
- Unstable fill soils that lack adequate bearing capacity
- Any grading work approaching Ventura County's permit exemption thresholds (excavations over 50 cubic yards, cut slopes exceeding 5 feet, or grades steeper than 2:1)
For hillside properties in Los Angeles and Ventura County with complex grades or drainage challenges, a site evaluation by experienced hillside specialists can surface structural issues before they become mid-project surprises. Vitoli Builders has completed over 1,800 hillside projects across the region and routinely identifies these prerequisites during initial assessments.
Tools and Materials Required
Essential:
- Compactable crushed stone base material
- Landscape fabric (especially on clay or unstable soils — geotextile fabric prevents subgrade fines from contaminating the aggregate base, preserving drainage and structural performance)
- Natural stone steps in the chosen type and finish
- Plate compactor or hand tamper
- Level and line level
- Pry bar and stone-moving equipment
Strongly recommended on hillsides:
- Edge boulders or border stones
- Drainage materials — perforated pipe, gravel, catch basins depending on site demand
Installing Natural Stone Steps on a Hillside: Step by Step
Hillside step installation follows a fixed sequence. Skipping or shortcutting any stage compromises the system — not just the individual step.
Step 1: Excavate to Undisturbed Soil
Step-cut into the hillside to create individual level pads for each step. Excavate down to undisturbed, stable soil — not topsoil, not loose fill. Each pad should be level side-to-side, with a slight forward pitch of approximately 1–2% for surface drainage. Following the USDA guidance for rock step installation, the first stone in the flight should be buried as an anchor to resist washout from below.
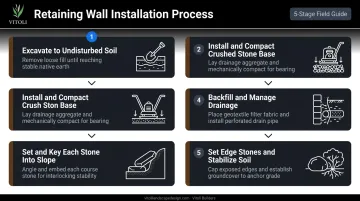
Step 2: Install and Compact the Crushed Stone Base
A compacted crushed stone base goes under every step and landing without exception. Base depth depends on site conditions — deeper is warranted for:
- Soft or unstable native soils
- Expansive clay that shifts with moisture
- High-drainage-demand slopes collecting significant runoff
The base serves two functions: distributing stone weight across the underlying soil and allowing water to drain downward rather than pool behind the tread.
Place landscape fabric between the native subsoil and the aggregate base when the subsoil contains clay or fine-grained material. Per FHWA geotechnical guidance, geotextile separators prevent subgrade fines from migrating into the base layer, which would progressively reduce drainage capacity and structural performance.
Compact the base in layers. Do not place stone on uncompacted material.
Step 3: Set and Key Each Stone Into the Slope
Place each stone on the compacted base, check level side-to-side, and confirm the slight forward drainage pitch front-to-back. Key the back edge of each stone slightly into the slope — this is the step most often skipped on improperly installed flights. A stone that isn't keyed can slide forward under repeated foot traffic and especially under the force of water moving behind it.
Check alignment and consistent riser height as each stone is set. Over a flight of 10 or 12 steps, small height discrepancies accumulate fast — a string line or story pole set at the target rise keeps cumulative error from building.
Step 4: Backfill and Manage Drainage Behind Each Step
The space between the back of each step and the uphill slope must be backfilled with compacted stone or gravel — not loose soil. Loose soil washes out.
Compacted gravel creates a drainage path that moves water laterally and downward rather than allowing it to accumulate behind the tread and undermine the base.
On sites with high drainage demand — slopes that collect significant runoff, or where a large uphill area drains toward the step run — install perforated drainage pipe behind the step run before backfilling. A 4-inch perforated pipe, sloped to daylight at the side of the run, handles the volume that compacted gravel alone cannot.
Step 5: Set Edge Stones and Stabilize Surrounding Soil
Place border boulders or edge stones alongside the step run to contain lateral soil movement and define the stairway boundary visually. On exposed cut slopes above the steps, apply erosion control fabric immediately after excavation — don't wait until the project is complete. Rock mulch or gravel in vulnerable areas provides immediate protection.
Groundcover planting is the long-term stabilization solution. Per Caltrans erosion control guidance, stepped slopes increase infiltration, reduce runoff velocity, and trap sediment — but only when you stabilize the edges.
Post-installation checklist:
- Consistent riser height across the entire flight
- Correct forward drainage pitch on each tread
- No rocking or shifting when stepped on with full body weight
- Clean drainage path behind each step
Common Hillside Stone Step Problems and How to Fix Them
Even well-built steps can develop problems over time — especially on hillsides where soil moves, water runs, and gravity is relentless. Here's how to diagnose and fix the three most common issues.
Steps Shifting Forward or Tilting
Problem: One or more steps tilt forward after the first rainy season.
Likely causes: Insufficient keying into the slope, shallow base, or backfill that wasn't compacted — allowing water to undermine the base from behind.
Fix: Reset the affected steps, deepen and re-compact the base, re-key each stone into the slope, and replace any soil backfill with compacted gravel.
If multiple steps have shifted, evaluate whether the underlying soil has adequate bearing capacity or requires engineered footings before resetting.
Erosion Washing Soil Onto Treads
Problem: After rain, soil and debris wash onto treads, creating muddy, slippery surfaces.
Likely causes: No drainage management above the step run, missing edge stones, or exposed cut slopes left bare after excavation.
Fix: Address the source above the steps, not just the symptom on the treads:
- Install border stones to divert surface flow away from the stairway
- Apply erosion control fabric and rock mulch on exposed cuts above the steps
- Establish groundcover plants as soon as possible — bare soil on a Southern California hillside degrades fast

Uneven Riser Heights
Problem: Step heights vary noticeably, causing users to misjudge footing.
Likely causes: Total rise wasn't measured and divided before excavation, or base material settled unevenly before stones were placed.
Fix: Remove the affected steps, adjust base depth individually, and reset. To prevent this entirely, measure total vertical rise before any excavation begins — then calculate the exact number of steps needed to hold a consistent riser height from top to bottom.
Pro Tips for Long-Lasting Hillside Stone Steps
Always specify a textured finish. Thermal, flamed, or bush-hammered finishes provide traction on hillside treads. Southern California's combination of dry periods, sudden seasonal rain, leaf litter, and algae growth makes smooth stone surfaces a genuine safety hazard.
Plan for lighting and handrails at the design stage. Long or steep stair runs serving regular guest access need low-voltage step lights and integrated handrails. Retrofitting them after construction typically costs two to three times more than building them in from the start.
Document the base work. Photograph the excavation, compacted base, and drainage installation before stones are set. Keep notes on base depth and drainage specifications. This documentation is valuable years later if steps need adjustment — and can prevent costly disputes or guesswork if drainage problems surface down the road.
Know when to bring in a specialist. Gentle grades with stable soil and minimal drainage complexity may be manageable for experienced DIYers. Southern California hillside conditions — expansive clay, fire clearance zones, seismic considerations, steep grades requiring retaining walls — frequently push projects into territory where professional design and engineering aren't optional.
Frequently Asked Questions
How much does a natural stone step cost installed?
Installed costs for natural stone steps in the US typically range from $300 to $900 per step according to HomeGuide's 2024 data, with full projects running $1,500 to $8,000 or more. Hillside installation in Southern California adds cost due to excavation difficulty, access constraints, drainage work, and permitting — pushing regional averages above national benchmarks.
What type of natural stone is best for hillside steps in Southern California?
Irregular sawn or dimensional granite and limestone are popular choices for hillside use — their consistent dimensions simplify installation and their surfaces accept thermal or flamed finishes well. Southern California's climate (UV exposure, heat, seasonal rain) favors denser stones with textured finishes that retain traction and resist weathering.
How deep should the base be under hillside stone steps?
Site conditions — not a universal formula — determine the right base depth. On stable granular soils, a 5–6 inch compacted base is a common starting point. On clay-heavy, soft, or high-drainage-demand hillside soils, 6–8 inches or more may be warranted. The base serves both a structural and drainage function — depth should reflect what the specific subgrade requires.
Do hillside stone steps need to be mortared?
Dry-set on a compacted base is standard for most natural stone hillside steps and allows for easier future adjustment. Mortar is typically used for dimensional steps in formal installations or where code requires it. Improperly mortared joints on a shifting hillside will crack — and they're significantly harder to repair than dry-set stones.
How do you prevent stone steps on a hillside from shifting?
Five measures work together to keep hillside steps stable:
- Adequate compacted base matched to actual soil conditions
- Each stone's back edge keyed into the slope
- Compacted gravel backfill (not loose soil) behind every step
- Drainage management to prevent undermining the base
- Edge stones or boulders to limit lateral movement
Can natural stone steps be installed on any hillside grade?
Natural stone steps work across a range of grades, but very steep slopes may require terracing, retaining walls, or engineered footings before steps can be safely installed. USDA Forest Service trail guidance recommends switchback layouts for sideslopes above 15%, with retaining structures needed at grades approaching 55%. Extremely steep or geologically complex hillsides in Southern California should be professionally evaluated before any installation is planned.