Introduction
Caisson installation is a technically demanding construction process. It requires licensed contractors, specialized drilling equipment, stamped engineering plans, and building department approval before a single auger turns. On hillside properties in Southern California, the stakes are higher: sloped terrain, seismic forces, and variable soil conditions can turn an undersized or improperly placed caisson into a structural liability that costs far more to correct than to build right the first time.
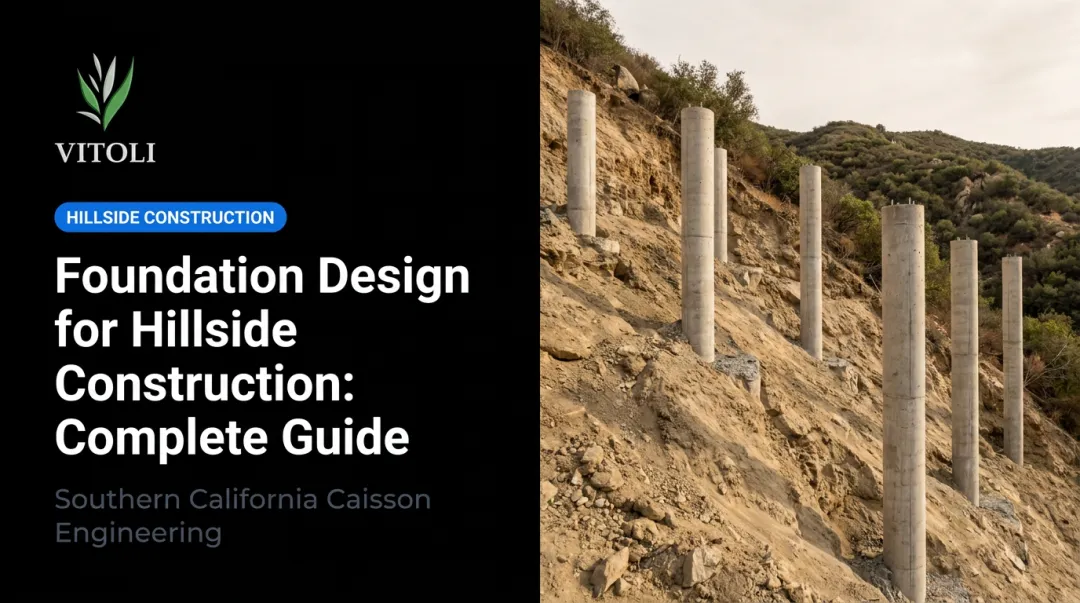
This guide covers drilled caisson foundations used in hillside residential construction. Reinforced concrete piers are drilled through unstable surface soils and anchored into bedrock or a competent bearing layer below. If you're a homeowner planning a hillside project in Los Angeles or Ventura County, here's what you'll find inside:
- What drilled caissons are and when they're required
- How the permitting and engineering process works
- The step-by-step installation sequence
- Common mistakes that lead to structural failure — and how to avoid them
Key Takeaways
- Caisson installation requires a geotechnical investigation, licensed engineering drawings, and building permits before drilling begins
- Soils reports and structural calculations set caisson depth and diameter — field estimates are never acceptable
- Installation follows a strict sequence: layout, drilling, soils inspection, rebar placement, concrete pour, and curing
- CBC Chapter 17 mandates continuous special inspection at multiple stages — no structural connections before sign-off
- Hillside sites require experienced crews, specialized equipment, and thorough documentation at every stage
Site Assessment, Prerequisites, and Safety
No drilling begins without a geotechnical investigation. Per CBC Chapter 18, a licensed soils engineer must evaluate soil type, bearing capacity, groundwater depth, and anticipated depth to a competent bearing layer. That report drives every caisson specification on the project.
In hillside areas, LADBS requires geology and soils reports submitted to its Grading Division, including maps and cross-sections showing groundwater, excavations, and foundation conditions.
Geotechnical and Engineering Requirements
Structural drawings stamped by a licensed engineer define caisson diameter, depth, rebar sizing, and concrete mix design. Field crews cannot self-determine these parameters.
If conditions discovered during drilling differ from the report's assumptions — deeper bedrock, expansive soils, unexpected groundwater — the engineering design must be updated before work continues. This is not a judgment call for the drilling crew.
Permits, Compliance, and Contractor Qualifications
Building permits are required in California for caisson installation under the California Residential Code. Working without approved plans exposes property owners to stop-work orders, demolition orders, and complications with future resale.
Under California Business and Professions Code, caisson drilling falls within licensed contractor work — the CSLB D-30 classification explicitly includes caisson drilling and auger service. Verify any contractor's license status through the CSLB before engaging them.
Vitoli Builders (CA License #1043914) coordinates permits directly with local agencies as part of their integrated hillside construction process for homeowners in Los Angeles and Ventura County.
Safety Requirements on Hillside Sites
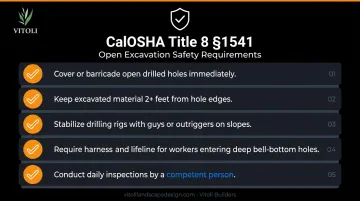
With permits and plans in place, on-site safety becomes the next non-negotiable. CalOSHA Title 8, Section 1541 sets specific requirements for open excavations:
- Open drilled holes must be covered or barricaded immediately
- Excavated material must be kept at least 2 feet from hole edges
- Drilling rigs on slopes must be stabilized with guys or outriggers
- Employees entering deep bell-bottom pier holes require harness and lifeline
- A competent person must conduct daily inspections
Confirm overhead utility clearance before any rig is positioned on-site.
Tools, Equipment, and Materials Required
Equipment
- Rotary drilling rig — truck-mounted for accessible sites, track-mounted for slopes where standard rigs cannot be safely positioned
- Auger — sized to the specified caisson diameter per engineering drawings
- Drilling casing — used in unstable soils to prevent hole collapse during drilling
- Tremie pipe — required for concrete placement in deep holes or holes with water present
- Internal concrete vibrator — consolidates concrete and eliminates voids around the rebar cage
- Survey equipment — for precise layout and location verification
Materials
- Pre-fabricated rebar cages — cut and tied to engineering specifications, including bar size, spacing, lap length, and total cage length
- Concrete — compressive strength per approved project specifications; FHWA drilled-shaft guidance references a common minimum of 4,000 psi, though final mix design must match approved project plans
- Rebar centralizers — maintain cage position to ensure adequate concrete cover on all sides (FHWA benchmarks: 3 inches for shafts up to 3 feet in diameter, more for larger shafts)
What's Situational vs. Non-Negotiable
| Item | When Required |
|---|---|
| Tremie pipe | Any hole with water depth exceeding 3 inches or infiltration above 12 in/hr |
| Drilling casing | Unstable soils, loose granular fill, saturated ground |
| Direct pour | Only in dry, stable, shallow conditions meeting FHWA dry-shaft criteria |
How to Install Caissons: Step-by-Step
Caisson installation follows a defined sequence — and the order is not flexible. Skipping or reordering steps creates failures that are difficult or impossible to correct once concrete is placed.
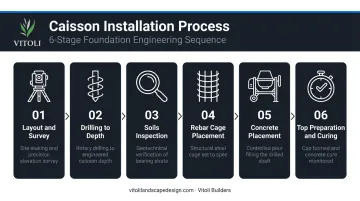
Step 1: Layout and Survey
A licensed surveyor or qualified crew member stakes each caisson location exactly per the engineering plan. Even minor deviations in position can compromise the structural system above. Re-verify layout before mobilizing the drill rig. That verification takes minutes and can prevent expensive corrections later.
Step 2: Drilling to Specified Depth
The auger bores into the ground, removing spoils to the surface. Drilling continues until reaching the bearing depth defined in the soils report — typically bedrock, dense decomposed granite, or the specific bearing stratum identified by the geotechnical engineer.
Drill resistance alone is not a reliable indicator. On Southern California hillsides, soil strata can vary considerably across a single property, which is why the soils report drives the decision, not the driller's feel.
Step 3: Soils Inspection Before Proceeding
This step is mandatory under CBC Chapter 17 — not optional. A soils engineer or approved special inspector must physically inspect the bottom of each drilled hole before any rebar or concrete is placed. The inspection confirms:
- The hole has reached competent bearing material
- No loose or sloughed material has accumulated at the base
- Conditions match the geotechnical report's assumptions
No concrete goes in without this sign-off.
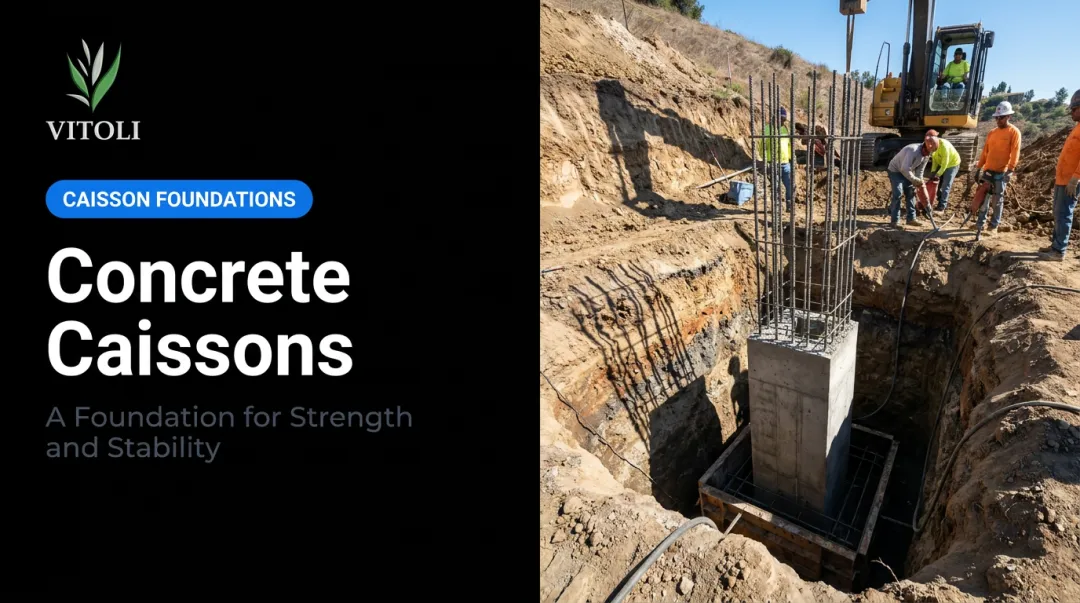
Step 4: Rebar Cage Fabrication and Placement
Rebar cages are pre-fabricated to the dimensions in the engineering drawings: bar size, spacing, tie pattern, and total cage length are all specified. Crews lower each cage carefully into the drilled hole using a crane or rig.
Centralizers attach to the cage to keep it centered, maintaining uniform concrete cover on all sides. That cover is critical for long-term corrosion protection — hillside environments in LA and Ventura counties carry persistent moisture exposure.
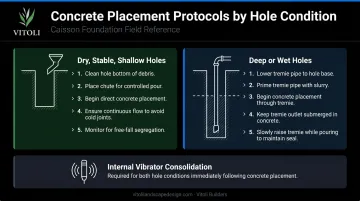
Step 5: Concrete Placement
Protocol depends on hole conditions:
- Dry, stable, shallow holes — concrete can be placed directly, provided it falls vertically down the center without contacting reinforcing bars or cage bracing
- Deep holes or holes with water — a tremie pipe must be used, depositing concrete at the bottom and withdrawing as the hole fills to prevent aggregate segregation
- An internal vibrator consolidates the concrete throughout placement, eliminating voids around the rebar cage
Step 6: Top Preparation and Curing
The caisson top is finished to the elevation specified in the drawings. Concrete must cure for the period specified by the engineer before any structural load is applied. FHWA guidance restricts excavation within 3 diameters of a newly placed shaft until concrete reaches 1,800 psi.
During curing, protect the exposed top from:
- Premature drying or direct sun exposure
- Freezing temperatures
- Physical disturbance or construction traffic overhead
Rebar dowels are left protruding from the top for connection to grade beams or the structural system above.
Post-Installation Checks and Validation
After all caissons are poured, three things must happen before structural work proceeds:
Complete as-built documentation. Record actual drilled depths, diameters, concrete volumes, and any deviations from the engineering plan. Submit this package to the engineer of record and the building department for permit close-out.
Obtain special inspection sign-off. CBC Chapter 17 requires all special inspections to be completed and documented before grade beams, post bases, or wall stems connect to the caissons. Proceeding without sign-off can trigger stop-work orders and require destructive testing to verify integrity.
Monitor for settlement. Check caisson tops for signs of settlement, cracking, or disturbance before and after adjacent caissons are drilled. Drilling vibration can disturb recently placed concrete in loose soils — a heightened risk on steep hillside sites where spoils and water movement compound the problem.
Common Caisson Installation Problems and Fixes
Most caisson installation problems on hillside sites trace back to soil variability that shifts significantly across a single property. The three issues below cover the most common field failures and how to address each one.
Hole Collapse During Drilling
Problem: The drilled hole caves or sloughs before or after reaching depth — common in loose granular soils, saturated ground, or disturbed fill.
Cause: Soil instability not fully anticipated by the geotechnical report, or groundwater higher than predicted.
Fix: Install temporary casing to support hole walls during drilling and concrete placement. Consult the geotechnical engineer to reassess bearing conditions before continuing.
Caisson Not Reaching Competent Bearing Layer
Problem: The crew stops at specified depth, but the soils inspector determines the hole hasn't reached competent material.
Cause: Bearing layer is deeper than the soil report predicted, or the crew misidentified the stratum based on drill resistance alone.
Fix: Extend drilling to the depth confirmed by the soils engineer on-site. Do not pour concrete until the inspector approves hole bottom conditions. Notify the structural engineer — the design may require revision.
Concrete Voids or Segregation
Problem: Evidence of voids, honeycombing, or aggregate separation in the finished caisson.
Cause: Concrete dropped from excessive height without a tremie pipe, inadequate vibration, or wrong slump for the placement conditions.
Fix: Use proper tremie technique for deep or wet holes. If voids are suspected after placement, notify the engineer of record — the engineer of record will determine whether core sampling or non-destructive testing is needed before the caisson can accept load.

Pro Tips for Hillside Caisson Installation
Keep the soils engineer on-site during drilling. Pre-drill depth estimates are not reliable enough on hillside properties where strata shift unpredictably. An on-site engineer makes real-time judgments that prevent costly rework.
Photograph every drilled hole before rebar placement. Capture depth with a measuring tape and document hole bottom condition. This photo record satisfies inspection documentation requirements and protects both contractor and owner if questions arise later.
Sequence drilling uphill to downhill. This prevents drill spoils and water from contaminating already-drilled holes. Coordinate pours to follow drilling as quickly as possible — open holes on hillside sites are vulnerable to sloughing and can lose integrity fast.
Conclusion
Caissons are the literal foundation of everything built above them. Skimping on depth, concrete quality, rebar placement, or inspections doesn't save money; it defers far more expensive structural corrections, or in the worst case, creates life-safety risks on sloped terrain where soil movement and seismic forces are active concerns.
Treat caisson installation as a collaboration between the geotechnical engineer, structural engineer, licensed contractor, and building inspector. On hillside properties in Southern California, hire a contractor with documented experience in the region's specific soil conditions. Expansive clays, decomposed granite, and variable fill are present under most of the hillsides in Los Angeles and Ventura County — and each one behaves differently under load.
Vitoli Builders has spent over 20 years drilling and placing caissons across those exact conditions throughout Los Angeles County and Ventura County. If you're planning a hillside project and want a team that understands what's beneath your property before breaking ground, contact Vitoli Builders to discuss your site.
Frequently Asked Questions
What is the purpose of a caisson?
Caissons are deep-drilled, concrete-filled structural piers that transfer building loads from weak or unstable surface soils down to bedrock or a competent bearing layer below. On hillside terrain, they provide the stable foundation that surface soils alone cannot reliably deliver.
Should a caisson be used in a deep or shallow foundation?
Caissons are a deep foundation solution. They are used when surface soils lack adequate bearing capacity — on hillside properties, this is typically where expansive soils, disturbed fill, or loose material sits above stable bedrock.
How much does it cost to install a caisson?
Costs vary based on diameter, depth, soil conditions, site access, and caisson count — with specialty or low-headroom rigs running roughly three times standard equipment costs. No reliable per-caisson figure applies universally. Get a site-specific estimate from a licensed hillside contractor.
What soil conditions require caissons on hillside properties?
Common triggers include expansive clay soils, loose or disturbed fill, decomposed granite, and hillside sites where seismic or slope-stability concerns make surface foundations inadequate. CGS maps identify specific hazard zones — including liquefaction and landslide areas — throughout Southern California.
Do caissons require permits in California?
Yes. Caisson installation requires building permits under the California Residential Code. Stamped engineering drawings and geotechnical reports must be submitted and approved before work begins, and CBC Chapter 17 mandates special inspections during drilling, reinforcement, and concrete placement.